Using the MDE device
Hinweis
You can also access this information in compressed form directly on the mobile device by pressing the F10 key.
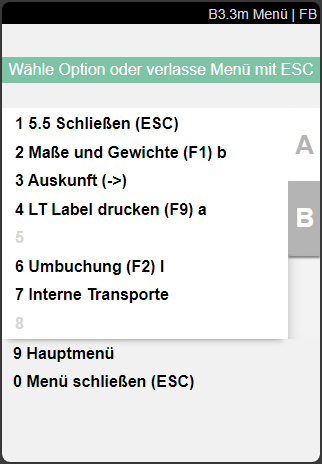
One of the most important elements when using SIEVERS WMS are the mobile devices, which can be used to scan barcodes and execute processes. The application on the devices is divided into different areas. These include A, B, C and numbers from 1 to a maximum of 9. In addition, areas D in the main menu and X in the submenus are available for customer-specific extensions. These areas are hidden by default and can be activated via the setup if required.
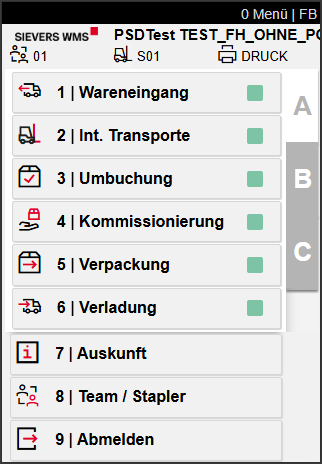
There are colored squares on the right side of many menu items and in the Team selection:
- Grey: There is currently nothing to do in this area or for this team.
- Green: There is work to be done in this area or for this team.
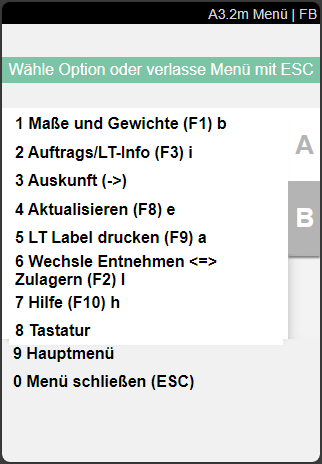
The menu can always be accessed with P1. Operation is either by menu or by shortcut. The shortcuts are shown in brackets next to the menu items.

If you access a new area of the first level, A8 Team/Forklift is opened first, where you specify the team, the forklift used and the printer station.
Depending on the device used, a toolbar is shown at the bottom of the display. Depending on the view, this toolbar shows a suitable combination of buttons consisting of standard functions such as Enter and Open keyboard as well as the menu functions belonging to the currently displayed page.
The processes are fundamentally structured so that there is an overview page of all available documents (X.1), which leads to the view of the specific document after scanning or selection (X.2). If a line is scanned or entered here, the line view and/or editing (X.3) is opened. Depending on the process, there are additional pages that can be opened.
When entering or scanning documents in the overview pages (X.1), the following should be noted: In these screens with document entry field, documents can also be found by partial entry of the document number. You do not necessarily have to enter the complete document number – the system automatically searches for matching documents.
Three cases are distinguished:
- One matching document found: The screen opens the document directly and continues as if the complete document number had been entered
- Multiple matching documents found: The document overview is automatically filtered to the found documents
- No matching document found: The document list is cleared and a red feedback with the message "Input not found" is displayed
The following sections show how the pages are structured and how they are used.
A
A1 Warehouse receipt
A1. Warehouse Receipt includes all processes and MDE pages relating to warehouse receipt. As a rule, you start with A1.1 WHS Receipt Overview.
Please note that A1 has an Input check for identification of incoming items. This stipulates that before an item can be processed, it must first be clearly identified. This is to avoid subsequent assignment errors.
Process:
- Enter a value in the scan/input field in pages A1.1, A1.2 or A1.3
- The system now checks whether a unique load carrier/receipt line could be identified with the input. a. If yes, depending on the existence of a load carrier, A1.4 Pos. Processing (for previously created load carriers) or A1.6 LC Creation (to create new load carriers) opens. b. If no, A1.2k WR Filter opens, where the user can search for the correct item with further filter options
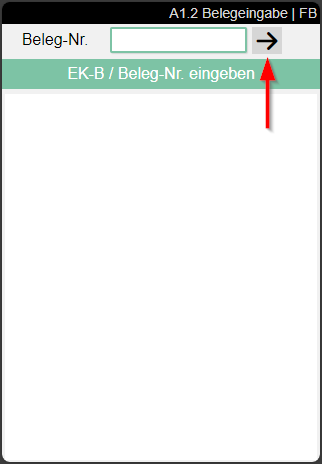
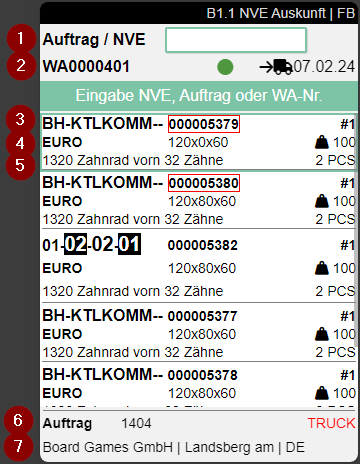
A1.1 Rec. Overview
The view of A1.1 shows an overview of all current warehouse receipts, that have the state 0-Notified or 2-Released MDE. The sorting is as follows:
- By state (first all released, then all notified warehouse receipts)
- If available, by arrival time in ascending order, otherwise by expected arrival in ascending order
- By warehouse receipt no. in ascending order.
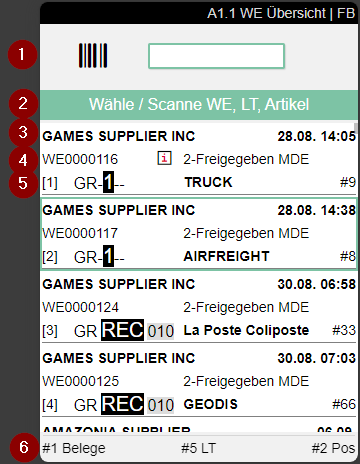
- Scan field
- Notes and feedback
- Start a new unloading process. This opens A1.0
- Left: Supplier name from the warehouse receipt | Right: Expected arrival
- Left: Warehouse receipt no. | Center: An i indicates that a comment text is stored. Access with F3 | Right: State of the warehouse receipt
- Left: Unloading place | Center: Shipping agent | Right: Number of load carriers
Hinweis
If the supplier is a supplier with maintained GS1 identifiers, either A1.2 or A1.GS1 SSCC Receiving is opened after selecting a load carrier, depending on the presence of load carriers. If there are already load carriers at warehouse receipt, A1.2 is opened, otherwise A1.GS1 SSCC Receiving.
Menu:
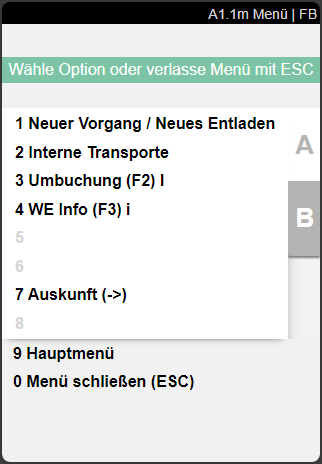
A:
- New Process / New Unloading: Creates a new unloading process. This sets the arrival time for the warehouse receipt.
- Internal Transports
- Transfer (F2) l
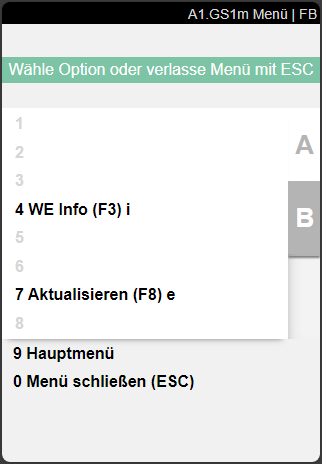
- WR Info (F3) i
- Update (F8) e
- Information (->)
B:
- Refresh (F8) e
A1.GS1 SSCC Receiving
This page opens when a GS1 barcode has been scanned in a warehouse receipt. This list only shows orders with receipt lines for the location in which the employee is currently logged in.
- Left: Warehouse receipt no. | Right: Supplier name
- Left: State | Right: Date and time of last state change
- Left: Type of warehouse receipt | Right: Identifier
- Item number, item description and GTIN
- Quantity
- Lot no. and Sell-By date
- Document no. The button on the right opens A1.GS1a - an overview of the orders. This allows the selection of the correct document if no barcode is available.
- Left: Storage place | Right: Weight
Menu:
- WR Info (F3) i: Opens A1.GS1i WHS Receipt Overview WHS Receipt Info
- Document selection (A5) s: Opens A1.GS1a SSCC Source Documents
- Refresh (F8) e
A1.GS1 SSCC Source Documents
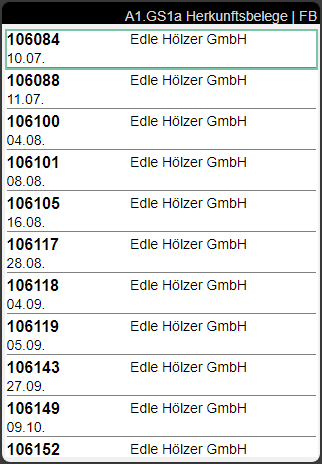
This list is accessed from A1.GS1 SSCC Receiving and shows all open purchase orders sorted by date. This allows the correct document to be searched for even if no barcode is available.
- Left: Document no. | Right: Vendor
- Document date
A1.1i Rec. Overview WR Info
A1.GS1i SSCC Receiving WR Info
A1.2i Load Carrier Overview WR Info
Shows information about the currently selected warehouse receipt.
Hinweis
A1.1 and A1.GS1i are the same contentwise.
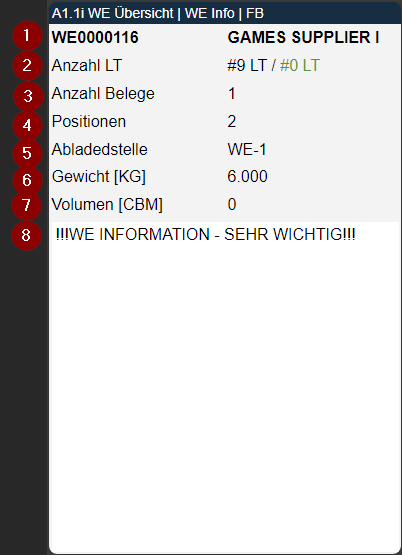
- Warehouse receipt no. and customer
- Number of load carriers in the Warehouse Receipt / how many load carriers have already been checked
- Number of source documents in the Warehouse Receipt
- Number of positions in the Warehouse Receipt
- Unloading place from the Warehouse Receipt header
- Total weight according to load carriers. If no load carriers are available, then gross weight from the packaging hierarchy
- Total volume according to load carriers. If no load carriers are available, then volume from the packaging hierarchy
- WHS Receipt Info
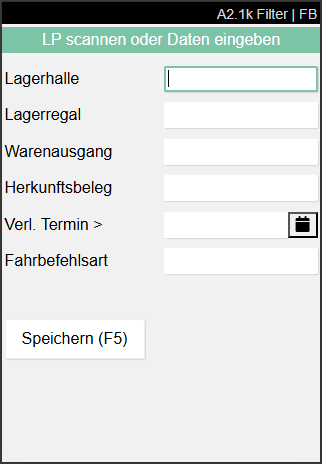
A1.0 New Unloading / Warehouse Receipt
On this page you can create a new warehouse receipt.
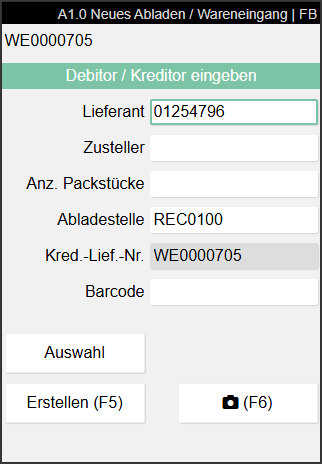
Either a supplier or a shipping agent must be entered. One of the two fields can remain empty. Alternatively, you can select a vendor or a customer via Selection. The other fields must all be filled in.
Hinweis
If some of the fields are greyed out and not editable please check the Whse. Rcpt. Mandatory Fields in the SIEVERS WMS Setup.
Use the button at the bottom right or the F6 key to take one or more photos of the truck before unloading. These are saved in the warehouse receipt and later also in the booked warehouse receipt in the fact box.
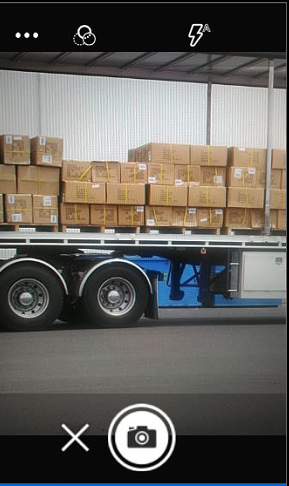
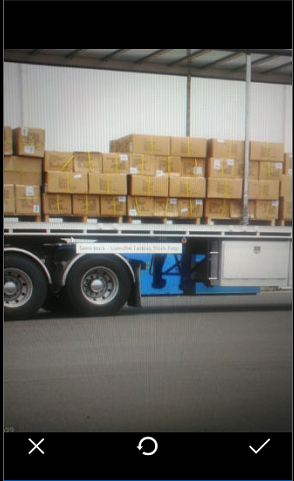

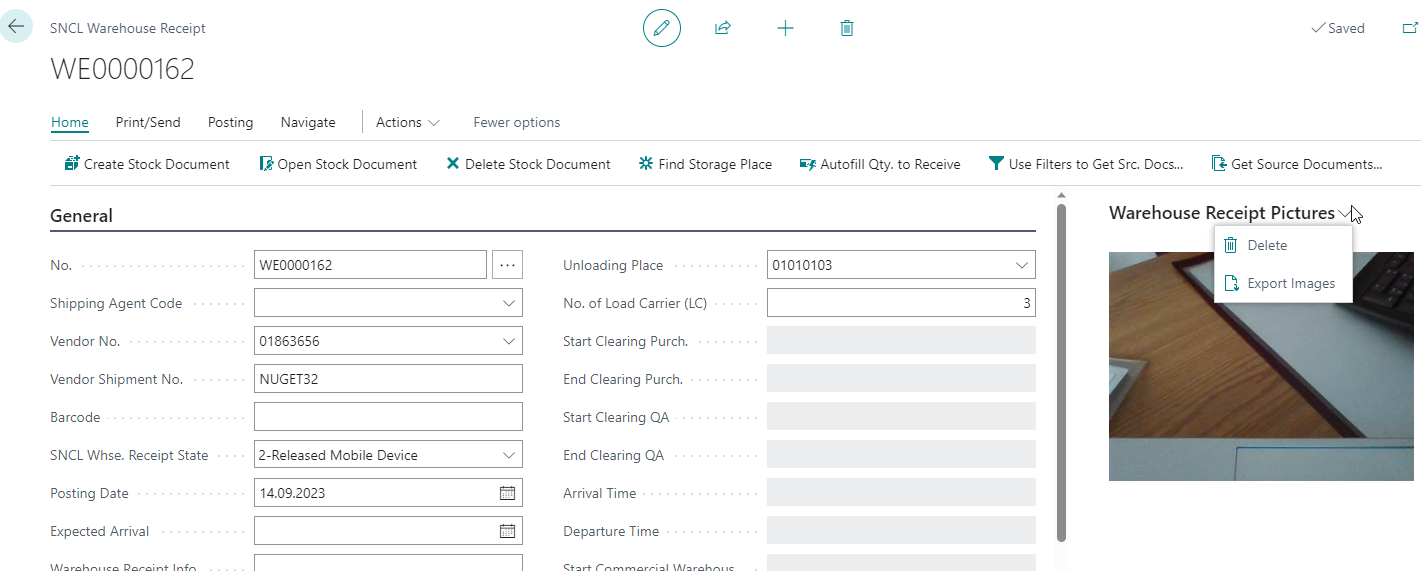
The last photo taken is always shown here. Further photos can be taken. To see these, the photos must be exported from the factbox. You can delete all photos with Delete.
When you are finished, create the warehouse receipt with Create or F5. If the process was successful, the system gives feedback in the form of the green banner Warehouse receipt created.
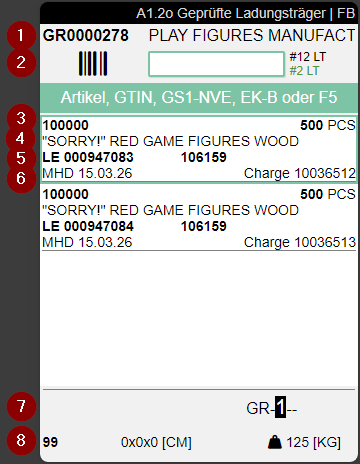
A1.2 Load Carrier Overview
The load carrier overview shows both the load carrier lines created in advance in the warehouse receipt and the document lines for which load carrier lines still need to be created.
The load carrier overview can be opened from A1.1 Rec. Overview by selecting a warehouse receipt process or by creating a new warehouse receipt process in "A1.0 New Unloading".
You can also manually assign receipt lines to this load carrier. To do this, access the menu B8 or enter a source document number manually to add it to the warehouse receipt. However, this is only recommended if there are very few documents.
- Left: Warehouse Receipt Number | Right: Vendor
- Scanfield for Load Carrier
- Left: Item Number (last 15 characters) | Center: Info symbol, if a comment text is stored on the Load Carrier | Right: Number of pieces
- Item description
- Left: Load carrier type and number or GS1-SSCC number | Middle: Last 9 characters of Source No. | Right: New Storage place or shortened Inbound Stock Post strategy
- Left: Create LC means that no load carrier exists yet
- Left: Supplier | Right: Current Storage Place (From warehouse receipt header or, if different, from load carrier line)
- Left: Inventory Measure Code | Middle: Dimensions | Right: Weight
Hinweis
If the item has a sell-by date or lot no. obligation, a fourth line is displayed showing the sell-by date and/or lot no.:
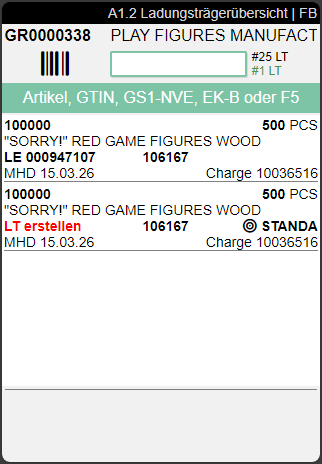
Clicking or pressing enter on a Load Carrier leads to A1.3 Position View.
Menu:
A:
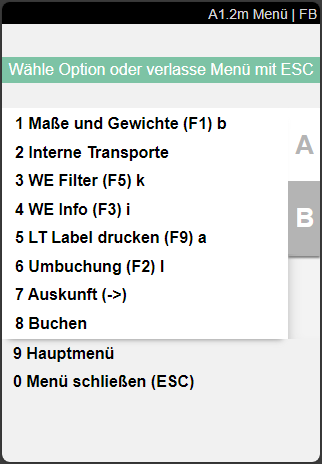
- Weights and Measures (F1) b: Opens Weights and Measures
- Internal Transport: Opens A2.0 Internal Movements
- WR Filter: Opens A1.2k warehouse receipt filter. Has no function on A1.2o (F5) k
- WR Info (F3) i
- Print LC Label (F9) a: Prints an LC Label of the selected load carrier
- Transfer (F2) l
- Information
- Post
B:
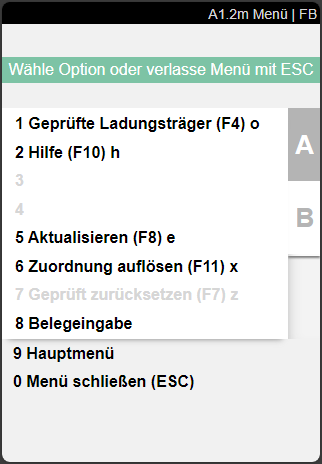
- Checked load carriers (F4) o: Opens A1.2o Checked LC Overview
- Help (F10) h
- Refresh (F8) e
- Dissolve Assignment (F11) x: Dissolves the document line - load carrier assignment. The items can now be assigned to another load carrier
- Reset Checked (F7) z: Resets already checked load carriers (view via A1.2o) to unchecked status
- Source Document Entries: Enables the manual assignment of source documents
A1.2k Load Carrier Overview Warehouse Receipt Filter
The WR filter is required to identify pre-filled load carriers or receipt lines in a warehouse receipt (or several warehouse receipts via A1.1) with regard to their identity and quantity so that they cannot be mistaken.
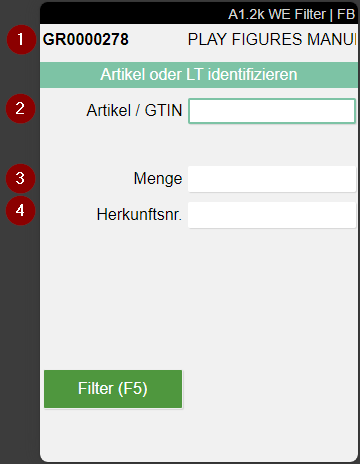
- Left: Warehouse Receipt No. | Right: Vendor / Shipping Agent
- Input field for Item No. / GTIN
- Input field for open and unchecked Quantity
- Input field for Source No.
Process:
- The warehouse receipt employee can open the filter at any time with F5 (ctrl+k)
- The employee enters one or more values until a load carrier line (or several identical ones) or a document line quantity has been identified
- The Filter (F5) button turns green, the employee presses F5. The employee is now shown the filtered page A1.2. As long as there is no uniqueness, the button is yellow. If several load carriers remain after all filter options have been used, the button turns green and the load carrier with the lowest load carrier number is selected.
A1.2a Load carrier Overview Src. Doc. Entry
If the warehouse receipt is a small delivery, employees can use this view to assign source documents individually, saving them a trip to the office or computer.
Hinweis
It is not recommended to enter a large number of documents via this view. This should still preferably be done via the classic document-oriented warehouse receipt.
When accessing receipt entry, you will first see an empty list. You can either enter a document number or scan it. You also have the option of clicking on the arrow to get an overview of all open purchase orders.
If you have just created a fresh warehouse receipt with supplier in A1.0 New Unloading, the list is filtered according to the supplier entered.
Now select the desired document. Only documents with open lines can be selected.
If you have selected a source document, all open lines are shown. You can now select a single line, which is loaded in A1.2 Load carrier overview. The load carrier creation can then be started there.
A1.2o Checked LC Overview
With A1.2o Check Load Carrier Overview you can view an overview of already checked load carriers. You can enter the page via CTRL+O or via menu.
- Left: Warehouse Receipt No | Right: Vendor
- Middle: Scanfield for search for checked Load Carriers | Right: Number of Items in the Load Carrier
- Left: Item No. | Right: Number of Pieces
- Notice
- Left: Last 9 characters of Source Document | Middle: Target Storage Place
- Left: Best Before Date | Right: Lot No.
- Right: Storage Place (From Warehouse Receipt Header or, if different, from load carrier line)
- Left: Load Carrier Type | Middle: Dimensions | Right: Weight
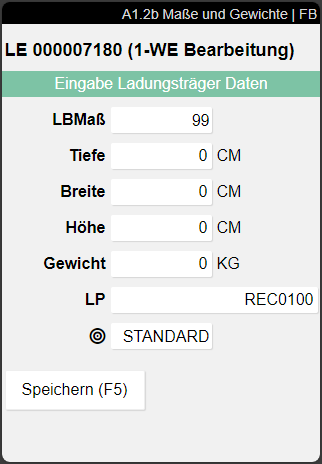
A1.2b Weights and Measures
On this page, you can change the following properties of the Load Carrier:
- Inventory measure
- Dimensions
- Weight
- Storage place
- {{Inbound Stock Post strategy}}
A1.3 Position View
This page provides information and shows the item positions of the load carrier. You can enter it by using Enter on a load carrier in A1.2 Load Carrier Overview.
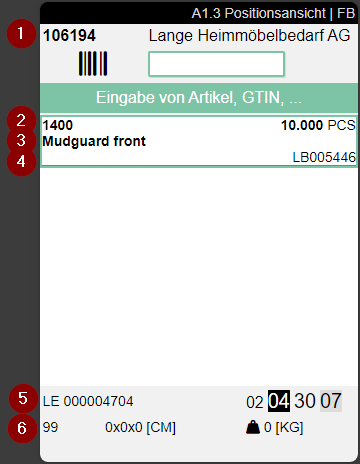
- Left: Warehouse Receipt No. | Right: Supplier
- Left: Item No. | Right: Quantity
- Left: Item Description
- Right: Inventory No.
- Right: Load Carrier Type and Load Carrier No. | Right: Storage Place of the Load Carrier
- Right: Inventory Measure Code | Middle: Dimensions | Right: Weight
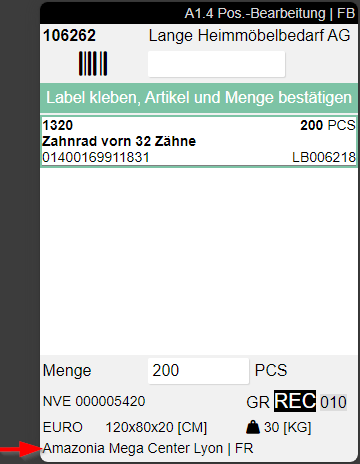
A1.4 Pos. Processing
When an incoming load carrier has been clearly identified, this page opens. Here, the Warehouse Receipt employee can check and release the load carriers content. If an i is visible in a line, a comment text has been stored for this. You can access this via Info (F3).
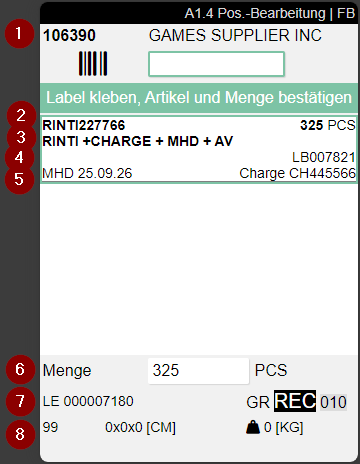
- Left: Order no. | Center: Camera symbol = picture available. Access with F6 | Right: Supplier
- Item no. | Right: Number of pieces to be checked
- Description of the item
- Left: GTIN from the item reference, which corresponds to the basic unit of measure | Right: Inventory no.
- Sell-by date and Lot no. if available
- Enter quantity
- Left: Load Carrier type and number | Right: Storage place from warehouse receipt or (if different) load carrier line
- Left: Inventory measure code | Center: Dimensions | Right: Weight
Process:
Click on the correct item and enter the quantity. If there was only one load carrier, the quantity is filled automatically. Confirming with Enter opens A1.5 LC Confirmation. If there is only one item in the list, the system will automatically select it. However, the user is still required to confirm the quantity.
If a shipping destination (Ship-to Name, Ship-to City) is already assigned to the load carrier, this is shown at the bottom:
Menu:
A:
- WR Info (F3) i: Opens A1.4i
- Picture (F6) f: Show or take item picture
A1.5 LC Confirmation
A1.5 Load carrier confirmation appears whenever a quantity of a load carrier is confirmed in A1.4. Here you can scan a load carrier barcode to mark it as checked. You can confirm all similar load carriers that are part of the warehouse receipt and have the same contents. The load carrier will be removed from A1.2. If the users want to reset the checked-state, they have to do this via A1.2o. Only checked load carriers can be posted later with the Warehouse Receipt.
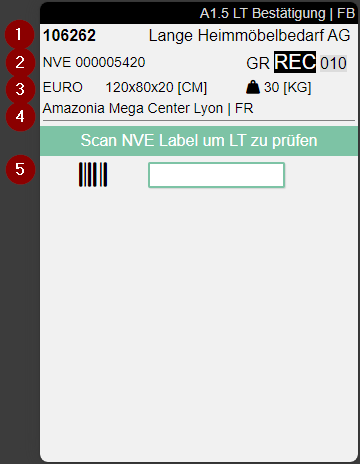
- Left: Order No. | Right: Vendor
- Left: Load Carrier Type and Code | Right: Storage Place (from WHS Receipt header or, if different, from load carrier lines)
- Left: Inventory Measure Code | Middle: Dimensions | Right: Weight
- Ship-to Name and Ship-to Country
- Here you can scan a PTU, SSCC or Blanco Barcode
A1.6 LC Creation
This page is used in the in the Warehouse Receipt process for the users to be able to create new load carriers during the process. The page has the following functions:
- Create several load carriers of the same type
- Assign a quantity (partial or complete quantity) to a single, new load carrier using a Blanco Barcode
- Add a certain quantity to an existing load carrier: The following rules apply:
- The load carrier must not be blocked.
- Checked and unchecked load carriers remain in their respective states.
- When put to PTU or SSCC, the system checks whether the warehouse shipment to which the order belongs matches the target SSCC. If no warehouse shipment has yet been assigned to one of the documents, the document must be identical.
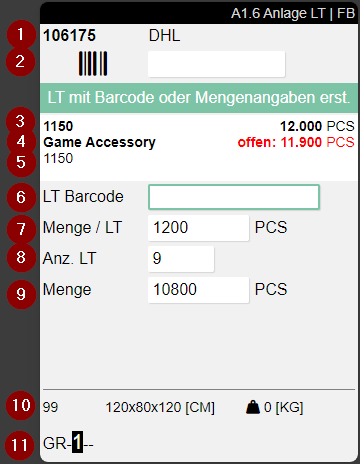
- Left: Purchase Order No. | Right: Vendor Name or Shipping Agent
- Scanfield to scan Item or GTIN
- Left: Item No. | Right: Number of Pieces
- Left: Item Description | Right: Quantity remaining
- GTIN
- Field for a single Load Carrier Barcode. Only editable if No. LC = 1
- Quantity to be assigned to Load Carriers
- Number of necessary Load Carriers
- Calculated Quantity from 7 and 8
- Left: Inventory Measure Code | Middle: Dimensions | Right: Weight
- Storage Place
Process:
- Scan a Barcode
- Quantities will be entered automatically
- Assign weights and measures with A1.6b LC Creation | Weights and Measures
- Create Load Carriers via menu A8 or hotkey F5
- The corresponding labels for the load carriers that have not yet been printed are printed automatically
- The created load carriers are automatically marked as checked
Menu:
- Weights and Measures (F1) b
- Create Load Carrier (F5) ctrl+k
A1.6b LC Creation | Weights and Measures
With this page users are able to enter an Inventory Measure Code, Weight and Measures for new load carriers when creating them in A1.6 LC Creation.
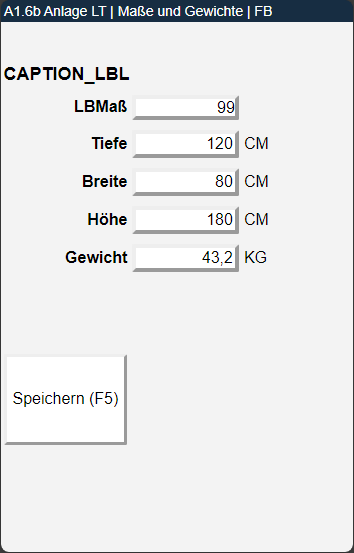
Process:
- Enter an item in A1.6 LC Creation
- Assign weights and measures
- Save values via Save button
A1.6s LC Creation | Serial Number Entry
The page A1.6s enables the entry of serial numbers when creating load carriers in the warehouse receipt. This function is designed for cases where no load carriers have been created in advance in the SNCL warehouse receipt and therefore no serial numbers can be transferred from pre-entry.
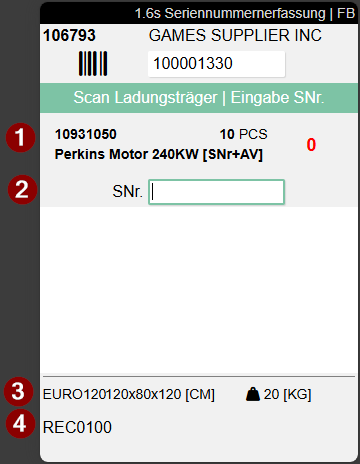
- Left: Item no. and item description | Center: Quantity | Right: Serial no. counter. If the counter is red, it means that not all serial numbers have been entered yet. The number of serial numbers is less than the number of load carriers requiring serial numbers. If the counter is green, all required serial numbers have been entered
- Serial number input. Newly scanned serial numbers are added at the top of the list, so that the most recently entered numbers are always directly visible without having to scroll. The serial numbers entered so far are displayed in the white area below this field.
- Left: Inventory measure and dimensions | Right: Weight
- Storage place
Trigger:
The page A1.6s opens automatically after quantity confirmation in A1.6 when:
- a serial number requirement exists in the receipt line from A1.2
- and no load carrier has been created yet in the SNCL warehouse receipt
Process:
- In A1.6, a blank barcode or an empty load carrier is scanned
- For items requiring serial numbers, the message "Enter serial numbers next" appears
- After quantity input, A1.6s opens automatically
- The focus is automatically on the serial number scan field
- Exactly one serial number is entered per unit of measure
- A quantity counter shows progress: Red for incomplete entry, Green for complete entry
- With F5, the entry is completed, the load carrier is marked as checked, and the load carrier label is automatically printed
Restrictions for serial number requirement:
- Splitting the quantity across multiple load carriers is not possible – the fields Qty / LC and No. LC are disabled
- Only one load carrier barcode can be scanned
Validation:
When scanning a serial number, a plausibility check is performed:
- "Serial no. is already contained in Warehouse Receipt" – The serial number has already been entered in this warehouse receipt
- "Serial no. - Item already exists in inventory" – The combination of serial number and item number already exists in inventory
Menu:
- Weights and Measures (F1) b
- Check Load Carrier (F4) ctrl+o
- Complete Serial Number Entry (F5) ctrl+k
Hinweis
The "Retrieve Photo" function (F6) is not available in A1.6s. An automatic completion when reaching the target quantity does not occur – the entry must be completed manually with F5.
A2 Internal Transports
Internal transports can be used to move entire load carriers from A to B. One or more load carriers can be picked up and, depending on the setting, also set down simultaneously. It is irrelevant whether transport orders exist for the load carriers or not. If a move job is present when scanning a load carrier, it is automatically displayed. If no move job exists for the scanned load carrier, one is created and a target determination is automatically carried out. If a PTU is picked up whose order has a packing team with a consolidation storage place and the matching location stored, the correct consolidation storage place is automatically determined.
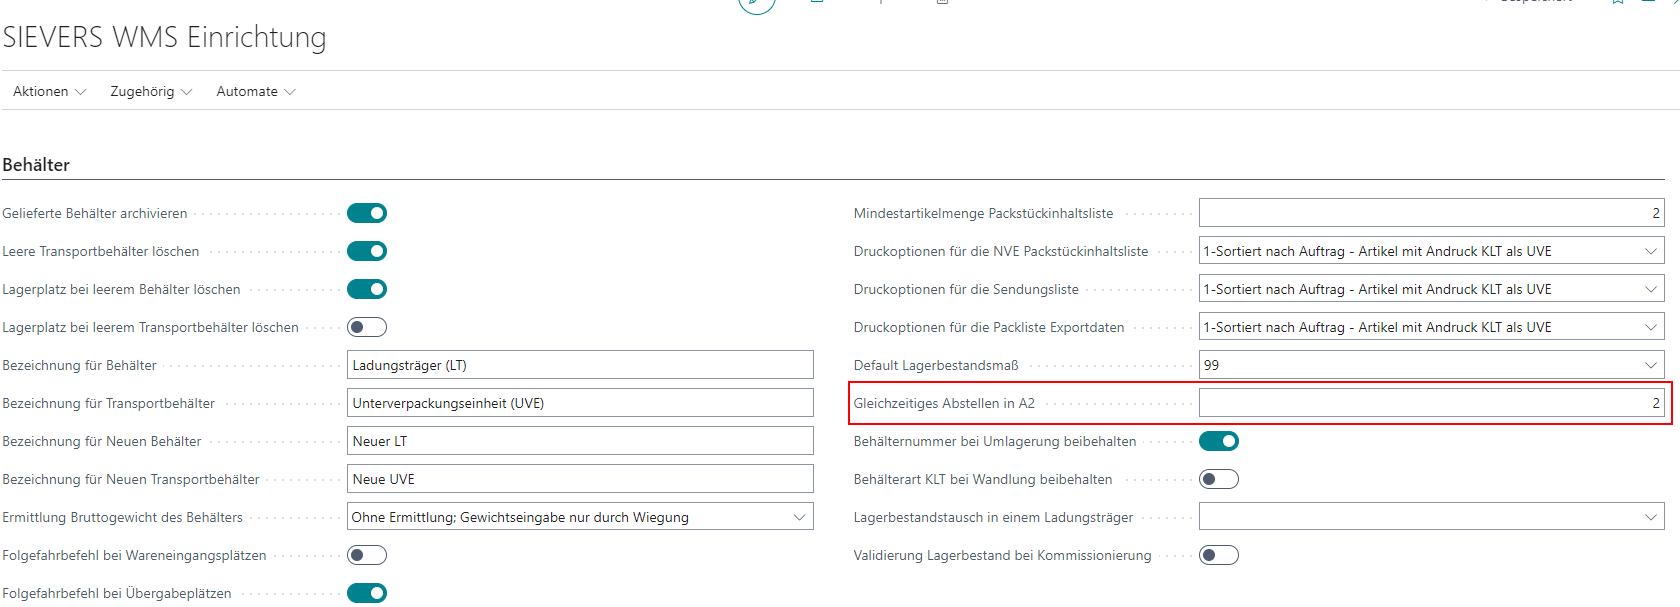
In the SIEVERS WMS setup, you can configure in the load carrier section that a follow-up move job is automatically generated for move jobs to receipt locations or transfer locations.
All movement data is stored in the SNCL Stock Entries and SNCL Load Carrier Entries.
When using A2, move jobs are automatically generated, employee markings are entered there, and the start and end time of the move job are stored.
The displayed move jobs are filtered to the selected team. Filters such as move job type or storage area are already taken into account when creating the move job for team selection.
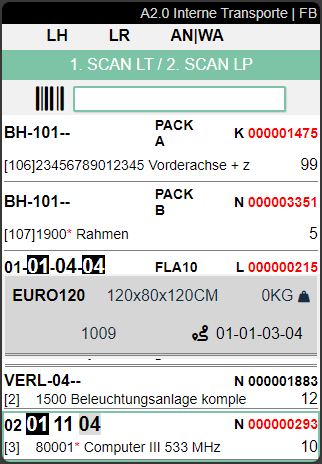
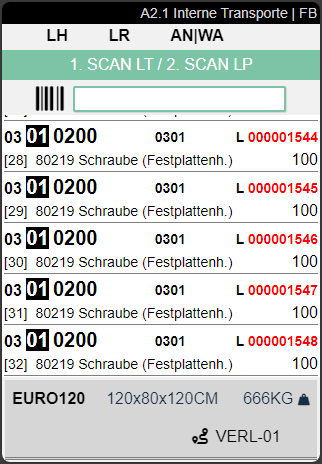
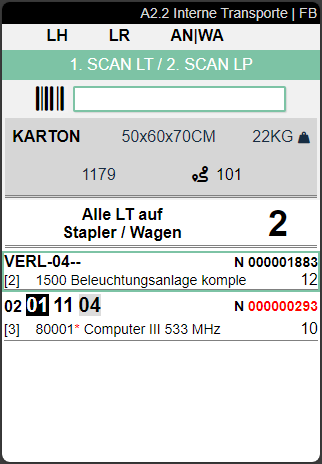
A2.0 Internal Transports
The view of page A2.0 shows both the open move jobs and the currently picked up load carriers. This split view is suitable when only a few load carriers need to be moved. As soon as the quantity becomes larger, the views A2.1 Open move jobs and A2.2 Picked up load carriers should be used.
Buttons:
- P1: Open the program menu
- F4: Change the view on the Zebra MC33 to A2.1 Open move orders and A2.2 Recorded load carriers.
- F5: Open the Internal-movements-filter
Process:
- scan load carrier to pick it up
- scan target location to put the load carrier down
or
- scan of several load carriers to pick them up
- successive drop-off of load carriers by scanning the load carriers and their destination storage places one after the other
or
- scan several load carriers to pick them up
- placing all load carriers in one storage place at the same time
Hinweis
If you pick up a load carrier that does not yet have a destination storage place, one is automatically found and assigned.
If you transport several load carriers at once, you will get this view on A2.0:
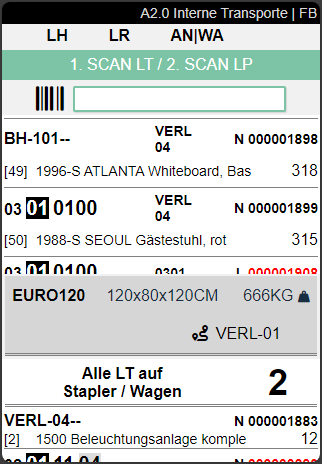
As you can see, All carriers on forklift / carts are now shown in the lower area. If you want to deliver the load carriers one after the other, simply scan them one after the other. If you want to deliver all load carriers at once, click on All carriers on forklift / cart. This screen will then be shown:
To place the load carriers, you must scan the new storage place. If the move order is of the type replenishment, you can also put to storage places where there is still remaining inventory of the item.
Hinweis
If you want to scan and deliver several load carriers at once, you must specify the number of load carriers required on the forklift so that the option All load carriers on the forklift is shown. See screenshot below.
The next screenshot shows a split view with open transport jobs and currently picked up load carriers.
The screenshot above shows a split view with the open transport jobs and the load carriers currently picked up.
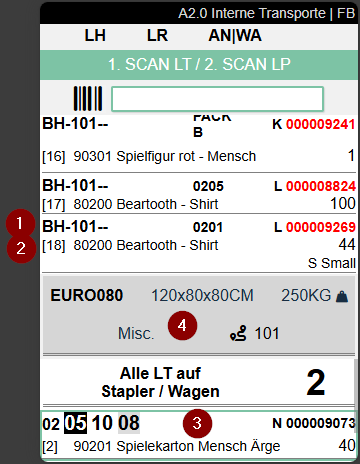
- Left: Destination storage places | Center: Storage area and shelf level | Right: Load carrier number or GS1-SSCC (red if Inventory measure code or dimensions are missing)
- Left: Item number and item description (if there are several items in the load carrier, the item number is marked with a red *) | Right: Quantity and if available item variant
- Currently selected load carrier
- If available, additional information on the current load carrier is shown in this gray area.
Top left: Inventory measure code | Top center: Dimensions | Top right: Weight |
Bottom left (if available): Source document number (see screenshot below) | Bottom center: The i shows that further information is available. Open this with the Menu. | Bottom right: Destination or departure point. Which location is shown depends on whether the employee has already picked up the load carrier:- Not yet collected: The destination is shown in the Additional information section
- Picked up: The additional information shows the departure location (see screenshot below)
In the example screenshot above, the additional information section shows the destination. The screenshot below shows the departure location.
Menu
You can access the menu via P1. This is the same on every A2 page.
It is divided into A and B.
The following options are available here:
- Weights and Measures (F1) B
- Order/LC-Info (F3) i
- Move Job filter (F5) k
- Information (->)
- Refresh (F8) e
- Print LC label (F9) a
- Transfer (F2) l
- Change view (F4) o: Changes the view depending on the current page. A2.0 -> A2.1 -> A2.2 -> A2.0
- Main menu
- Close menu
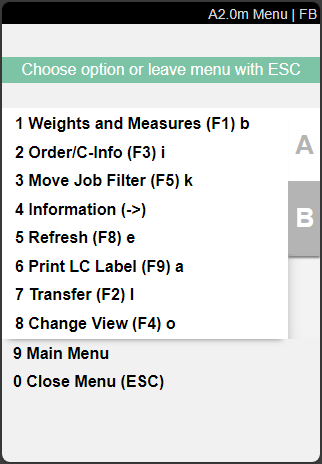
- New destination (F7) z
- Help menu (F10) h
- Photo (F6) f: Create and view photos. The photos taken will be stored at the Load Carrier
- Keyboard
- SSCC Info (<-)
- Main menu
- Close menu
A2.0i Order/LC-Info
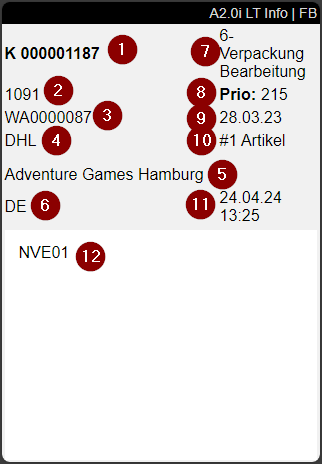
This info page can be accessed via the order/LC info menu of A2.0. The following information about the selected Load Carrier is shown here:
- load carrier number
- origin document no.
- Warehouse Shipment No.
- shipping agent code
- state of the warehouse shipment
- priority
- day of loading
- number of items
- time of last change
- customer name
- ship-to country
- comment text
Hinweis
The fields Origin document no. and Day of loading are only filled if it is a PTU or SSCC.
A2.1 Open move orders
A2.1 shows all currently open move orders. This view does not show the load carriers currently picked up. Press the F4 button for this view.
The structure and the information per entry are the same as in A2.0.
A2.xk Filter
The move job filter is an important tool for the forklift driver to show certain movements according to his choice.
Here you can filter the available transports according to the following properties:
- Warehouse
- Storage Shelf
- Warehouse shipment
- Source document
- Ship. Date >: Filters for move jobs which are younger than the entered date
- Move order type:
- Storage bin transfer
- Replenishment
- Inbound Stock Post
- Return Order
- Loading preparation
- Manual Transfer
- Transfer to Production
- Picking Cancellation
A2.2 Picked up load carriers
A2.2 shows the load carriers currently picked up. Press F4 to switch back to the split view A2 Internal transports.
The structure and the information per entry are the same as in A2.0.
A3 Item transfer
The item transfer can be used to transfer item quantities from one load carrier to another. The difference to A2 Internal transports is that here it is not entire load carriers that are moved within the warehouse, but item quantities that change load carriers.
When A3 is used, move orders are automatically generated, employee markings entered and the start and end times of the move order stored.
As long as a reservation that points to an inventory is not split, a transfer may also be carried out.
Area A3 consists of the following parts:
Hinweis
Where possible, lines are shown cumulatively by load carrier and item.
Line sorting is based on the movement strategy code of the user's team.
A3.1 Item transfer overview
This overview shows the currently open transfer transactions.
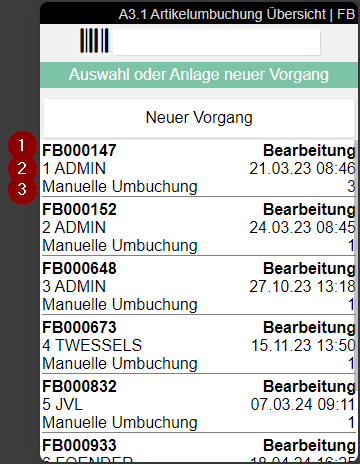
1: Move order number
2: State of the move order
3: User abbreviation of the user who created the move order
4: Time at which the move order was created
5: Move order type
6: Scope of posting - number of stocks in the transaction
A3.2 Item Transfer Take Out
This is the Take Out function of the item transfer.
Hinweis
If you want to transport a full load carrier within the warehouse, please use A2 Internal transport.
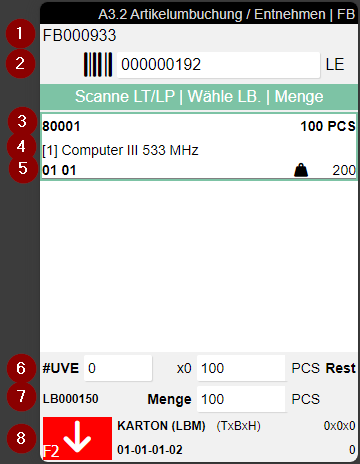
- The move job number
- Scan a load carrier or storage place here
- Left: Item no. | Right: Number of items in stock
- Item description
- Left: Warehouse code + storage shelf code | Right: Total weight according to item master data multiplied by quantity and variant if available
- Number of SPU x quantity + individual pieces
- Left: Inventory no. | Right: Total quantity to be taken out
- Inventory measure + dimensions. The red symbol shows that you are on the take out screen
Hinweis
For replenishment move jobs, the inventory list is automatically filtered to display only relevant entries. The filtering is based on the Inventory Swap in a Load Carrier setting in the SIEVERS WMS Setup.
Process:
- Scan the inventory unit via Scan LC/SP
- Scan the desired inventory or select it from the list.
- Enter the desired quantity (confirm all or partial quantity)
- Repeat the process for further stock
- Press F2 to switch the mode from removal to *putaway
- The put to process is described in A3.3
The A3.2 menu enables the following functions:
A:
- Dimensions and weights
- Order/LC-Info
- Information
- Update
- Print LC label
- Switch between Remove <=> Add to stock. Use this function to switch back and forth between A3.2 and A3.3.
- Help
- Keyboard
- Main menu
- Close menu
B:
- Internal transports. Switches directly to A2 Internal transports.
A3.3 Item transfer Put To
This is the Put To function of the item transfer. It can be used to add item quantities recorded in A3.2 Take out to a load carrier. In this case, the function Storage Place: autom. allocation finds and reserves a storage place from the move order based on the Inbound Stock Post strategy.
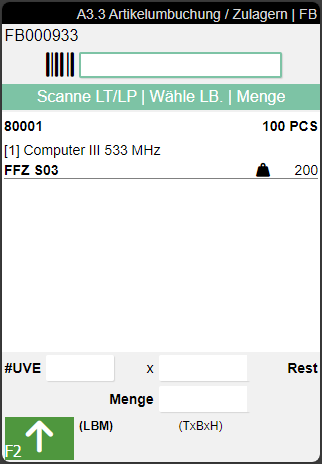
Process:
- Make sure that you are in Inbound Stock Post Mode. You can recognize this by the fact that the button at the bottom left is green and the arrow is pointing upwards.
- Scan the desired inventory and then the target load carrier or a blanco barcode to transfer the item to a new load carrier (SU with state 2-recorded).
The A3.3 menu enables the following functions:
A:
- Dimensions and weights
- Order/LC-Info
- Information
- Update
- Print LC label
- Switch between Remove <=> Add to stock. Use this function to switch back and forth between A3.2 and A3.3.
- Help
- Keyboard
- Main menu
- Close menu
B:
- Internal transports. Switches directly to A2 Internal transports.
- Create Load Carrier (F5) k: Opens A3.3 Weights and Measures to create a load carrier and print a storage unit label
A4 Picking
This program is used to carry out order picking. It consists of three levels:
Depending on whether the quantities on the SU correspond to the picking quantities, either the standard process or the alternative process is used. If the SU quantities do not correspond to the picking quantities, please proceed according to the standard process. If the picking quantities correspond exactly to the SU quantities, you can also use the faster alternative process.
The standard picking process runs as follows:
- The picker selects an order via the picking list overview.
- The picker scans Blanco Barcode in A4.2 item overview and creates a new PTU that can be used for picking. Alternatively, he selects an existing PTU or scans an empty reusable carrier, which is automatically converted into a PTU (see note below).
- Picker moves to the first storage place with the load carrier into which he wants to pick.
- If not already done, the picker selects the first item and validates whether he is picking from the correct pallet by scanning the SU barcode on A4.3 item processing.
- The picker then confirms the quantity picked on A4.3 Position processing or enters a partial quantity.
- Steps 3-5 are repeated until picking is complete. Now the picker enters the dimensions, weights and inventory measure via the menu
Alternative process:
If the quantity on SU corresponds to the picking quantity of a picking item, the SU can be converted into a PTU/SSCC with a 2nd scan. This shortens the process, as no Blanco Barcode has to be scanned and attached to the LT.
- The picker selects an order via the picking list overview.
- The picker selects an item in A4.2 Item overview and goes directly to A4.3 Item processing.
- Now the picker scans the SU and thus validates that he is picking the correct pallet. As the picking quantity matches the current SU quantity 1:1, the correct quantity is suggested directly.
- The picker confirms the quantity after a check.
- Since the quantity on the SU corresponds to the picking quantity of the picking position, it can now be converted into a PTU with a second scan. This automatically generates a move order to the next best Consolidation Storage Place (from packaging, from picking team or last used Consolidation Storage Place)
- The picker then enters the dimensions, weights and inventory measure via the menu. Once this is finished, a SSCC is created.
- Steps 2-5 are repeated until picking is complete.
Hinweis
In picking, only PTUs or SSCCs can be used as target containers. If a reusable empty storage unit (SU) is scanned where the Chg. Load Carrier Type allowed flag is set, it is automatically converted into a PTU and can be used directly for picking.
Menus:
In A4 there are menus A and B.
A:
- New PTU: Creates a new PTU with the selected position. Also prints a new PTU label. This is useful if only one load carrier with one position is to be generated. If the function is grayed out, the setup Create PTU/SSCC via hotkey A4, A5 is disabled in the SIEVERS WMS Team Card.
- Dimensions and weights
- Assign/Unload TU: Depending on whether or not you have created or selected a PTU/SSCC, you can use this function to either place the load carrier in a transfer location or pick up a load carrier in order to pick into it. If a single PTU is to be unloaded, a Consolidation storage place is suggested. If there is a consolidation storage place in the picking team, it is used. If there is none, a place is determined via the move job action Determination of Packaging Consolidation Storage Place for PTUs. In A4.2, you can also start this function by directly scanning a PTU or SSCC.
- Order/pos - info
- Information
- [Transfer](#a3-item transfer)
- Internal transports
- Print PTU/SSCC label
B:
- Stock difference
- Photo: Here you can take photos of the picked items which will be stored on the picking document in the details section.
- New picking place: Searches for a new picking place when inventory is blocked
- SU label
- Help
- Keyboard
- SSCC Info
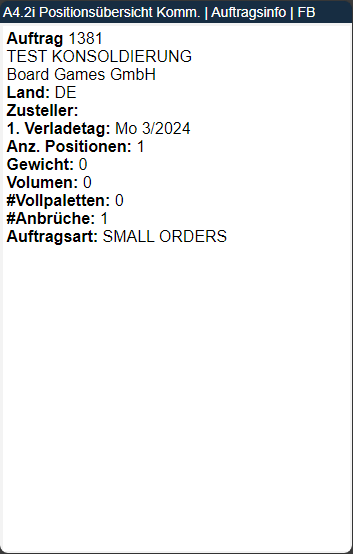
A4.Xi Order info
Shows an information overview of the selected picking order. This page can be accessed from all A4 pages via the menu or F3.
- Order no.
- Customer/vendor name
- Country
- Shipping agent
- 1st loading day
- Number of Positions
- {{Weight}}
- Volume: Calculated from the item master data.
- Number of Full Load Carrier Picks
- Number of Partial Picks
- Order Type
A4.1 Picking list overview
All orders that have been released and are therefore available for picking can be viewed on the picking list overview. The pickers can use this overview to select an order to pick. Multiple users can select a picking document at the same time. The users will be displayed separated by commas.
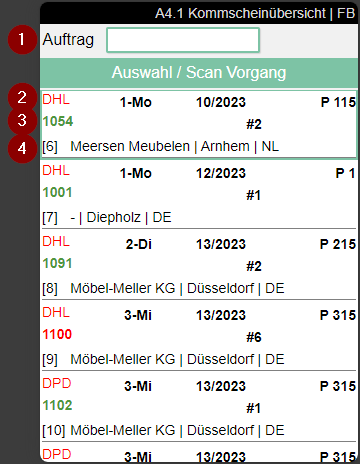
1: An order number can be entered here
2: Left: Shipping Agent Code | Center: First loading day and loading week from Warehouse Shipment Planning | Right: Priority
3: Order number (Green or Red) | Middle: Number of Positions | Right: Employee Marking
4: Left: Order line | Center: Customer name, city and country code | With MOP or SOP: Comment text from MOP or SOP Monitor
Hinweis
The color of the order number depends on whether it is a partial delivery or not. Green = no partial delivery, red = partial delivery.
If a i is seen in a document, there is additional information that can be accessed via F3. For MOP and SOP orders, this comment text originates from the respective monitor.
Hinweis
Please note that the shipping agent and customer information is omitted for a picking series and the picking series number is shown instead. In addition, the number of pieces picked so far and the total number of pieces in the series are shown.
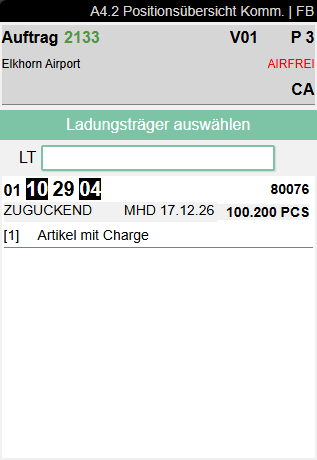
A4.2 Position overview
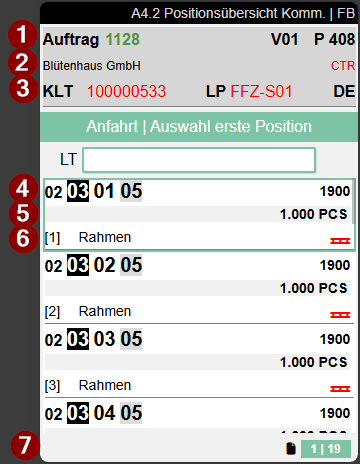
The picking item overview can be used to estimate the scope of an order. From here, the picker can also influence the picking route himself.
- Left: Order number (red or green) or various order number or MOP batch number | Center: Packaging team | Right: Priority/Sort number of the order
- Left: Customer name | Right: Shipping agent | With MOP: Comment text from MOP Monitor
- Left: Load carrier type and no. or GS1 SSCC no. | Center: Current location of the load carrier, in this case a floor conveyor vehicle | Right: Ship-to Country
- Left: The storage place from which the items are to be picked | Right: Item no.
- Left: Lot no. and/or sell-by date | Right: Quantity to be picked (for various orders, totaled quantity per picking team)
- Left: Item description and Variant Code | Right: The red pallet symbol indicates that an entire load carrier is to be removed.
- Shows the current workload. Left number: Number of open orders | Right number: Number of open positions
Hinweis
The color of the order number depends on whether it is a partial delivery or not. Green = no partial delivery, red = partial delivery.
If a i is seen in a document, there is additional information that can be accessed via F3. For MOP orders, this note text originates from the MOP Monitor.
Further functions and links can be viewed on the Zebra MC33 via the menu under P1.
To continue the picking process from here, a picked load carrier (PTU) or a shipping unit number (SSCC) is required. Scan a new Blanco Barcode or an existing PTU/SSCC that belongs to the same warehouse shipment. The system then automatically starts the function Unload PTU/SSCC, so that you can put down the load carrier at a transfer location or Consolidation Storage Place. Alternatively, you can still access the function via the menu (F8).
Hinweis
You can also pick into PTUs that are already in packaging according to the state. However, this is only possible as long as nothing has been packaged yet. If you decide to continue picking, the PTU is removed from the packaging process.
Hinweis
Please note that the shipping agent and customer information is omitted for a picking series and the picking series number is shown instead. In addition, the number of pieces picked so far and the total number of pieces in the series are shown.
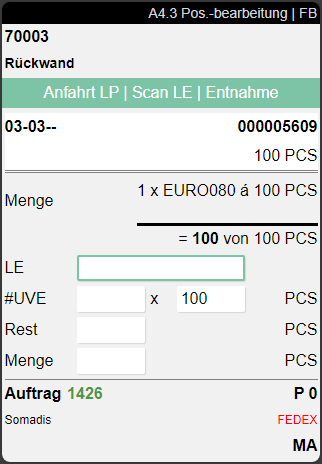
A4.3 Position Processing
The item processing page is used to validate and confirm picking. Employees can also block conspicuous inventories (e.g. too low). You can find out more about this below the process description.
Depending on whether a subpackaging unit is stored in the inventory, one of two different views is shown. The regular variant, without SPU, is this one:
Fields:
- Item no.
- Item description
- Left: Storage place | Right: SU no. or GS1 SSCC no.
- Left: Lot no. and sell-by date | Right: Expected inventory in SU
- Quantity still to be picked of the total quantity to be picked
- Enter SU number
- Quantity
- Left: Order no. | Centre: Packaging team | Right: Priority
- Left: Customers | Right: Shipping agent
- Left: Load Carrier no. | Centre: Current Location Code | Right: Country code
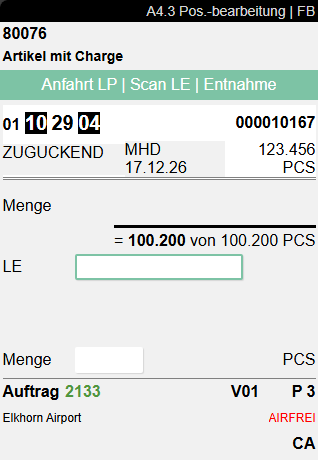
If an SPU is stored in the inventory, A4.3 looks like this:
In this view, the quantity is divided into SPUs and individual pieces so that it is clear to the picker how many SPUs he should pick. In addition, the #SPU and Left fields can be used to influence the distribution.
The focus control automatically adapts to the demand quantity to avoid unnecessary input steps:
- Demand quantity > SPU quantity: The focus is initially on #SPU. After input, the cursor automatically jumps to Left, as a remaining quantity is likely required.
- Demand quantity = SPU quantity: The focus is on #SPU. After input, the cursor jumps to Quantity.
- Demand quantity < SPU quantity: The focus is directly on Quantity, as no complete SPU is being taken out.
If the storage place and inventory number are coloured red, the inventory is blocked.
If a i is seen in a document, there is additional information that can be accessed via F3.
Hinweis
Please note that the shipping agent and customer information is omitted for a picking series and the picking series number is shown instead. In addition, the number of pieces picked so far and the total number of pieces in the series are shown.
The same applies to orders that are part of a various order handling. In this case, DIV + picking document no. is shown instead of the order number and the total number of items per picking team/consolidation number, load carrier and item. In addition, the lowest priority of all included orders is shown.
Process:
- Go to the storage place displayed and check the storage unit barcode by scanning the SU label in the SU field highlighted in blue in the screenshot.
- At the top in the feedback area, you will now see the quantity that you need to pick. For SPU-managed items, the focus automatically jumps to the appropriate quantity field. Count and enter the picking quantity in the Quantity field or scan a GTIN barcode to reduce the displayed quantity by the quantity contained in the SPU. As soon as you confirm the Left field, the quantity is automatically filled in. If you have entered a Quantity Suggestion Mobile in the team properties, the quantity is automatically suggested.
- Then press the enter keys to confirm the picking. The system then assigns the picked quantity to the selected PTU. If you have confirmed a partial quantity, the first line of the Outbound Stock Post is always served.
Hinweis
You can also scan a Blanco Barcode for a new PTU in the SU field. This is then automatically used as the active PTU to be picked into.
Hinweis
If inventory swaps are allowed in the WMS Setup, the appropriate quantity will not be shown in the feedback area until the inventory has been scanned.
Hinweis
Please note that the Quantity Suggestions Mobile from the SIEVERS WMS team also apply here.
Hinweis
If a shortage is found in a picking series, the system blocks the remaining stock of this inventory and searches for an alternative inventory. If no alternative inventory is found, the series is blocked and assigned the state Clarification.
Blocking inventory:
It can happen that a inventory quantity is lower than expected during the pick and the pick cannot be carried out. In this case, the picker enters a 0 for the quantity and confirms this. The system then asks whether the inventory should be blocked. If you confirm with Yes, the system locks the inventory and searches for new inventory for picking, depending on the setup. Either via Inventory swap or via cancellation and re-release of the lines (see Pick. Optimization w. Inv. blocked in the Warehouse shipment section of the SIEVERS WMS Setup). The blocked inventory is documented with the Standard blocking code from the SIEVERS WMS setup and must be manually unblocked again via Business Central. The blocking and unblocking automatically affects all associated move job lines.
A4 MOP PTU LC Assignment
This page opens after you have selected a MOP batch in A4.2. Here the assignment of picked goods to load carriers and MOP boxes takes place.
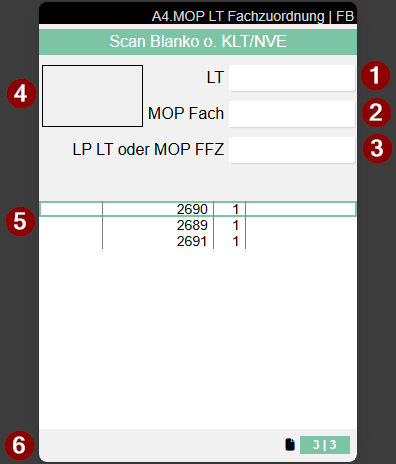
- Input load carrier, e.g., via blanco barcode
- Input MOP box
- Input storage place for load carrier or MOP rack
- Current MOP box. Remains empty when a new PTU is created for a new line or a new order. Shows the box number only after successful assignment
- Assignment table. Column 1: Box (empty here) | Column 2: Order number Green: All positions of the order are completely picked; Black: Order not yet started (no box number assigned); Normal display: Order in process (box number assigned) | Column 3: Number of positions | Column 4: Load carrier number with prefix. P = PTU; S = SSCC. The color of the load carrier shows the processing status: Black: PTU - no further attributes required, normal packaging follows; Green: SSCC with complete attributes, ready for shipment (inventory measures, dimensions and weight are maintained); Red: SSCC with missing attributes: inventory measures, dimensions (length/width/height) or weight are missing
- Work Indicator. Left number: Number of unfinished orders | Right number: Number of open picking positions | Colors: Green: There is something to do. Gray: There is nothing to do.
Process:
- You have already scanned or selected the first position in A4.2 and are therefore at the correct storage place with your forklift
- You must first create a new load carrier, as there is currently no assigned PTU. The cursor is automatically set to the order for which the PTU is needed. You have two options:
- Scan a blanco barcode in the LC field and attach it to your desired container
- Press F5 or select A1 New PTU in the menu to create a PTU without a blanco barcode. The PTU label will be printed automatically
- Then scan one of the boxes of your MOP rack in the MOP Box field.
- Now A4.3 opens. Continue here with the standard process and enter a quantity. In the bottom right of the window you see a large number. This shows the box number into which the goods must be placed. For a new line, the box number is only displayed after assignment in A4 MOP.

- The system then opens A4 MOP LC Box Assignment again. The focus is automatically on the MOP box field, so you can scan the box directly. In the assignment table there is a new line consisting of the box number in column 1 and the PTU number in column 4. You also now see the box number again in the top left corner, into which the goods must be placed. Since this process step is particularly error-prone, the box must be confirmed by scanning the box storage place code as soon as the goods have landed in it. Once this has happened, the new line with PTU and box number is assigned to the corresponding order. The current order is marked turquoise in the assignment table, making it immediately clear which order the box confirmation is being performed for.
- After confirming the box, the system automatically navigates to the next picking position:
- Position with assigned PTU: A4.3 opens directly with the next position. Confirm the quantity and then the box in A4 MOP.
- Position without assigned PTU (new order): A4 MOP opens with focus on the LC field. Create a new PTU, assign a box and pick the position in A4.3. If a box is full, you can also assign a new box after scanning a new PTU or a blanco barcode.
- This process repeats until all positions of the MOP batch have been processed. With ESC in A4.3 you reach the position overview A4.2 to orient yourself or to choose a deviating entry point.
- Optional: You can remove individual finished PTUs from the MOP rack during ongoing picking and bring them to packaging. As soon as a PTU is removed, its state automatically changes from 5-Picking Processing to 6-Packed Processing. Packaging can thus work in parallel to picking.
- Once you have processed all lines, you must place the PTUs or the entire rack on a storage place or convert the PTUs to SSCCs.
- For direct conversion to an SSCC, select the load carrier in the table, open the Weights and Measures form via toolbar, menu or F1 and enter the desired inventory measure and weight. Once this is done, you can print an SSCC label via F9
- To place the entire rack at a storage place, scan the storage place in the SP LC or MOP WHV field. Please note that in this case the PTUs remain in the boxes in the system and only the rack itself is located at the new storage place. When putting down the rack, the state of all PTUs automatically changes from 5-Picking Processing to 6-Packed Processing, so that packaging can already begin while the MOP batch is still running.
- To place individual PTUs, scan the PTU in the LC field and then the storage place in the SP LC or MOP WHV field
Now you can continue with A5 Packaging.
A5 Packaging
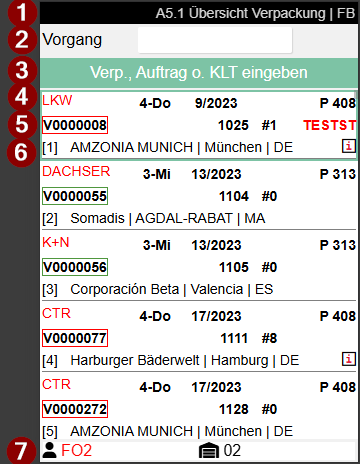
A5.1 Packaging Process Overview
Packaging has the following main tasks:
- Packaging the picked items for shipment
- Checking the picked items (PTU)
- Consolidation of the picked items
In the packaging process overview, the packer can see for which orders packaging processes have been created and what is to be packed. If only a certain number of documents are shown here, this is due to the setting Max. # documents in the SIEVERS WMS Team. Scan a PTU or SSCC to be packed here or enter an order number to go to A5.2.
- Title bar with page no. / description | user abbreviation
- Pack. Proc. = Packaging process | here the packaging process can be selected by scanning the packaging process number or entering the order number. The process can also be selected by clicking and pressing Enter
- Note and feedback field
- Shipping Agent Code from Warehouse Shipment Planning | Middle: First Loading Day of the Warehouse Shipment | Right: Priority
- Packaging process number (Red or Green) | Middle: Source Document No. and Number of SPUs | Employee Marking Packaging
- Left: Customer name / city and country | Right: i symbol if information exists (access with right arrow key)
- Left: Employee Marking Picking | Right: Warehouses with the remaining Pickings
::: Note: There is a green or red box around the packaging process number. Red = There are still items in the Outbound Stock Post that have not been picked and / or there are missing items in the Outbound Stock Post (= partial delivery). Green = All items have been picked and are ready for packaging. :::
You can access the following via the A menu:
- SSCC Info
- Information
- Order Info
- Main menu
- Close menu
A5.2 Load Carrier Overview
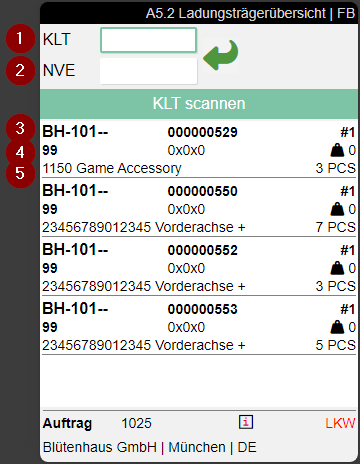
Here the packer or forklift driver of a packing group can see which PTUs have to be packed together for an order (i.e. a warehouse shipment). The sorting of the displayed list corresponds to the movement strategy stored in the packaging team. Scan a PTU or SSCC to be packaged here to go to A5.2.
Fields:
1: PTU number, state to the right (see next screenshot)
2: SSCC number, state to the right (see next screenshot)
3: Left: Storage place | Center: Load carrier number with type PTU | Number of the item in the PTU
4: Left: Inventory measure of the Load Carrier | Center: Dimensions | Right: Weight
5: Left: Item no: Item no. | Center: Item description | Right: Quantity

If an i is visible in a line, a comment text has been stored for this. You can access this via Info (F3).
Process:
- Scanning of the KLT to be packed
- Scanning of the SSCC (Blanco Barcode or existing SSCC)
- Confirm the packaging
- Continue from step 1 with the next PTU
- If all quantities are packed and the state is set to 7-packed, the packing process is automatically completed.
Menus:
A:
- Weights and Measures (F1) b
- SSCC Print label (F9) a
- SSCC Info (<-)
- Transfer (F2) i
- Internal transports
- Refresh (F8) e
- Main menu
- Close menu
B:
- Unpack
- Photo (F6) f: Create and view photos. The photos are stored at the packaging process
- Help (F10) h
- Main menu
- Close menu
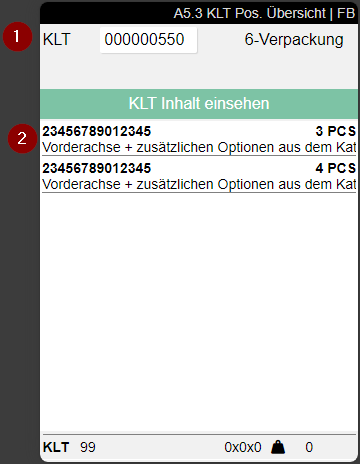
A5.3 PTU Pos. Overview
If you scan a PTU in A5.2 Load Carrier Overview, this page opens. The packer can check the contents here and then scan the target SSCC.
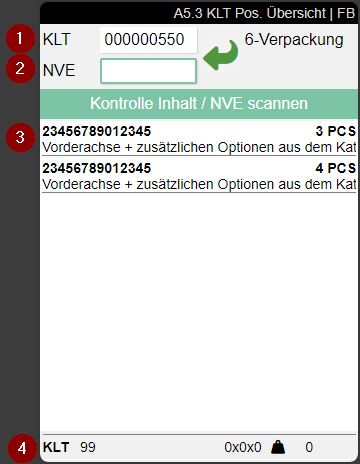
- Scanned PTU
- Target SSCC
- Content
- Left: Load carrier type, Inventory Measure Code of the SSCC and Order No. | Right: Dimensions and Weight of the SSCC, Infosymbol and Shipping Agent
The scanned target SSCC can be:
- Scanned PTU
- Blanco Barcode
- Existing SSCC
If you have selected a PTU in A5.2 Load carrier Overview by pressing Enter, a special info view of A5.3 opens. You cannot edit anything here and you cannot scan any SSCCs.
Menus:
A:
- Information (->)
- Transfer (F2) i
- Internal transports
- Refresh (F8) e
B:
- Item Rel. Packaging o
- Picture (F6) f: Shows the item picture or, if there is none, lets the user take a picture
- Help (F10) h
A5.4 Unpacking
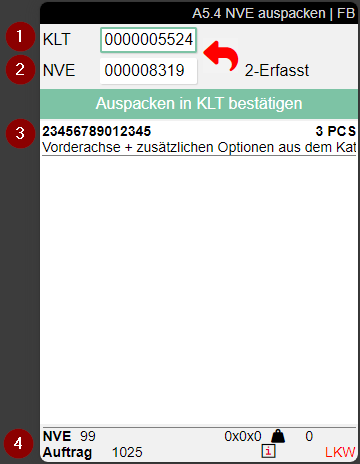
You can use this function to return the contents of the SSCC of the current packaging process to a PTU. To do this, scan the SSCC in the SSCC field (2) and the PTU in the PTU field (1). Then confirm the unpacking.
- PTU
- SSCC
- Left: Item no., item description | Right: Quantity
- Left: Load carrier type, Inventory Measure Code of the SSCC and Order No. | Right: Dimensions and Weight of the SSCC, Infosymbol and Shipping Agent
A5.5 Item Related Pack
With A5.5 you can package by item. This page is opened via the menu Packaging by item or F4 if you have scanned a PTU in A5.3.
- Enter PTU
- Enter SSCC
- Enter item no.
- Available items with no., description and quantity
- Enter quantity
- Current load carrier. Left: Load carrier type, Inventory Measure Code of the SSCC and Order No. | Right: Dimensions and Weight of the SSCC, Infosymbol and Shipping Agent
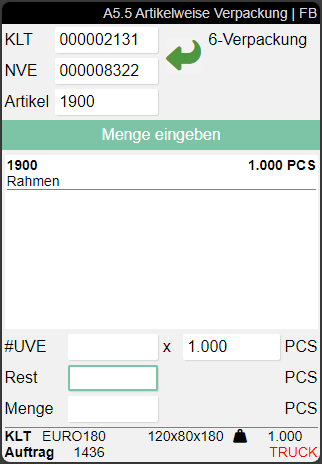
If there is a maintained SPU for the item/inventory, the #SPU x PCS and Left fields are also shown. This allows the packer to determine exactly how many SPUs are to be packaged or how much is left over.
If the quantity in the PTU is greater than or equal to one SPU, the focus is set on the #SPU field. If the quantity in the PTU is smaller, the focus is set to Left and the packer can confirm the quantity remaining directly.
Hinweis
Please note that the Quantity Suggestions Mobile from the SIEVERS WMS team also apply here.
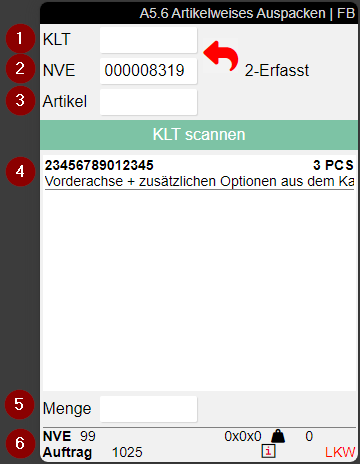
A5.6 Item Related Unpack
With A5.6 you can unpack by item. This page is opened via the menu Unpackaging by item or F4 if you have scanned a PTU in A5.4.
- Enter PTU
- Enter SSCC
- Enter item no.
- Available items with no., description and quantity
- Enter quantity
- Current load carrier. Left: Load carrier type, Inventory Measure Code of the SSCC and Order No. | Right: Dimensions and Weight of the SSCC, Infosymbol and Shipping Agent
If there is a maintained SPU for the item/inventory, the #SPU x PCS and Left fields are also shown. This allows the packer to determine exactly how many SPUs are to be packaged or how much is left over.
If the quantity in the PTU is greater than or equal to one SPU, the focus is set on the #SPU field. If the quantity in the PTU is smaller, the focus is set to Left and the packer can confirm the quantity remaining directly.
Hinweis
Please note that the Quantity Suggestions Mobile from the SIEVERS WMS team also apply here.
A6 Loading
A6.1 Loading Overview
This page provides an overview of all currently open loadings with the states
- 2-Released for preparation
- 3-Released
- 7-Loading Processing.
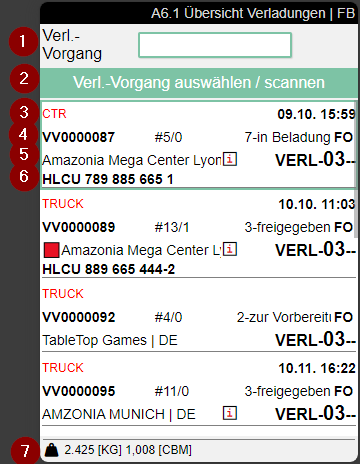
- Scan field for scanning a loading process
- Information and feedback field
- Left: Shipping agent | Right: Either planned loading time or start of loading
- Left: Loading process no. | Center: Number of SSCCs packed / number of SSCCs loaded | Right: Status of the loading process and loader's abbreviation
- Left: Green box: Warehouse finished state and no partial delivery. Red box: Warehouse open or released state and partial delivery. Keyword from the warehouse shipment. | Center: An "i" indicates that further information is available. Call up with F3. | Right: Loading storage location
- Load Carrier No. or License Plate if no Load Carrier No. is entered
- Weight and volume SSCC open
To continue, select or scan a loading process from the list. Alternatively, an SSCC can be scanned to automatically select the associated loading process. For more information on the selected loading process, press F3 to go to A6.1i Loading Info.
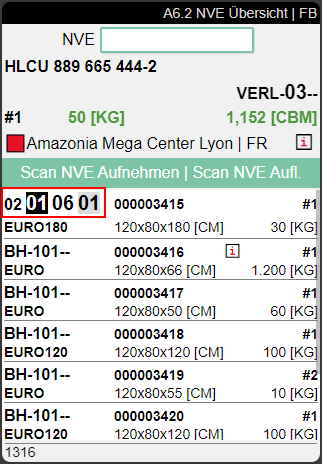
A6.2 SSCC Overview
This page shows the contents of an SSCC that is part of a loading process. When the loader has selected a load process and pressed Enter or clicked it again, the system displays the SSCC Overview. This is the loader's primary processing screen.
- The loader can open the menu with Ctrl+m or P1
- To pick up an SSCC, any SSCC from the loading process can be scanned
- The loader can load the SSCC onto the loading storage place with a second scan
- The SSCC receives the loading process number and the state 8-loaded
- The SSCC then disappears from A6.2 from the list of SSCCs to be loader
If the SSCC is to be retrieved from the loading storage place, it must be scanned a third time.
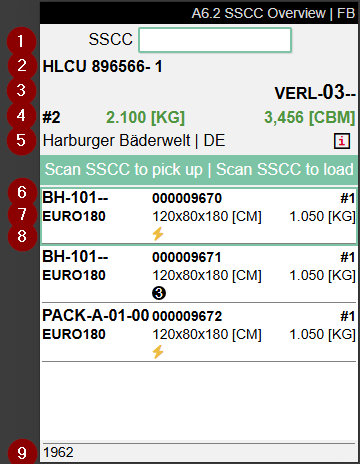
- Scanfield for SSCC no.
- If filled: Load Carrier no or GS1 SSCC. If no Load Carrier no is present, this field contains the trucks license plate
- Storage Place
- Left: No. of loaded SSCCs in the Load Carrier | Middle: Weight of loaded SSCCs in the Load Carrier | Right: Volume of loaded SSCCs in the Load Carrier
- Warehouse Shipment Keyword | An i means that further information is stored. Access this via F3
- Left: Storage Place of SSCC | Middle: SSCC no. | Right: No. of items in SSCC
- Left: Inventory measure code | Middle: Dimensions | Right: Weight
- Left: Unloading place | Center: Flash icon = High priority, 3 icon = Low priority
- Source no. If there is more than one, an * is shown
A6.2m Menu
The page has the following menus:
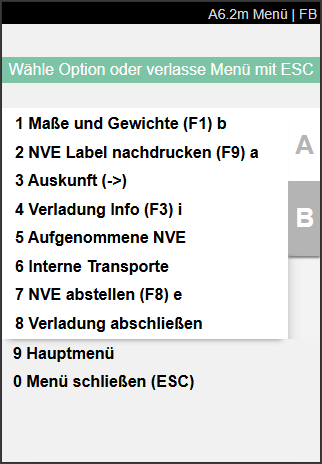
A:
- Weights and Measures
- SSCC Label reprint
- Information: A7.3 Load Carrier Info
- Loading Info: Use this menu or arrow button right. Opens MDE page A6.1i Loading Overview Info
- Internal Transport: Opens A2.0 Internal Movements
- Unload SSCC
- Finish Loading: Finishes Loading Process, sets state to 8-Loaded and removes loading process from A6.1.
- Main Menu
- Close Menu
B:
- Change View
- Picture (F6) f: This allows the user to take photos of motifs relevant to loading, for example to document truck loading and load securing. The photos taken are saved on the loading process. It is operated similar to the picture function in Warehouse receipt A1.0.
- Help (F10) h
- SSCC Info (<-)
- Update
- Main Menu
- Close Menu
Weights and Measures
When you have selected a LC, you can look into and change its weights and measures.
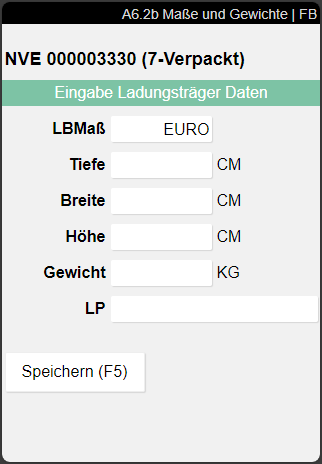
- Measure: Inventory Measure Code | If you select an inventory measure here, the dimensions and weight will be adjusted accordingly. The weight is calculated according to the formula selected in the setup field Determination Container Weight. You can find the field in the SIEVERS WMS Setup in the container section.
- Depth
- Width
- Height
- Weight
- SP: Storage Place
Unload SSCC
There are possible scenarios in which SSCCs that are part of a loading process must be placed back in a storage place. This action is available for this case.
- Click on action or press F8 to start unloading process.
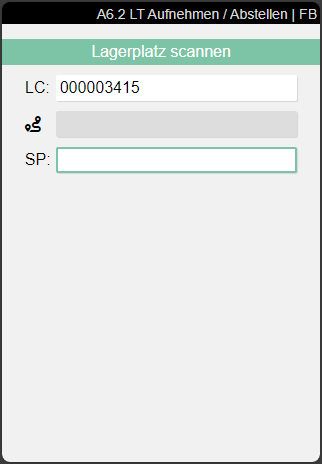
- Scan storage place.
- New storage place on SSCC.
A6.1i A6.2i Loading Overview Info
This page shows all relevant information about the current loading process. You can open it with F3.
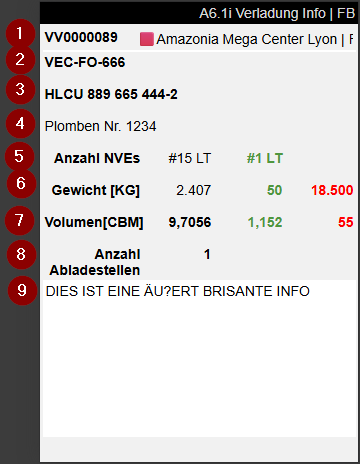
- Left: Shipment No. | Right: Warehouse Shipment Keyword
- License plate front/back
- Load Carrier No.
- Vehicle Text
- Left: Number of open SSCC in this loading process | Right: Already loaded SSCC in this loading process
- Left: Weight of open SSCC | Middle: Weight of already loaded SSCC | Right: Maximum weight
- Left: Volume of open SSCC | Middle: Volume of already loaded SSCC | Right: Maximum volume
- Number of Unloading Points
- Loading instructions
A6.2o Loaded SSCC
This page is opened by the action Change View in menu B of A6.1 and A6.2. This page shows the currently loaded SSCC of the selected loading process. These SSCC have been scanned two times in the loading process. A third scan of an SSCC will unload it and change its state from 8-Loaded to 7-Packed.
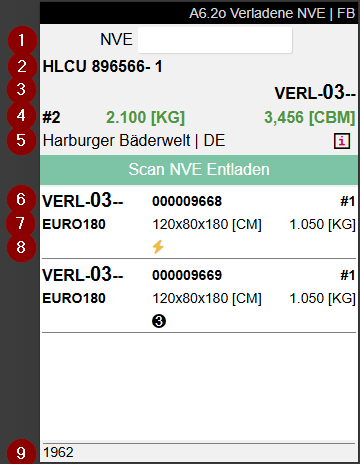
- Scanfield for SSCC no.
- If filled: Load Carrier no or GS1 SSCC. If no Load Carrier no is present, this field contains the trucks license plate
- Storage Place
- Left: No. of loaded SSCCs in the Load Carrier | Middle: Weight of loaded SSCCs in the Load Carrier | Right: Volume of loaded SSCCs in the Load Carrier
- Warehouse Shipment Keyword | An i means that further information is stored. Access this via F3
- Left: Storage Place of SSCC | Middle: SSCC no. | Right: No. of items in SSCC
- Inventory measure code | Middle: Dimensions | Right: Weight
- Left: Unloading place | Center: Flash icon = High priority, 3 icon = Low priority
- Source no. If there is more than one, an * is shown
A7 Information
The A7 program is used as information for items, storage places and load carriers. A7 information can be accessed from the other MDE programs after a selection via the menu - Information. However, you can also open the information program via the main menu and scan an item, storage place or load carrier to obtain more information about it.
Hinweis
The items/load carriers/storage places scanned and displayed in the information have nothing to do with those in the current work step. If you return to the work step after viewing the information, the MDE will show you the same content as before you called up the information.
The information programs have an A and a B menu, which can be accessed via P1 on the MDE device.
A:
- Weights and Measures
- Information
- Refresh
- Print LC Label
- Print Inv Label
- Print Item Label
- Take Out <=> Put To
- Internal Transport
B:
- Help
- LC-Info
- Keyboard
- SSCC Info
A7.1 Item info
The item info shows information on the selected item, where and what quantity is currently located where. Here you can scan not only item labels but also GTINs.
Pressing the right arrow -> Opens A7.3 Load carrier information.
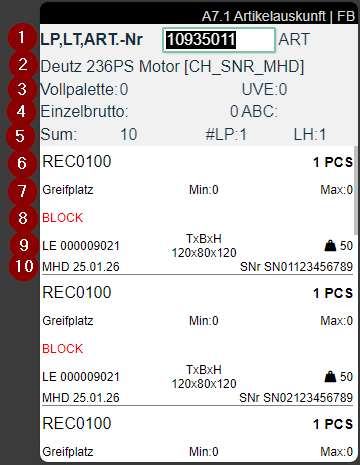
- Item number
- Item description
- Left: Number of full pallets | Right: SPU quantity from packaging hierarchy
- Left: Single gross amount | Right: ABC class | Far right: Camera symbol when a photo is stored on the item card. Access with F6
- Left: Total of stock | Center: Number of storage places | Right: Occurrence in different warehouses
- Left: Storage place | Right: Number of items in this storage place
- Center: Minimum stock values from replenishment | Right: Maximum stock values from replenishment
- Displays BLOCK when inventory is blocked
- Left: Load Carrier type and number or SSCC No. | Center: Dimensions | Right: Weight
- Displays Sell-by date, Serial no., Lot no. and Variant. If a serial no. exists, it is displayed in preference to the lot no.
A7.2 Information by storage place
The information by storage place is intended to help the warehouse employee understand what is posted in the storage place. For this purpose, target/actual checks can be carried out. In addition, the warehouse employee can use the menu to reprint labels and check the movements to and from the storage place.
Pressing the right arrow -> Opens A7.1 Item Info.
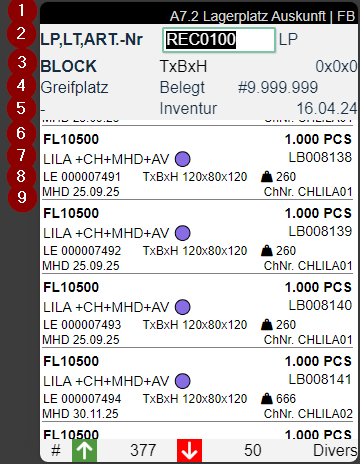
- Title bar - Page / Description / User
- LP = storage place | LC = load carrier | item input field
- Left: Category code of the storage place | Center + Right: TxWxH => Depth, width, height of the storage place.
- Left: Type of storage place | Center: State | Center Right: Number of load carriers permitted in the storage place | Right: ABC code "A"
- Blocking code in red
- Left: Item no: Item no. | Center: Shows red Blocked when the stock is blocked | Right: Quantity
- Left: Item description | Right: Inventory no.
- Left: Load carrier type and load carrier code or SSCC code | Center: Dimensions | Right: Weight | Far right: Camera symbol when a photo is stored on the item card. Access with F6
- Left: Sell-by date | Right: Prefers serial no., lot no. or variant
A7.3 Load carrier information
The load carrier information allows you to check the load carrier contents, correct dimensions and weight and reprint labels. Regular load carrier labels and GS1 SSCC labels can be scanned here.
Pressing the right arrow -> Opens A7.1 Item Info.
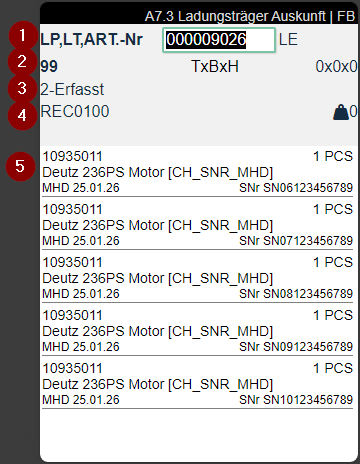
- Load carrier no. or SSCC code and load carrier type
- Inventory measure
- Dimensions depth x width x height
- State of the load carrier
- Storage place where the load carrier should be located
- GS1 reference, if available
- Contents with item no., item description, quantity, sell-by date, serial no., lot no. and variant. Serial number is shown in preference. | Center: Shows red Blocked when the stock is blocked | Far right: Camera symbol when a photo is stored on the item card. Access with F6
A7.4 Inventory Information
The inventory information enables direct scanning and information retrieval of inventories. This form provides detailed information about a specific inventory and allows flexible navigation to other information forms.
Accessible from A7.1 Item Info by scanning an inventory number or directly via A7.4 by scanning item, GTIN, inventory, load carrier, GS1 or storage place.
Pressing the right arrow -> Opens A7.1 Item Info.
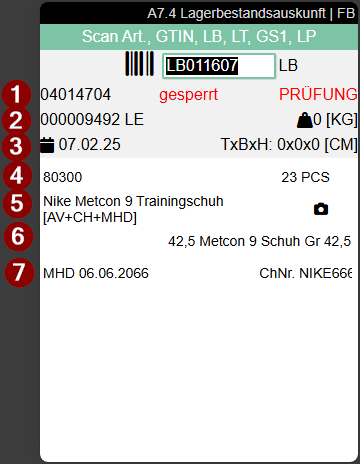
- Displays the storage place. For blocked inventories, the red notice "blocked" appears together with the blocking code
- Left: Load carrier code and load carrier type (SU, PTU, SSCC) | Right: Weight
- Left: Inbound warehouse receipt posting date | Right: DxWxH (Depth/Width/Height)
- Left: Item number | Right: Quantity
- Left: Item description | Photo symbol shows that an image exists for this item
- Variant
- Left: Sell-by date | Right: Lot or serial number (serial number is shown in preference)
A8 Team / Forklift
This program is used to assign the employee to the team, forklift and printer. The assignments can also be changed during operation. Press F5 to automatically accept the preselection.
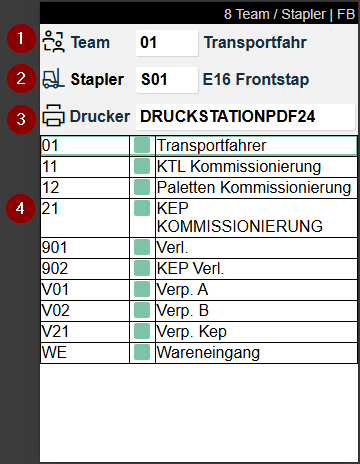
1: Team
2: Forklift
3: Printer
4: List of available options. The colored boxes indicate whether there is currently work for this team.
- Green: There is currently nothing to do for this team
- Gray: There is work for this team
Hinweis
Pre-assignments can be entered for each employee for the assignments in the user administration. If Restrict to logistics team is set to for the respective user, the employee cannot change their team themselves.
When the team, forklift and printer are assigned to the employee, the other content on the MDE device is filtered accordingly so that the employee only receives orders that match the properties defined here.
B
B1 SSCC Info
On this page you can view all information about the SSCCs of the whole Warehouse Receipt. Either scan a SSCC barcode or type in a Source Document or a Warehouse Shipment No.
- Scan SSCC, Order or Warehouse Shipment
- Left: Warehouse Shipment No. | Middle: Stock Light from Warehouse Planning | Right: Loading Day
- Left: Storage Place | Middle: SSCC No. (outlined in red when not packaged) | Right: Number of items in SSCC
- Left: Inventory Measure Code | Middle: Dimensions | Right: Weight
- Left: First Item | | Middle: The occasional i means, that this load carrier has a comment text attached. Look it up with F3 | Right: Number of pieces of this Item
- Left: First Item | | Middle: The occasional i means, that this load carrier has a comment text attached. Look it up with F3 | Right: Number of pieces of this Item
- Left: Source Document Type and No. | Right: Shipping Agent Code
- Customer Name, Location and Country Code
Only SSCCs with the states 2,3,4,5,6 or 7 are listed. The SSCCs are sorted first by state and then by storage place in ascending order.
Menu:
A:
- Weights and Measures (F1)
- Print SSCC Label (F9)
- Order Info (F3)
- Information
- Internal Transport (F2)
- Refresh (F8)
B:
- Help
B2 SU label
With this function, you can reprint any SU label. To do this, scan the storage place and the desired item.
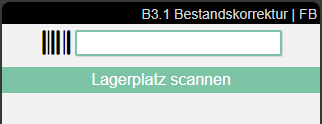
B3 Adjust Inventory
You can use the inventory adjustment function to enter stock differences identified during stocktaking.
B3.1 Inventory Adjustment
This page is used to enter the storage place to be corrected. Entering or scanning a countable storage place leads to B3.2 Perm. Stocktaking Positions.
Menu
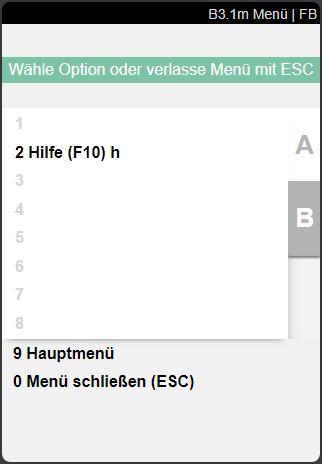
- Help (F10) h
B3.2 Perm Stocktaking Positions
On this page, users can, among other things, correct inventories, enter new inventories or confirm empty inventories.
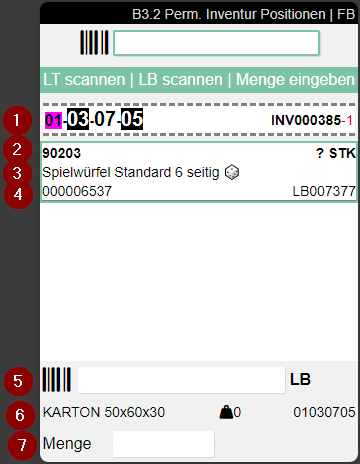
- Left: Storage place | Right: Inventory number and Cycle Counting List
- Left: Item no. | Right: Unclear Quantity. Intentionally not shown so that counting is necessary
- Item Description
- Left: GTIN | Right: Inventory no.
- Scan field for the inventory no.
- Left: Inventory Measure Code and Dimensions | Center: Weight | Right: Storage place
- Input field quantity
Menu
A:

- Capture new Inv. (F5) k
- Weights and Measures (F1) b
- Information
- SU Label Reprint
- Refresh (F8) e
- Confirm empty SP (F2) l
- Print Inv label (F9) a
B:
- Help (F10) h
- Foto (F6) f
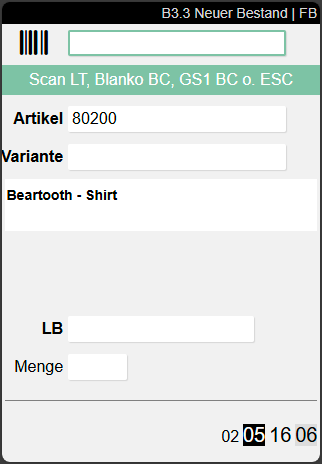
B3.3 New Inventory
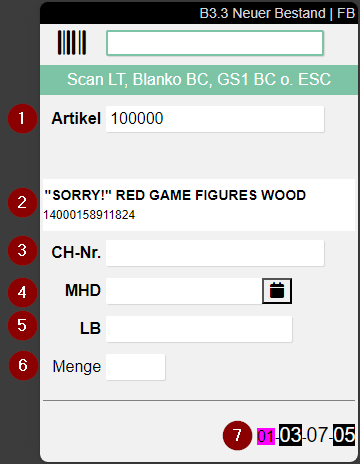
B3.3 is used to be able to record additional inventories that arise during stocktaking.
The following fields are available:
- Item: Scan the item found
- Item scanned
- Lot no.
- Sell-By Date/BBD: Input possible directly or via calendar
- Inv
- Quantity
- Selected storage place
The fields lot no., BBD and Inv are only shown if they are set as mandatory fields for this item. If the item has variants, the corresponding field will appear. You must enter a variant here.
Here you can scan several types of codes:
- Item No.
- GTIN
- GS1 Barcodes
- Blanco Barcodes to create new Load Carriers
- Existing Load Carrier Barcodes
For more information on adding stock, see Add new inventory during a stocktaking.
B3.3 Menu
- Cancel new inventory: Closes the new inventory entry and returns to B3.2
- Weights and Measures (F1)
- Information
- Print LC label (F9)
- Transfer (F2)
- Internal transports
B4 Warehouse Receipt Unloading
A warehouse receipt unloading process can be created and executed using these pages. This area is explicitly intended for employees who focus exclusively on unloading warehouse receipts. For this purpose, there are only the following pages in B4
- B4.1 Rec. Overview and
- B4.2 New Unloading/ Receipt
The pages corresponds exactly to A1.1 and A1.0. Scanning a warehouse receipt, load carrier or item in B4.1 starts the unloading process. Alternatively, you can also create a new process via menu A1. If possible, the supplier or shipping agent is already pre-filled so that only
- No of packages
- Storage place and
- Barcode
have to be filled in by the user. Otherwise, you can also manually select a supplier in B4.2 using Selection. If necessary, add photos to the warehouse receipt via F6 and create it with F5.

- Scan field
- Notes and feedback
- Left: Vendor name from the warehouse receipt | Right: Expected arrival
- Left: Warehouse receipt no. | Center: An i indicates that comment text has been stored. Access with F3 | Right: State of the warehouse receipt
- Left: Unloading place | Center: Shipping agent | Right: Number of load carriers
- Left: Number of source documents | Center: Number of load carriers | Right: Number of items
Process:
- Select a warehouse receipt from the overview, scan a load carrier or item, or start an empty process from the menu (item 1). This sets the arrival time of the warehouse receipt.
- Fill in the fields in B4.2 New Unloading beginning with the No. of packages. Also scan a load carrier or a blanko barcode in the barcode field.
- If required, add photos using F6. These are attached to the warehouse receipt.
- Create the unloading process using F5. This populates the departure time of the warehouse receipt and sets the state to 1-Recorded.

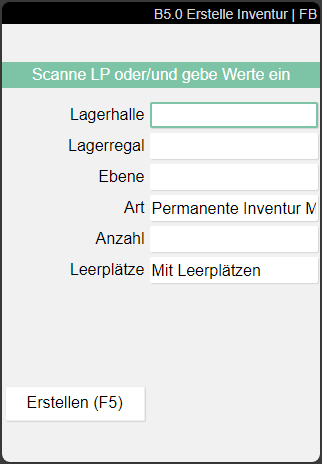
B5 Stocktaking
A warehouse employee can use the MDE device to start stocktaking at any time. The storage places and stocks are not blocked.
Hinweis
Please note that the creation and progress of a stocktaking is only possible if the corresponding setting in the SIEVERS WMS Setup is set to active.
- Select New process.
- Scan a Location Code or enter a Warehouse and a Storage Shelf or a Level.
- Enter the number of storage places to be counted now.
- Specify whether the stocktaking should also include Empty Storage Places, no Empty Storage Places or only Empty Storage Places.
- Press Create or the F5 key.
Hinweis
It is also possible to create an empty cycle counting list with the initial stocktaking type in the Business Central system and then scan the storage places you want to count one by one.
The stocktaking lines are added and the associated cycle counting list with the corresponding counting list lines is released directly for progress on the MDE.
Each storage place is now scanned individually by the stocktaking employee.
After scanning a storage place, the item page is opened:
- Storage place
- Left: Item with item number, description and storage unit number |Right: Uunit of measure. There is no quantity at this point, so that it cannot simply be checked during stocktaking, but must actually be counted
Hinweis
Please note that storage places that have not been counted are deleted from the stocktaking and cycle counting list when the stocktaking employee leaves an open count. This does not apply to storage places that are to be counted a second or third time.
B5.0m Menu
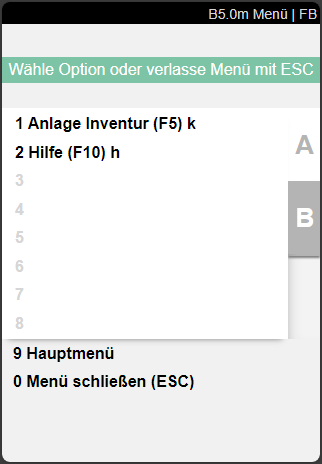
- Create Stocktaking (F5) k: Creates a stocktaking based on the parameters entered in B5.0
- Help (F10) h
B5.1 Perm Stocktaking Overview
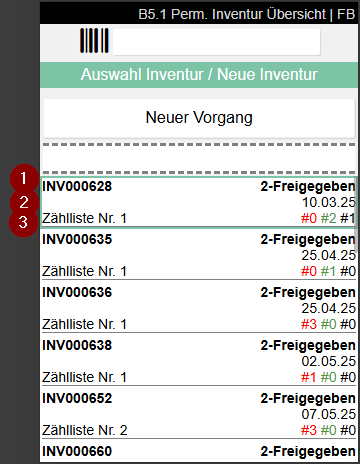
Shows the currently open stocktakings and allows the user to create a new stocktaking with New process.
- Left: Inventory no. | Right: Status of inventory
- Date of inventory
- Left: Cycle counting lists no. | Right: Red: Inventory still to be counted; Green: Inventory already counted; Black: Empty storage places
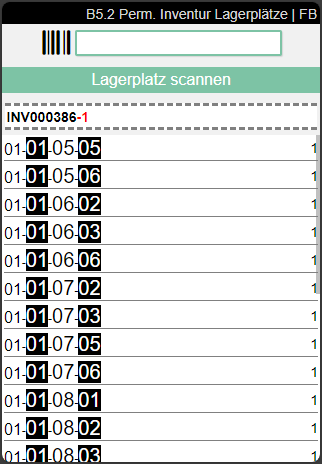
B5.2 Perm. Stocktaking Storage Places
Shows the storage places to be counted for the selected stocktaking.
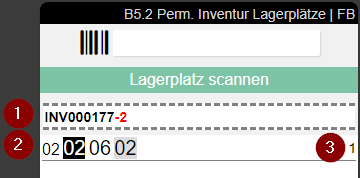
- Inventory No. and Cycle Counting List No.
- Storage Place
- Number of Inventories in stock to be counted
The order of the storage places displayed depends on the movement strategy entered for the SIEVERS WMS team.
Scan a storage place here to continue the process.
::: Attention When exiting B5.2, the current stocktaking is automatically deleted, unless it is a stocktaking with the type Annual stocktaking or Initial Stocktaking. :::
B5.2m Menu
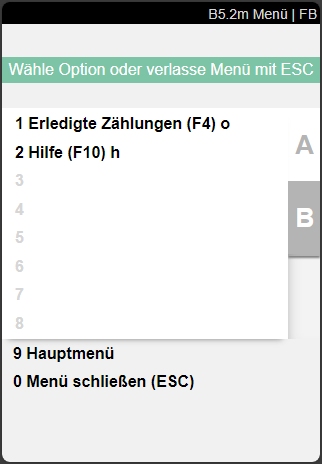
- Finished counts: Shows the finished counts for this cycle count
- help
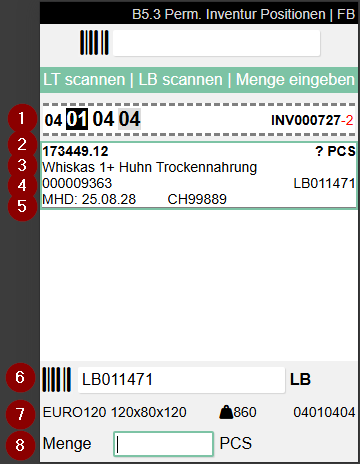
B5.3 Perm. Stocktaking Positions
Either select the items on the screen or scan the inventory to do the stocktaking.
- Storage place and inventory no. + count list no.
- Left: Item number | Right: Unit of measure. No quantity is entered here so that items cannot simply be checked during stocktaking, but must actually be counted.
- Item description
- Left: Load carrier no. | Right: Inventory no.
- Sell-by date, lot no. and serial no.
- Inventory no. entry
- Left: Inventory measure and dimensions | Center: Weight: | Right: Storage place
- Enter quantity here
B5.3m Menu
A:
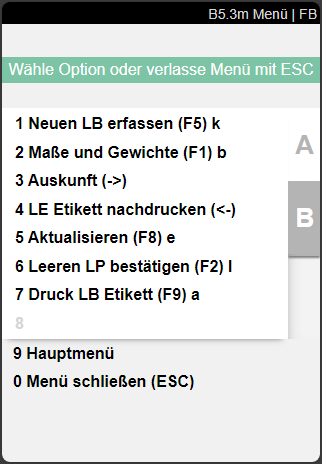
- New item found
- Dimensions and weights
- Information
- Update SU label
- Update
- Confirm empty SP: Confirm empty storage place
- Print Inv Label
B:
- Help
- Picture
B5.4 Perm. Stocktaking Storage Places Finished Counts
This page shows an overview of the count list lines that have already been counted.
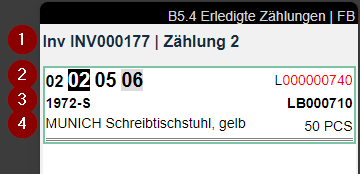
- Inventory no. and Cycle Counting List No.
- Left: Storage Place | Right: Load Carrier No.
- Left: Item No. | Right: Inventory No.
- Left: Item Description | Right: Quantity
B5.4 Menu
- Capture New Inv. (F5) k
- Weights and Measures (F1) b
- Information (->)
- Reprint SU label (<-)
- Refresh(F8) e
- Confirm empty SP (F2) l
- Print Inv Label (F9) a
- Change counted value (F4) o: The user can enter a new value for the inventory that has already been counted.
B5.5 New Inventory
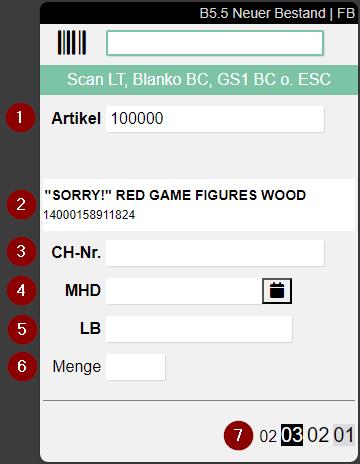
B5.5 is used to enter additional inventories that have arisen during stocktaking.
The following fields are available:
- Item: Scan the item found
- Item scanned
- Lot no.
- Sell-By Date/BBD: Input possible directly or via calendar
- Inv
- Quantity
- Selected storage place
The fields lot no., BBD and Inv are only shown if they are set as mandatory fields for this item.If the item has variants, the corresponding field will appear. You must enter a variant here.
Here you can scan several types of codes:
- Item No.
- GTIN
- GS1 Barcodes
- Blanco Barcodes to create new Load Carriers
- Existing Load Carrier Barcodes
For more information on adding stock, see Add new inventory during a stocktaking.
B5.5 Menu

- 5.5 Close (Esc)
- Weights and Measures (F1)
- Information
- Print LC label (F9)
- Finished Counts (F4) o
- Transfer (F2)
- Internal transports
C
C1 Production Take Out
This process is used to process quantities from the warehouse for production. Here, the employee can see which move jobs are released for processing, select move jobs, and edit them.
Hinweis
Move jobs of type Transport to Production, which are created in C1, automatically receive a team assignment based on the parameters maintained in the SIEVERS WMS Teams (location, warehouse, storage area, type, move job type filter). The parameters refer to the destination of the move job. If no matching team can be determined, the assignment remains empty. These move jobs are displayed in a separate stack in the role center.
C1.1 Overview Take Out
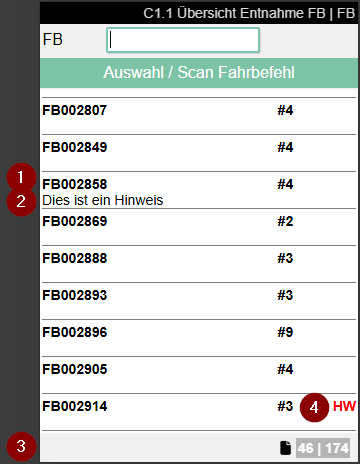
This page shows the current move jobs released for processing with the type Production supply.
- Left: Move job number | Right: Number of move order lines | Far right: Priority. Only the priorities High and Low are shown.
- Left: Comment text
- Shows the current workload. Left number: Move job headers that contain lines that are being processed with the current team. Right number: Move job lines that are to be processed with the current team.
- Employee marking from the move job
Selecting or entering a move job opens C1.2. Scan a move job barcode in the field above or enter a number to filter the list.
C1.2 Take Out Positions Overview
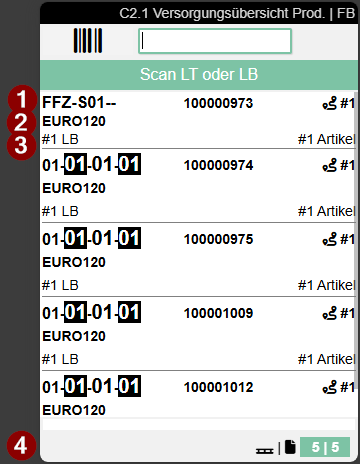
Here, warehouse staff can find out how many and which move order lines the selected move order contains and process them one after the other. To do this, a load carrier (always a SU) is first scanned and then the positions are moved.
If a load carrier is already on the forklift when this page is accessed, the user receives a warning message indicating this fact. This prevents accidental packing into the wrong SU. If a PTU or SSCC is on the forklift, it must be removed.
If the pick up was successful, the load carrier can be moved to the destination. Press F8 to open menu item 7 TU park. The destination is shown here.
Alternatively, when all positions have been processed, the storage place can be scanned directly in the "Take Out Positions Overview" screen to park the load carrier.
Hinweis
If the load carrier is not parked at the destination shown, a move order is automatically generated for that destination.
- Left: Move order number | Right: Priority (High or Low only)
- Comment text from move order header
- SU number
- Left: Storage place of the position | Right: Item number
- Left: Lot no. if required | Right: Quantity
- Left: Item description and variant | Right: Employee marking
- Left: Shows whether it is a full pallet | Right: Left number: Number of different load carriers in the selected move job for the selected team. Right number: Number of move job lines in the selected move job for the selected team
Hinweis
Removing the quantity remaining on a pallet and transferring it as a load carrier is not currently supported.
Hinweis
If the field Take out pos. cum. per LC & item is enabled in the SIEVERS WMS Setup, the display in C1.2 changes: All move job lines with identical storage place, item, lot, variant, sell-by date and serial number are consolidated into one line. Selection is then made exclusively by:
- Scan of the carrier number (SU) or
- Manual selection in the list
Direct scan of an inventory item is not possible in this mode.
C1.2 Menü
A
- Order Info (F3) i: Opens the move job info containing the comment text
- Unload TU (F8) e: Opens a page where the user can scan a new storage place for the currently loaded load carrier.
B
- New SU (F5) k: Creates a new carrier (SU) without blank barcode and automatically prints the SU label. This function is only available if the field Allow New SU without Blank Barcode is activated in the SIEVERS WMS Setup. The new SU automatically receives the default inventory measure and the associated standard dimensions.
- Keyboard
C1.3 Take Out Pos. Processing
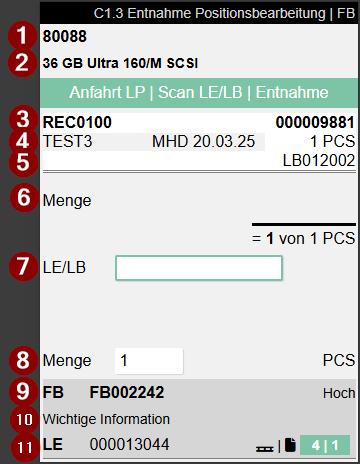
Used to process individual move order positions in production supply. This page is structured almost exactly like A4.3.
Item No.
Item Description
Left: Storage place | Right: SU no.
Left: Lot no. and sell-by date | Right: Number of pieces from the move order line
Reserved inventory number from the move order
The quantity to be picked
Scan the storage unit or inventory here. If there are several inventories on the targeted load carrier, only one inventory can be scanned here
This quantity field is pre-filled or remains empty depending on the field No confirmation of take out qty in PS in the SIEVERS WMS setup.
Left: Move order number | Right: Priority if it is low or high
Comment text
Left: Load carrier number to which is being picked | Right: First number: Number of load carriers in the move job that still need to be processed. Second number: Number of move job lines that are served from the current load carrier. Colors: Green: There is something to do. Gray: There is nothing to do.
As in A4.3, the user scans the targeted load carrier or inventory and then confirms the quantity to be picked. The next position is then shown in C1.3.
Hinweis
If additional carriers are needed spontaneously during production removal, they can be created directly with F5 or via menu item B1 without having to scan a blank barcode. The prerequisite for this is the activated setup field Allow New SU without Blank Barcode.
Hinweis
It is possible to perform an inventory swap. This means that you can take a different inventory from the load carrier. The prerequisite for this is that the inventory characteristics (number of pieces, variant, lot no., sell-by date) match.
If the process needs to be interrupted, the user can stop the load carrier to be picked at any time by pressing F8 or selecting menu A7.
Hinweis
If the field Take out pos. cum. per LC & item is activated in the SIEVERS WMS Setup, C1.3 displays the cumulated total quantity of all consolidated lines. The user enters the total quantity removed. The entered quantity must not exceed the displayed total quantity. After confirming the entry, all associated individual lines are automatically posted as removed and assigned to the selected carrier (SU).
C2 Production Supply
C2 is used to transport the inventory taken from C1 to the production locations.
Menu
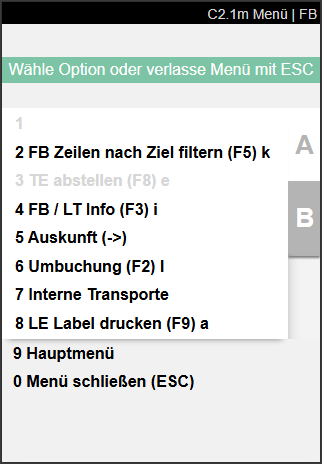
A:
- Filter MJ Lins by target (F5) k: Enables filtering of move job lines by warehouse and storage shelf
- Unload TU (F8) e: Opens a page where the user can scan a new storage place for the currently loaded load carrier.
- MJ / LC Info (F3) i: Opens C2.1i and displays information about the load carrier and move job.
- Information (->): Opens information A7.3 for the currently selected load carrier
- Transfer (F2) l: Opens A3.1 Item transfer overview
- Internal transports: Opens A2.0 Internal transports
- Print SU label (F9) a
B:
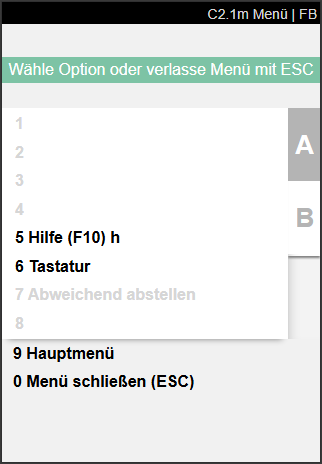
- Help (F10) h
- Keyboard
- Drop alternatively: Allows you to drop off a quantity remaining on a storage place that differs from the original destination. This requires that a partial quantity has already been dropped off at the actual destination.
C2.1 Supply Overview Prod.
After selecting the team, forklift, and printer as usual, C2.1: Supply Overview Production opens. Here, the production supplier can find out what load carriers are available for distribution to the destinations in production. All load carriers with the type SU that are listed in a move order with the type Supply Production and are to be taken to their destination are shown here. The setup of the teams and sorting by storage place and route optimization are taken into account.
Select a load carrier by scanning or manual selection and pick it up with the forklift.
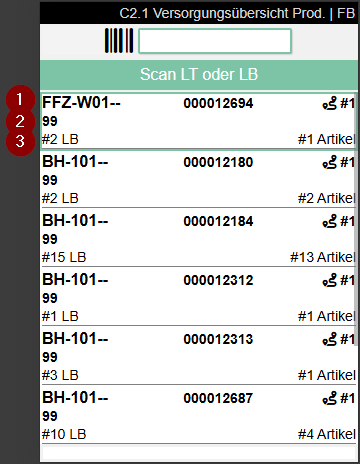
- Left: Current storage place of the load carrier | Center: Load carrier no. | Right: Destination symbol with number of different destinations
- Left: Inventory measure code
- Left: Number of inventories in stock | Right: Number of items
- Left: Pallet symbol with number of all load carriers that need to be brought to production | Right: Document symbol with number of all move job lines that need to be distributed. For numbers over 999, the value is rounded to the first decimal place and a "k" is appended (e.g. 1999 = 1.9k). Gray = work available, Green = no more open tasks. The numbers are automatically reduced when move job lines are confirmed
C2.1i C Info
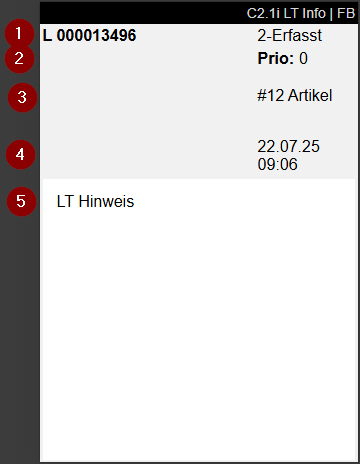
- Left: Load carrier number | Right: Load carrier status
- Priority
- Number of different items
- Time the move job was created
- Comment text load carrier
C2.2 Production Supply Proc.
After a load carrier has been recorded in C2.1 via scan or manual selection, this page is displayed. The inventory of the load carrier is now shown and where it is to be taken.
Hinweis
Picked up load carriers are still shown on C2.1 so that they can be edited if the mobile device fails.
Scan an inventory and then the destination storage place. You can also scan the destination storage place directly. If there is only one possible inventory, you can then confirm the storage place and complete the move order. If there are several matching move order lines, the desired line must be selected via item or inventory scan or manually.
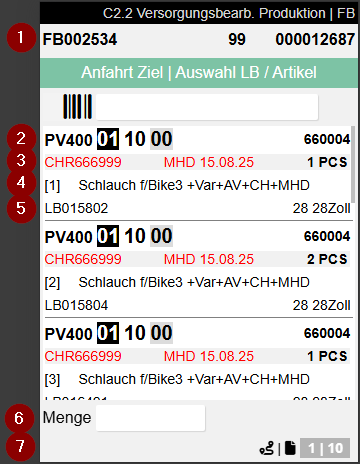
- Left: Move order number | Center: Inventory measure code | Right: Load carrier number
- Left: Destination from the move order line | Right: Item number
- Left: Lot no. | Center: Sell-by date | Right: Quantity and base unit
- Item description
- Left: Inventory number | Right: Variant
- Quantity input field for confirmation
- Shows the current workload
- Left number: Number of different destinations in the move job that are being approached by the team
- Right number: Number of move job lines that are currently still to be processed.
Menü
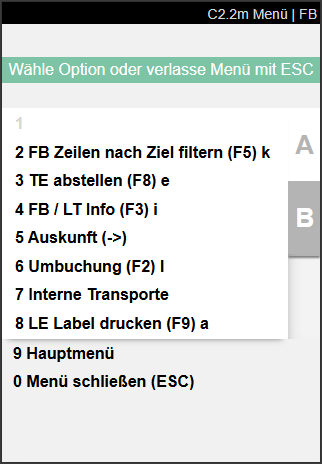
- Filter MJ Lins by target (F5) k: Currently not functional
- Unload TU (F8) e
- MJ / LC Info (F3) i: Currently not functional
- Information (->): Opens A7.3 load carrier information for the currently selected load carrier
- Transfer (F2) l: Opens A3.1 Item transfer overview
- Internal transports: Opens A2.0 Internal transports
- Print SU label (F9) a