Setups
After installation and before starting up the SIEVERS WMS, some setup is required. It is recommended to use the setup menu on the Business Central start page as a guide.

In the following, individual setups are listed again separately, explained and linked to the correct places in the documentation. In this chapter, you will find many sections on setup pages.
- Units: Set up the unit codes and conversion factors for the units of measure
- SIEVERS WMS Setup: The central point for WMS setups. These have an influence on warehousing, outside storage, goods flows, stocktaking and production. All processes in the WMS eventually refer to a setup here
- Warehouse Topology: Topology of storage places and areas
- Warehouse Staff and SNC Mobile User: Assign the system users to the storage locations.
- Number series: Number series in Microsoft Dynamics 365 Business Central are used to uniquely identify documents, master data and processes. They ensure that numbers are assigned consistently and automatically, which means that processes remain structured and traceable.
- Occupancy Matrix: Various combinations of inventory measures and category codes can be stored here.
- Shipping Setup: This page is used to define settings for shipping orders. Recommended if you process larger shipping orders multiple times a day using trucks or similar.
- Packaging Hierarchy: Define packaging units and their relationship to each other
- Inbound Stock Post Strategies: Define rules for placing incoming goods in the warehouse
- Inventory Selection Strategies: Specify rules for finding and selecting items in the warehouse.
- Movement Strategies: Optimise the routes of employees within the warehouse.
- Logistics Teams: Create teams to which certain activities and tasks can be assigned.
- Organise Replenishment: Automatically generates replenishment from reserve locations to picking places, depending on the replenishment strategies set up. Manually generated replenishments can also be created based on replenishment strategies using Check Replenishment.
- Blocked codes: Specify how blocked inventory is to be marked and handled.
- Printers: Define printer stations and their properties. These are important for printing labels or lists such as shipment lists or picking lists.
Structure of the Warehouse
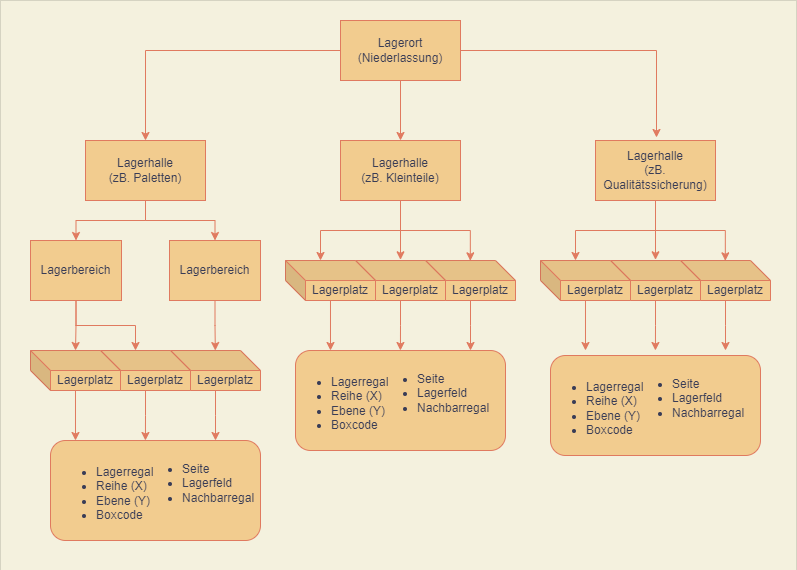
With SIEVERS WMS you can map your physical warehouse in Business Central. The warehouse structure is divided into
The storage places have the properties
- Storage Shelf
- Row
- Level
- Box code
- Side
- Storage bay
- Neighboring Shelf
In principle, you have the option of mapping your warehouse 1:1 in Business Central. However, it can also be useful to carry out thematic separations, for example, as shown in the diagram. Here, for example, 3 warehouses have been created in the SIEVERS WMS location, but they only exist in the software. In reality, the items can actually be stored in a single warehouse, but for process and overview reasons it made more sense to separate them thematically. Talk to your SIEVERS WMS consultant about this.
A location is always at the top. This location can include one or more warehouses. A warehouse always belongs to a storage location. Storage shelves can be placed in a warehouse. A storage shelf is divided into several levels. Each level of a storage shelf consists of individual rows. All the information together then results in the storage place code for one of the storage boxes.
SIEVERS WMS enables the Inbound Stock Post of items in Load Carriers or load carriers. These Load Carriers can be provided with various additional properties, such as height, width, depth, weight, etc. You determine these properties with the inventory measures. The properties are used, among other things, to calculate which load carriers fit into which storage locations. Load carriers have the following central properties:
- State: Describes the current state of a load carrier
- Source: Contains information about the source type and the number of the original document
- Storage place: The storage place where the load carrier is located.
- Type: Defines whether it is a storage unit (SU), a picked load carrier (PTU) or another load carrier. See also load carrier type in the keyword index.
How To Create A Warehouse Topology
- Open Business Central and navigate to the SNCL Warehouse List page.
- Create a new warehouse by clicking the New button. The SNCL Warehouse Card should then open.
- Fill in the fields on the SNCL Warehouse Map. Then click on the button Create Storage Places.
- In this dialogue, you can enter various sizes for the structure of your warehouse shelves. Based on your entries, Business Central will now virtually construct the storage shelves and boxes.
::: Attention The warehouse card contains the two options Visible for Sales and Visible for Production. These must be set if SIEVERS WMS manages your location. If you want to put items into and take them out of the warehouse, you should make sure that the two properties Warehouse Receipt Required and Warehouse Shipment Required are set in the location. :::
Setup Master Storage Places
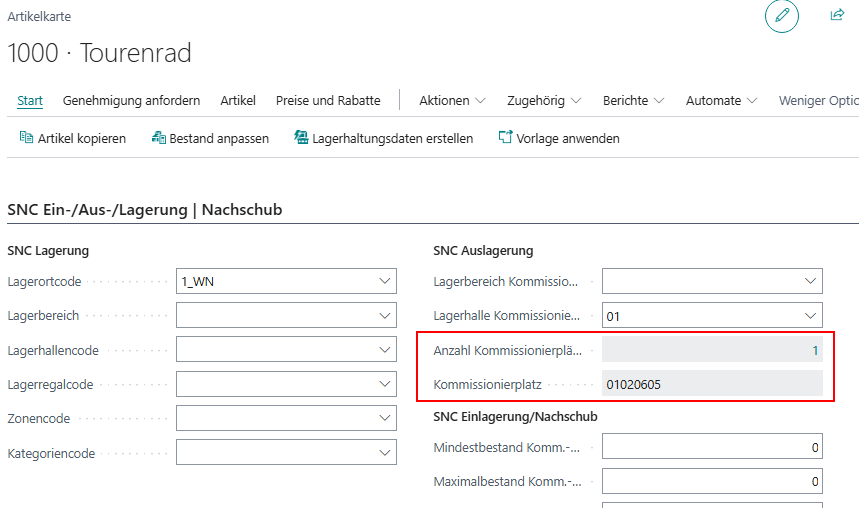
In a simple warehouse with low frequency, it can make sense to assign master storage places to the items. This means that each item has its master storage place, to which the Inbound Stock Post leads and from which picking takes place. If the storage place is full, the space next to it is used. The aim of this system is to avoid chaos and provide employees with a clear overview of the warehouse.
To do this, set up one or more picking places in the Number of Picking Places field in the item card. The field below, Picking Place, always shows the numerically smallest place that was set up in the other list.
Units
Base Unit of Measure List
Use this list to fix the unit codes for the base units of the system. You should have already defined these units of measure in the Units list. The base units of measurement are added to the labels of the corresponding fields and column headings.
Select a base unit type from Volume Unit, Length Unit and Weight Unit and assign a unit of measure code to it.
Unit Conversion List
This list defines the conversion factors of the units. These conversion factors are used in other places such as reports or Load Carriers for conversion. Specify which factor should apply for the conversion from unit 1 to unit 2.
SIEVERS WMS Setup
Menu
Actions
- Import/export setup: These actions allow you to export the settings made in the SIEVERS WMS setup in full and save them separately. These functions are particularly useful for reproducing test environments.
- Update Consolidation No.: When updating to a newer version of SIEVERS WMS, it may be necessary to set consolidation numbers in the warehouse shipments that already have a picking document. Please contact our team before pressing this button.
- Update SBD Defaults: Transfers the content of the Default Residual Term field to the items
- Archive Empty Load Carriers: Archives empty or already delivered Load Carriers. This function is available after the Archive delivered Load Carriers option has been activated.
- Archive Finished Shipping Orders: Transfers finished shipping orders to archived shipping orders
Related
- SWMS Feature Setup
- Open Base Unit of Measure
- Open Unit Conversion
- Open Time Protocol: Opens a log that records changes to the field Allow Correction Postings without WMS.
General
- Reservation method: A method for determining the items to be removed from storage can be specified here. The following three methods are available for selection:
- Inbound Stock Post Date: This method describes the FIFO principle. (First In - First Out)
- Production Date: With this method, the items to be removed from storage are determined on the basis of the earliest production date, which is noted in the Inbound Stock Post document line at the time of Inbound Stock Post.
- Sell by Date: This method is used for the storage of foodstuffs. The item that reaches the sell-by date first is determined for Outbound Stock Post.
- Quality Control: If this option is active, the quality status in the field of the same name on the [Inbound Stock Posts](#sncl-Inbound Stock Post) page must be set to Depot or Block Stock.
- Dissolution of Arrears: If this option is active, Outbound Stock Post documents are also created if the quantity to be shipped is greater than the stock quantity.
- Time to Create Stockdocument: A period can be specified here (e.g. 3D = 3 days) in which the warehouse shipment date of the order must lie for the automatic warehouse document creation to take effect.
- Correction Transf. Qua. to Ship.:
- Sync. Weight in Pack. Hierarchy Entries: Activating this option means that if the gross or net weight of the smallest storage unit in the packaging hierarchy changes, the other entries can be adjusted automatically. Before the change, there is a confirmation prompt. For example, the formula ‘number of pieces of stock ÷ number of pieces of smallest storage unit * gross weight of smallest storage unit = new gross weight of stock’ applies. This formula also applies to the other lines and the net weights. For the smallest storage unit, the following applies: ‘Gross weight of inventory ÷ number of pieces of inventory = new gross weight of smallest storage unit’. This also applies to the net weight.
- Deactivate GTIN sync. with item references: Normally, the GTIN field in the item card and the barcode entry in the item references of an item are synchronized with each other. You can use this option field to disable this behavior.
- Transfer Order Update Shipment Quantity: If this option is active, the quantity to be delivered in the source document of the stock transfer order is adjusted to the quantity in the stock document.
- Set Item Track. from Stock Document: This option ensures that the specific item tracking, for example the serial or lot no. or the sell-by date, is automatically transferred from this stock document to the source document when a stock document is completed. The purpose behind this is to synchronize the SIEVERS WMS stock document and the source document from Dynamics 365 Business Central. If this option is not activated, item tracking numbers must be entered manually in the source document.
- Action Reserv. Inventory in Stocktaking: Reserved inventory cannot be transferred to a stocktaking. Use this field to specify what should happen if an attempt is made to do so. This setup applies to the following functions: Enter Inventories by Item, Enter Inventories by Storage Place and Stocktaking for Selection.
- Automatic Finish Message Stock Documents: This indicator specifies whether Assembly Headers cause the warehouse documents "Inbound Stock Post for the finished part" and " Outbound Stock Post for the components" to be completed automatically when they are posted.
- Allow correction posting without WMS: This option allows the posting of one-sided quantity corrections. This function is only used by the SIEVERS GROUP if there is an error that cannot be corrected in any other way! When this function is activated, corresponding log entries are created. Please do not use this function without prior consultation! After activating this function, the button Set without LVS posting will be visible in the item journal.
- Direct Print: With direct print, all printouts are sent to the printer immediately. The printout is no longer processed by the job queue. This can fix problems with the print order.
Numbering
This section contains the number series of the vouchers.
- Inbound Stock Post Nos.
- Outbound Stock Post Nos.
- Transfer Nos.
- Stocktaking Nos.
- Move order Nos.
- Inventory Nos.
- Collection Nos.
- Picking pallet Nos.
- Load Carrier No.: Please ensure that the number series entered is numeric, has 9 digits and an end number.
- Consolidation No.
- Packaging No.
- Bill of lading Nos: Used for numbering the International Bill of Lading
- Picking Series Nos.
- MOP Batch No.
- Series Distributon Nos.
- Automatic Item Transfer Jnl. Template Name
- Automatic Item Transfer Jnl. Name
Outside stock
- Inbound Stock Post Order Nos.
- Outbound Stock Post Order Nos.
- Service Order Warehouse Nos.
- Posted Inbound Stock Post Order Nos.
- Posted Outbound Stock Post Order Nos.
- Posted Service Order Warehouse Nos.
- Calculate St. Charge per Res.: You can currently ignore this option as it is not functional
- Inbound Stock Post Order Update Shipment Quantity
- Outbound Stock Post Order Update Shipment Quantity
- Enter Inbound Stock Post/Outbound Stock Post/Stocktaking/Transfer/Assembly Charges automatically: If this option is activated, resources are automatically entered during document posting based on the resources stored for the items. In the case of stocktaking, the expenses are automatically entered in the service order warehouse. This applies to full and partial deliveries. There are the same setup fields on the customer and in the documents (Inbound Stock Post order, Outbound Stock Post order, stocktaking, assembly order, stock transfer order). These overwrite the settings made here. Please note that if these settings are activated, the corresponding codes must also be stored in the items concerned.
Load Carrier
- Archive delivered Load Carriers: After activating this option, Load Carriers with status 9 + warehouse shipment number and the associated picking documents, packaging and loading processes with status 9 + warehouse shipment number are archived. If you want to restore an archived Load Carrier, you can do this using the Restore Load Carrier function in the posted Load Carrier card. Archived Load Carriers are displayed together in the Packing list export data. It is recommended to perform the Archive Empty Load Carriers action after activating this option.
- Delete Empty Trans Load Carriers: If this option is active, transport Load Carriers are deleted as soon as they are empty.
- Remove SP from Empty Trans/Load Carrier: Activation means that the assignment to the last storage place is automatically removed after a reusable Load Carrier has been emptied.
- Load Carrier/Transport Load Carrier/New Load Carrier/New Transport Load Carrier Caption: Defines how the respective field is to be named in the system
- Default Storage Place for Reusable LC: Defines the storage place to which reusable load carriers are automatically posted after the warehouse shipment posting. After resetting, the load carriers are available at this storage place for new warehouse processes.
- Determination of Load Carrier Weight
- Determination according to item gross weight * quantity
- Determination according to item net * quantity + inventory measure weight
- Without determination: weight input by weighing only
- Default Inventory Measure Code: This Inventory Measure Code will be used as default suggestion for items which have no Packaging Hierarchy. Also serves as a default for Load Carrier inventory measure codes for newly created PTUs in the picking process and newly created SSCCs in the packaging.
- Drop All Load Carrier - Feature: Specifies the number of load carriers that must be on the forklift for the totals line to be displayed in SNC Mobile form A2. This line can be clicked to drop all load carriers simultaneously. A value of 0 disables the totals line completely.
- Put down load carrier without user confirmation: When the user puts down a load carrier in A2 they normally need to confirm the put down, even if it is just one. If this flag is activated, a forklift driver does not have to confirm the allocation of a load carrier again. This only happens if the forklift driver has picked up just ONE load carrier. If several load carriers have been collected in A2, the confirmation window will still appear.
- Keep Load Carrier Numbers by Transfer: This checkbox is relevant for the warehouse receipt in a transfer. If it is activated, the original Load Carrier number from the other location is adopted and no new Load Carrier is created. In addition, the Load Carrier properties (inventory measure, dimensions, weight) are also transferred.
- Load carrier type PTU retained during conversion: If a full pallet is picked, the SU can be converted directly into an SSCC when doing the picking response by entering all attributes (inventory measure, dimensions, weight). This eliminates the process of converting from SU to PTU and then from PTU to SSCC. If this is not desired, it can be prevented by activating this indicator.
- Inventory swap in a load carrier: This setting enables the swap of inventory within a load carrier. Regardless of whether lot no. or serial numbers are used. Regardless of whether inventory swap is allowed or not allowed in the storage location categories. If a lot no. or serial number is specified in the source document, no exchange is allowed, even if inventory exchange is allowed in this setting, unless it is the same lot. On the MDE, you can see from the instruction field in A4.3 whether inventory exchange is possible. Either a specific inventory or “Scan Inv” is shown here. In the latter case, an inventory exchange is possible. For document-based picking, you can use the function in the picking document lines. If this field is empty or the inventory swap is not allowed, A3.2 is filtered to the specific inventory item for replenishment move jobs. Please note: If this setting is activated, the inventory number is not printed on the picking document. This setup field exists on several pages of the system. The following order of the list is the priority in which a setting applies. Priority 1 overrides all other settings.
- Stockkeeping unit data
- Item card
- Item category
- SIEVERS WMS Setup
- Validation Inventory No. in Picking: Forces the picker to validate the inventory no. by extra scan if there is more than one inventory in a load carrier
- Show GS1-SSCC: If this flag is active, the last 9 digits of the barcode reference type GS1-SSCC will be displayed instead of the 9-digit load carrier code. If the GS1 SSCC is not filled, the load carrier code is still displayed as a fallback. This option applies to MDE pages A7.1, A7.2 and A7.3.
Warehouse Receipt
Warehouse Receipt General
- Correction Purcha Qua. to Ship: If this option is active, the quantity received in the source document of the purchase order/Inbound Stock Post order is adjusted if the quantity in the Inbound Stock Post document is different.
- Create Whs Sip/stock document during order assignment in whse receipt: This setting controls whether a warehouse shipment and a Outbound Stock Post should be automatically created in the warehouse receipt after order assignment. If the setting is deactivated, no PTU and SSCC are produced in the warehouse receipt, but SU are created instead. If it is activated, a Outbound Stock Post matching the warehouse shipment is created. The Outbound Stock Post lines are fully processed in the system, including picking and packaging, so that the warehouse shipment can be posted directly. This setting enables a direct transfer of packages from a warehouse receipt to an assigned warehouse shipment and ensures consistent processes for order assignment.
- Not show Inbound Stock Post Whse. After Create Stock Document: Causes no [Inbound Stock Post form](#sncl-create-Inbound Stock Post) to be shown when creating a warehouse receipt
- Warehouse Receipt Delete Source on Splitting: When a warehouse receipt (WHS Receipt) is posted, the open quantities should be deleted from the WHS Receipt. This means that a new WHS Receipt can be created for the remaining quantities in the event of a new inbound delivery. 1 WHS Receipt = 1 inbound transport. 2 WHS Receipt = 2 inbound transports.
- Completion Warehouse Receipt: Specifies how the warehouse receipt can be completed.
- after commercial check: It is sufficient to release the warehouse receipt in the [warehouse receipt mask](#sncl-goods receipt) in Business Central
- after physical check: The warehouse receipt can only be released after confirmation by an MDE device on the MDE device
- Update Posting Date: When checked, the warehouse receipt posting dates will be always automatically set to the current working date.
- Check Occupancy Matrix in Inbound Stock Post: Option to enable automatic checking and adjustment of the new Inventory measure code based on the occupancy matrix and storage place category.
- Default With Sell-By Date: Specifies whether the sell-by date in the warehouse receipt is a mandatory field, optional or unnecessary.
- Def. Whs Receipt Residual Term: Specifies a sell-by date for each item for which the field is empty
- Reac. SBD Resi. Term Whse Rec.: Specifies what should happen if the sell-by date residual term is exceeded
- Warning: Issues a warning
- Refuse: Rejects the item in principle
- Without Notification: Sell-by date exceeded is ignored
- Use Item Pack Hierarchy for Lot No.: Normally, a load carrier is created for each lot. This setting causes this principle to be ignored and the packaging hierarchy of the items within a lot to be taken into account when the lot is deposited.
- Reaction Lot: Specifies what should happen if lot information is missing
- Warning: Issues a warning
- Refuse: Rejects the item in principle
- Without Notification: Missing lot information is ignored
- Printing Options for Inventory Label: Determines whether and when an inventory label should be printed.
- 0 - No inventory label is ever printed in warehouse receipt and for Inbound Stock Posts based on output journals
- 1 - An inventory label is always printed for each inventory item in the warehouse receipt and for Inbound Stock Posts based on output journals, even if a label is already printed for the storage unit or the load carrier. The printing of Inbound Stock Posts based on output journals depends on the setting Auto Print LC on Output in the production section.
- 2 - An inventory label is only printed if there is more than one inventory on a load carrier.
- Whse. Receipt Subpage Lines: Determines which subpages should be displayed on the Warehouse Receipt page.
- Load Carrier Lines: Enables the allocation of items to load carriers
- Inventory Lines: Enables the detailed allocation of inventories even in the same load carrier
- Load Carrier Lines and Inventory Lines
Whse. Rcpt. Unloading - Mandatory Fields
- No. of packages: Specifies whether the number of packages must be entered in the mobile screen A1.0 New unloading.
- One-Stage Warehouse Receipt: Specifies whether the storage place can be entered in the mobile screen A1.0 New unloading. If this setup is active, the field is grayed out.
- Vend. Shpt. No. = Whs Receipt No.: If this is activated, the warehouse receipt number is used as the vendor shipment note number. The user no longer has to enter the vendor shipment note number manually in the mobile screen A1.0 New unloading.
- Warehouse Receipt Status Released MDE after Unloading: Causes the warehouse receipt to be set directly to 2-Recorded on mobile pages A1.0 and B4.0 as soon as it is created. If the setup is not active, the warehouse receipt remains at status 1-recorded. This setup streamlines the workflow, particularly in warehouse receipt teams without division of labor.
Warehouse Shipment
- Correction Sale Qua. to Ship: If this option is active, the quantity to be shipped in the source document of the order/Outbound Stock Post order is adjusted if the quantity in the Outbound Stock Post order is different.
- Delete Picking Release Automation Protocol after: Specifies if the picking release protocol data will be deleted after this date. Date Expression has to be entered. Reference date is always current system date. For example, if all entries created 10 days before current date should be deleted, "-10D" has to be entered.
- Delete Picking Team Determ. Protocol after: Specifies whether and when entries in the picking team determination protocol should be removed. A date formula must be entered. The current date is used as the basis for calculation. For example, if all entries created 10 days before today's date are to be deleted, “-10T” must be entered.
- Mark Inventories as completely reserved by Outbound Stock Posts: By activating this option, inventories are marked as fully reserved in the event of a complete Outbound Stock Post. As a result, they can no longer be found during an inventory selection. We recommend only activating this function if you have a high number of inventories in stock with a very low number of pieces. Otherwise there could be severe performance losses.
- Not Show Outbound Stock Post Whse. After Create Stock Outbound Stock Post: Causes the Outbound Stock Post page not to be opened automatically after creation.
- Use Whse. Automation by Release Sales Document: Activates automatic warehouse shipment. A warehouse shipment is automatically generated when an outgoing document is released. Please read the corresponding section
- Add to Warehouse Shipment from Source: Allows the user to continue adding lines to the source document after the warehouse shipment has been created and to add these new lines to the existing warehouse shipment with the regular Create Warehouse Shipment. This also works for automatically created warehouse shipments. In the next field, define the number of days before the loading date up to which lines may be added.
- #Days before Load. Date add to Whse. Ship.: Defines how many working days before the first loading day new lines may be added to an existing warehouse shipment. You can also enter a 0 or a negative number here. This means that lines can still be added to the warehouse shipment on the loading date. Please note that this setting is only used for manual warehouse shipments and is irrelevant to Whse. Ship. Automation.
- Set Loading Date to workdate when in past: Causes a loading date in the past to be set to the current date.
- Consolidation by Shipping Address allowed: Allows the By Shipping Address indicator to be set in the source document table of Warehouse Shipment Planning. This indicator allows this order to be picked and packed with other fitting orders.
- Allow picking creation by consolidation no.: If this option is activated, cross-order picking can be summarized by consolidation number and picking team.
- Picks cumulated per load carrier and item: If this setup is activated, the quantities of the picking items in A4.2 are shown summarized by load carrier and item. If the setup is not active, they are shown by inventory number.
- Negative Picking Threshold: Defines the percentage value at which negative picking is suggested. If the demand quantity reaches or exceeds this percentage of the available inventory, a corresponding symbol is displayed in A4.2.
- Pick. Optimization w. Inv. blocked: When an inventory is blocked in mobile picking (A4.3) by entering the quantity 0, the stock Outbound Stock Post lines containing the current item in the current Load Carrier will be cancelled and immediately released afterwards to trigger the inventory determination strategy in order to find an alternative inventory. This is a more optimal option for the workflow than the regular inventory swap, which is used when this option is not enabled, as it does not require any active action on the part of the employee.
- Proposal of the unloading point: When this indicator is activated, orders with the same delivery address are assigned the same unloading place. This basically ensures that orders with different addresses are not inadvertently packed together and reduces the manual maintenance effort.
- Automatically Archive Picking Series: Causes picking series to be archived automatically as soon as the last item has been posted.
- Disable autom. Serial Distribution Creation: Activating this option causes series distributions to no longer be created automatically as soon as a picking series is completed or the first load carrier has been put down at the packaging station via the MDE.
- Disable autom. SSCC label print in Series Distribution: When enabled, SSCC labels in series distribution are not automatically printed as soon as a PTU/SSCC reaches status 7-Packed. Printing must then be triggered manually via the corresponding action.
- Allow manual item selection in series distribution: Enables manual item selection by clicking in the series distribution, without the item having to be validated by scanning the GTIN, item number or inventory no. After clicking on a line, the fields are automatically filled and the user can directly edit the quantity. Attention: This setup should only be activated in warehouses where picking series are formed exclusively with single items and no inventory characteristics need to be considered. With mixed-item series, there is a high risk of picking errors.
- Allow manual document selection in series distribution: In the series distribution, the current order of the just scanned item is normally selected automatically. If the distributor should have freedom of choice in the selection, you can activate this option.
- Default Inventory Measure Serial Distribution: Defines a default inventory measure that is automatically used during serial distribution when new load carriers are created (by scanning a blanco barcode or via "Create Container"). Only inventory measures with the flag "Use as Shipping Unit = True" can be selected. If the field remains empty, no default is set.
- Shipping Advice Rules: Defines what should happen with specific shipping advices. See Shipping Advices Rules
- Defaults Residual Term Whse. Shipment: Defines a default residual term for warehouse shipment items
- Reaction SBD Residual Term Whse. Shipment: Defines what should happen when the residual term of an inventory is exceeded.
- Warning: Issues a warning
- Refuse: Rejects the inventory in principle
- Without Notification: Sell-by date exceeded is ignored
- Post Whse. Ship. after Loading checked: Determines the behavior after Loading Checked has been activated in the shipment process.
- Queries: Displays a query where you can decide individually whether the warehouse shipment should be posted after Loading Checked.
- Always post: Immediately posts the warehouse shipment after Loading Checked. No query.
- Post and print: Same as Always post, but also prints the stored warehouse shipment note
- Never post: Does not post the warehouse shipment after Loading checked. The warehouse shipment must be posted manually
- Min Item Qty. SSCC Pack. Cont: Use this field to determine the number of items in an SSCC that triggers automatic printing of a package content list.
- Printing Options for SSCC Packaging Content List: Specifies how much information the package content list should have.
- 0 = Lines without information on the sub-packaging
- 1 = The PTU no. is shown for the line
- Printing Options for Shipment List: Specifies how much information the shipment list should have.
- 0 = Lines without information on the sub-packaging
- 1 = The PTU no. is shown for the line
- Printing Options for Packlist Exportdata: Specifies how much information the packlist exportdata should have.
- 0 = Lines without information on the sub-packaging
- 1 = The PTU no. is shown for the line
- Whse. Ship. Docum. with GTIN: Specifies the default setting for the field of the same name in the customer card. Activating this setting causes the GTIN to be printed on the Shipment list, SSCC Package content list and Packlist Exportdata. By selecting or deselecting the field, you can decide whether this setting should be applied to all customers. The setting for the customer overrides this setting.
- Edition Whse. Ship. document without loading during "Post and Print:" Specify the delivery note form that should be issued when "Whse. Shipment Post and Print" on Whse. Shipment Planning is selected for a Warehouse Shipment without Loading. If no report is specified, the standard delivery note will be printed.
- Download Delivery Document Without Loading: Indicates whether the expression for Edition Whse. Ship. document without loading during "Post and Print" should be printed on a printer station or if only a file download should occur.
- Edition Whse. Ship. document with loading during "Post and Print:" Specify the delivery note form that should be issued when "Whse. Shipment Post and Print" on Whse. Shipment Planning is selected for a Warehouse Shipment with Loading. If no report is specified, the standard delivery note will be printed.
- Download Delivery Document With Loading: Indicates whether the expression for Edition Whse. Ship. document with loading during "Post and Print" should be printed on a printer station or if only a file download should occur.
- Manual Change Qty. Packed and Flag Packed: Determines whether manual changes to the Packed and Quantity Packed fields on the outbound stock post lines are possible. These manual changes quickly lead to inconsistent data. Therefore, it is hidden by default and set to False. A change to this field creates a corresponding log entry in the Time Protocol.
Stocktaking
- Standard Blocking Code: Defines a standard blocking code which is used to block an inventory if there is an unexpected difference during the count
- Difference Blocking Type: Specifies what is to be blocked if a stock difference is detected. You can choose between the Load Carrier and the storage unit.
- Use Value Difference LCY: If working with threshold values in company currency is activated, the establishment of the 2nd or 3rd count also depends on a value limit. So that further counts for differences, e.g. less than 15€, are not even started. These differences are defined in the field Value Difference LCY
- Aut. Takeover Cycle Counting Lists 1-2: Activates the automatic takeover of a counting lists 1 and 2 to the SNCL Stocktaking when the counting list state reaches the status 4-counted
- Zero Stocktaking Picking: Activates zero stocktaking on the MDE. Storage places emptied during picking must be confirmed or counted directly as empty.
- Confirm inv. by selection (MDE): If this flag is activated, the inventory can be selected manually in the mobile stocktaking process and the inventory do not need to be scanned (B5.3, B3.2).
- Take Blocked Inventory into Account: Normally, blocked inventory cannot be counted. This setup deactivates the check for blocked inventory. If this flag is set, stocktakings for blocked inventory can be created, counted, and posted without restrictions.
::: Attention In warehouses with lots, sell-by dates and serial numbers, the Confirm inv. by selection (MDE) indicator should remain deactivated. :::
Permanent Stocktaking
- Active: Activates all inventory types
- Date Formula: Determines the period after which a count via permanent stocktaking is necessary for a storage place. A time interval to the current date is determined via this date formula. For example, if the storage place has not been counted in the last 3 months, it must be counted. For this purpose, M3 would have to be entered in the field. J1 is equal to 1 year. Stocktakings of the type Inventory Correction are excluded from this rule.
- No. Series / Document No.: Sets the Document no. field in the stocktaking journal
- Jnl. Template Name: Defines the standard journal template name for stocktakings. This is only used internally. Please talk to the SIEVERS Support before you change this
- Jnl. Batch Name: Defines the standard journal batch name for stocktakings. This is only used internally. Please talk to the SIEVERS Support before changing this
- Perm. Stockt. Jnl. Batch No Series: Specifies the no. series for the stocktaking journals, as there may be several stocktakings at the same time.
- {{Quantity Difference}}
- {{Value Difference LCY}}
Internal Movements
- General
- Block Orig. Target Storage Place A2: Causes the original target storage place to be blocked when changing target storage places in A2 using the New Target Storage Place function. A standard blocking code can be entered in the Blocking Code Internal Transport field for this purpose.
- Blocking Code Internal Transport: Determines the standard blocking code for storage places blocked by means of the Block Orig. Target Storage Place A2 setup. If this field is empty, a blocking code is requested from the user for each blocking.
- Inbound Stock Post
- Follow-up move order on Warehouse Receipt Storage Place: Causes a follow-up move order to be generated when a load carrier is placed in a warehouse receipt storage place. If there was already a destination storage place in the previous move order, this is also adopted in the follow-up move order.
- Follow-Up Move Order on Transfer Storage Place: Causes a follow-up move order to be generated when a load carrier is placed in a transfer location. If there was already a destination storage place in the previous move order, this is also adopted in the follow-up move order.
- Replenishment
- Trigger-based Replenishment: Automatically generates Load Carrier or inventory move jobs depending on the defined replenishment strategies
- Post Repl. on existing Inv.: This option allows you to add items to an existing stock number.
Strategies
- Default Inbound Stock Post Strategy Code
- Default Inv. Selection Strategy Code
- Default Replenishment Strategy Code
- Default Picking Strategy Code
- Warehouse Receipt Strategy Code
- Replenishment Strategy Code
- Inv. Sel. Strategy Code Manuf.
Production
If these fields are filled, the corresponding fields on the production order are preassigned. Please note that entries in the item category, item card and stockkeeping unit data take precedence.
- Location Code Production: Defines the storage location at which components are provided and posted for production
- Supply Class Production:
- Empty: Assembly or production are not active.
- Replenishment: The required components are compiled across all orders. Move orders are generated in the system. With this supply class, supply can also be organised without order reservation with quantity specifications on the item. Inventory-based quantity supply on the production areas
- Auto Print LC on Output: If the option is activated, the printing of load carrier labels is automatically triggered when stock placements are posted on the basis of an actual report.
- Create Warehouse and Stock Document on Output: Specifies whether a warehouse shipment and the related stock document are to be generated automatically when the output journal of a production order linked to a sales order is posted. The Outbound Stock Post lines automatically generated by this setup run through the entire picking process within the system. This means that they are no different from manually created lines and no incorrect data is generated. The stock documents are automatically assigned to the sales order. This setup also controls the carrier type during deposit: If it is activated, the manufactured inventory item is deposited on a PTU/SSCC. If it is deactivated, deposit occurs on an SU (Storage Unit).
- Scrap Code Necessary: Specifies that a scrap code must be entered when specifying a scrap quantity during output posting and finishing a product.
- Auto. Creation of Outbound Stock Post lines During Order Assignment: This indicator controls the automatic creation of stock documents for output journals. This field can only be activated if Create Warehouse and Stock Document on Output is activated.
- For all lines: When an output journal is created for a production order, Outbound Stock Post lines are created or updated for all items in the related goods issue.
- Only for affected lines: Only the line belonging to the output journal is processed in the warehouse shipment; all other stock documents remain unaffected.
- No attachment: Only the warehouse shipment is created. Outbound Stock Post is performed manually or at a later time, if necessary.
- Quantity determination Basis Manuf.: Defines the basis on which the quantities for production are determined
- Only according to quantity specifications for the item: The quantity specifications can be found in the SNC assembly & Manuf. Supply area on the item card
- Only Item Quantity Specifications: Replenishment determined exclusively on the basis of the quantity specifications for the item.
- Only Requirements from Production Orders: Replenishment determination exclusively on the basis of reservations through production orders
- Production Orders and Item Quantity Specification: Replenishments are created based on the item master data plus the reserved quantities from the production orders. The setups for the item fields Maximum Inventory Production PLace and Step Size Production are particularly relevant here. The replenishment quantity from items and production orders is cumulated in a move order.
- Replenishment Move Job Manuf. per Target: If the option is enabled, a replenishment move order is created for each storage area in production
- Output Journal Template
- Consumption Journal Template
- Provision of Components: Defines the storage parts in which the components required for production are provided
- Storage Place Components
- Provisioning Strategy Code Manuf.: This strategy determines the target location for all required input materials per production order.
- Replenishment Strategy Code Components: This strategy determines the replenishment for all required input materials per production order.
- Inv. Selection Strategy Code Components: Determines the inventory selection for all required input materials per production order
- Output of finished Products: Specifies where the finished products should be taken to
- {{Storage Place Code Finished Products}} Is being filtered on the selected Location Code Production
- Inbound Stock Post Strategy Code Manuf.: Defines the target storage place for the finished product. Must always be filled for the output journal.
- Take Out / Supply Production:
- No confirmation of take out qty in PS: Causes an employee in C1.3 Pick Item Processing to no longer have to validate the quantity after scanning the inventory or load carrier if the planned picking quantity is equal to the inventory quantity.
- Manual selection of LC in prod. supply allowed: Allows manual selection of a load carrier in C2.1 via touchscreen or cursor and enter. If the flag is deactivated, the load carrier must be scanned
- Manual selection of Pos. in prod. supply allowed: Allows manual selection of a position in C2.2 via touchscreen or cursor and enter. If the flag is deactivated, the position must be scanned
- Without quantity confirm. in prod. supply: If this option is enabled, the user does not have to confirm the quantity in C2.2 Supply processing production. This speeds up the process of processing move jobs. If you want the quantity to be confirmed during move job line processing, you should not activate this option.
- Take out pos. cum. per LC & item: Activating this setup causes move job lines with identical parameters (storage place, item, lot, variant, sell-by date and serial number) to be displayed cumulatively on mobile pages C1.2 and C1.3. This reduces scanning effort, simplifies operation and minimizes operating errors.
- Allow New SU without Blank Barcode: If activated, a new carrier (SU) can be created directly in the Prod. Removal (C1.2 & C1.3) without using a blank barcode. For this purpose, the menu item B1 New L5 (F5) is activated. This accelerates the removal process when additional carriers are needed spontaneously.
Import and Export Setup
These functions in the SIEVERS WMS Setup enable the manual export and import of all setup tables in the SIEVERS WMS system. You can manually select which tables you want to export. Please make sure that the selection of tables makes sense. For example, you should not export table lines without a table header. There is no check for dependencies during the export! When importing a setup file, you can also select which tables you want to import. Only the tables that are actually contained in the file are shown. There are two checks during the import:
- Dependencies: Tables are checked for dependencies on other tables. If you try to import a table whose associated tables are missing, an error occurs.
- Data validation: The program checks whether the imported data is valid. For example, if you try to import a report whose report ID is not otherwise contained in the system, the report will not be imported. If a storage place has a blocking code that is not defined as such, it will be discarded at the storage place. This ensures that less inconsistent data is imported.
::: Attention This function is only suitable for setting up test systems or a minimal initial setup. Please do not use this function for your production system! :::
SWMS Feature Setup
Enables switching certain WMS features on and off.
Hinweis
After changes to the feature setup, the client must be restarted for the changes to take effect.
- Series Order Picking: Controls the visibility of all SOP-relevant fields, actions, and pages. Series order picking is only possible when this option is activated.
- Multi Order Picking: Controls the visibility of all MOP-relevant fields, actions, and pages (e.g., MOP Monitor, MOP batch creation strategies). Multi order picking is only possible when this option is activated.
- Item Variant: Controls the display of item variants system-wide. Relevant for warehouses with variant management (e.g., sizes, colors).
- Sell-by Date: Controls the display of sell-by date fields system-wide. Relevant for warehouses with food or perishable goods.
- Lot: Controls the display of lot number fields system-wide. Relevant for warehouses with lot-tracked items.
- Serial Number: Controls the display of serial number fields system-wide. Relevant for warehouses with serial number-tracked items.
Hinweis
The tracking features (item variant, sell-by date, lot number, serial number) can be activated independently of each other. They each affect over 20 central areas in the system, including:
- Warehouse shipment and picking
- Inventories and load carriers
- Series distribution and packaging
- Stocktaking and move jobs
- Inbound and outbound wstock posts as well as warehouse receipt
- Outside storage orders
Item
Many setup fields have been added to the item card of the Business Central standard.
- GTIN: Please note that the GTIN is automatically changed as soon as the base unit of the item is entered in the item reference items. In this case, the reference number is entered as the GTIN. If you delete the GTIN from this field, the corresponding entry in the item references will also be deleted.
Item Tracking
- Item Tracking Code: If you set an Item Tracking Code in the Item Card, the option Lot No. necessary in the SNC Classifications will be automatically set to true. If item tracking with expiration calculation is used, the With sell-by date option is automatically set to Mandatory field.
SNC Storage/Removal/Storage | Replenishment
SNC Storage
- Location code
- {{Storage Area}}
- Warehouse code
- {{Storage Shelf Code}}
- {{Zone code}}
- Category code
SNC Outbound Stock Post
- Storage area Picking
- Warehouse Picking
- Number of picking places: Shows the number of picking places assigned to this item. By clicking on the number, the places themselves are displayed and can also be managed. This field is not filled until the item has been assigned to a storage location and then updated with F5.
- Picking place
SNC Inbound Stock Posts/Supplies
- Minimum inventory pick place
- Maximum inventory pick place
- Minimum replenishment quantity pick place
- Step Size Replenishment: With this field you can gradually increase the replenishment amount based on the demand. For example if the demand for replenishment is 3 and the step size = 10, then the replenishment quantity is 10. If the demand is 11 pieces, the replenishment quantity is 20. This ensures replenishment at the appropriate level of the sub-packaging unit (e.g. carton-by-carton replenishment). Please make sure that the step size is always below the maximum inventory pick place.
- Number of inventory items for replenishment
Transactions Replenishment
- Number of Inventories in Picking Area: Calculated field that counts the number of inventories located in picking areas (places, areas, halls, etc.).
- Number of Pieces in Picking Area: Calculated field that counts the sum of the items located in picking areas (places, areas, halls, etc.).
- Quantity in Inbound Stock Post Picking Area: Calculated field showing the total of the items that are in open move orders with a picking area as their destination
- Quantity in Reservation Picking Area: Calculated field showing the total of the items that are in picking areas in reservations
SNC Strategies and Movement Data
SNC Strategies
- {{Inbound Stock Post strategy}}
- {{Replenishment Strategy}}
- {{Inventory Selection Strategy}}
- Reservation method
SNC Transactions
- Load Carrier code
- Number of inventories in stock
- Stock number of units
SNC Classification and Units
SNC Classifications
- {{Size range}}
- {{ABC code}}
- A/B/C fix: If this indicator is set, the ABC code is not reset when analyzing is not reset
- With sell-by date: This field is used to determine what role the sell-by date plays for this item. If this item is activated for item tracking with an sell-by date, this field is automatically set to mandatory. In this case, the sell-by date is also written to the item entries after posting in addition to the stock entries and inventories. If item tracking is switched off, the sell-by date is not written to the item entries.
- Optional: The sell-by date can be entered optionally
- Without sell-by date: The sell-by date cannot be recorded
- Mandatory field: The sell-by date must be recorded
- Residual Term Whse. Receipt: Date formula. Calculates the sell-by date. In the SIEVERS WMS setup, the Reac. SBD Resi. Term Whse Rec. field is used to determine what happens if the remaining sell-by date is exceeded
- Residual Term Whse. Shipment: Calculates the sell-by date. In the SIEVERS WMS setup, the Reac. SBD Resi. Term Whse. Ship. field is used to determine what happens if the remaining sell-by date is exceeded
- Lot no. necessary: Specifies whether a lot no. must be assigned for the item. This option causes all WMS documents with this item to require a lot no.
- Serial no. necessary: Specifies whether a serial no. must be assigned to the item
- Empties no.: If empties are used, you can enter the corresponding number here
- Empties: Specifies whether this item is an empties item. See Empties management
- Blocking code: A reason for blocking an item can be entered here
- Inventory Swap in a Load Carrier: Enables the swap of inventory within a load carrier. Please read the description in the SIEVERS WMS setup
- Merge Inventories with same Characteristics: If this setting is enabled, the system checks during inbound stock posting to an existing load carrier whether an inventory with the same item (No., Variant, Lot, Sell-by Date) already exists. If so, the quantity is added to the existing inventory. This setting overrides the item category and the SWMS setup.
Units
- {{PU Unit of Measure}}
- Subpackaging Unit (SPU): Defines the standard subpackaging unit for this item. The subpackaging unit specifies the unit in which the inventory is placed on a load carrier. If this unit is not set, the picker must enter the quantities to be picked independently. The sub-packaging unit must exist in the packaging hierarchy before it can be selected here.
Size range
The size range can be used to assign a property to items that enables filtering in the SIEVERS WMS Teams. For example, items that must be picked up with a specific forklift can be marked.
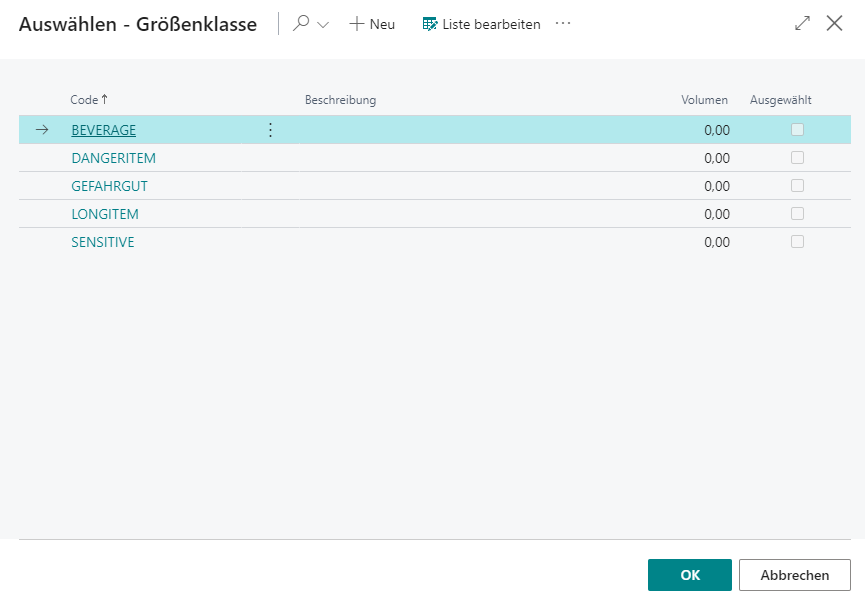
- Code
- Description of
- Volume
- Selected
SNC Packaging Hierarchy
This table is intended to describe the packaging structure of the item. It has three key functions:
- Storage of inventory measures and dimensions of the smallest unit of measure
- Assignment of inventory measures to utilization
- Calculation of weight incl. packaging material in warehouse receipt
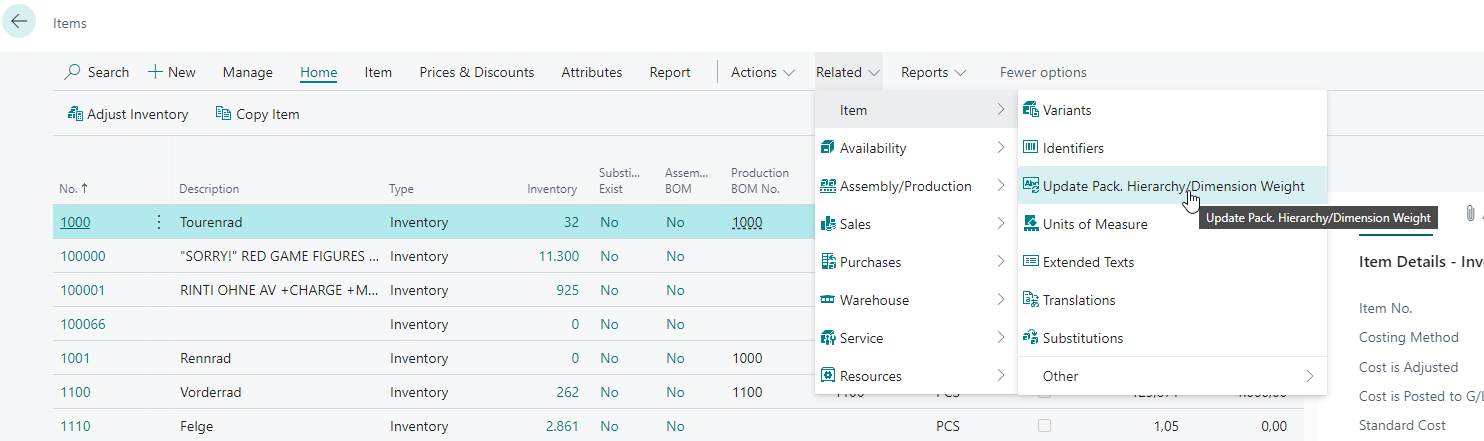
Hinweis
The weight of the smallest unit can also be generated automatically and synchronized with the weight of the smallest unit of measure of the item. Start the automatic synchronization by selecting Associated -> Items -> Update packaging hierarchy / dimension weight in the item list.
It is possible to set several sub-packaging units per item in the packaging hierarchy. A unique inventory unit of measure must be selected for each sub-packaging.
Please note the following information about synchronizing item units and packaging hierarchies:
- Item units can no longer be deleted once they are being used in the packaging hierarchy
- If the number of pieces per unit is changed in the item units, the field with the same name in the packaging hierarchy is updated
- If entries are deleted in the packaging hierarchy, these entries are also deleted in the item units
- If an item unit is created, it is not automatically entered in the packaging hierarchy
It contains the following information:
- Item no.
- Entry No.: Consecutive number
- {{Inventory Measure Code}}
- Number of pieces per unit: Specifies the number of items in this packaging unit. The field must be greater than 0. Entries with quantity 0 are rejected when leaving the line.
- Utilization: Each utilization with the exception of the information can only be used once per item
- Load carrier creation: If this utilization is selected, the data is transferred to new load carriers when they are created. If there is no entry with this utilization, the Default inventory measure from the WMS setup is used when creating new load carriers.
- Inventory creation: This data is transferred when inventory items are created
- Information: Only serves as information, no function
- Sub-packaging unit (SPU): Utilized in the Packaging process and Picking document reports to determine the remaining quantity
- Creation Transport Load Carrier system (SPU): Transport Load Carrier Creation Template
- Smallest storage unit: Defines the smallest possible storage unit
- Depth
- Width
- Height
- Gross weight
- Net weight
- GTIN
- GTIN relevant
The units of measurement from the base unit of measure list are also used for the respective dimensions and weights.
Hinweis
If Serial no. necessary is activated in the item area, the number of pieces per unit is automatically set to 1 when Inventory creation is utilized. If there is no such row in the packaging hierarchy table at the time the serial number requirement is activated, it will be created automatically.
If you create a row with the utilization carrier creation, an inventory creation row with the same number of pieces per unit of measure is automatically created.
SNC Assembly & Manufacturing supply
- Location Code Production
- Supply Class Production
- Providing production
- Number of Production Places Production
- Production Place
- Provisioning Strategy Code Components
- Replenishment Strategy Code Components: indicates the replenishment strategy to be used for production replenishments.
- Inv. Selection Strategy Code Components: indicates the inventory selection strategy to be used for production
- Output Finished Product
- Inbound Stock Post Strategy Code Finished Products
- {{Storage Place Code Finished Products}}
- Production Quantity Specifications
- {{Minimum Inventory Production Place}}
- {{Maximum Inventory Production Place}}
- {{Step Size Production}}
- {{Minimum Replenishment Quantity Production}}
- Transactions Production: Provides current statistics for the item in production
- Number of Inventories in Production
- Number of Pieces in Production
- Quantity in Inbound Stock Post Production
- Quantity in Reservation Procution
SNC Stock Account
- Inbound Stock Post Customer No.: If you enter a customer here, this item is henceforth declared as an outside storage item and can only be used as such
- Outbound Stock Post Customer No.: If you enter a customer here, this item is henceforth declared as an outside storage item and can only be used as such
- Inbound Stock Post Customer item no.
- Outbound Stock Post Customer item no.
- Storage charges code
- {{Inbound Stock Post code}}
- {{Outbound Stock Post code}}
- Picking charges code
- Stocktaking Charges Code
- Insurance value
- Insurance size of calculation
- Insurance factor of calculation
- Number of assortments
- Production Item: Indicates whether the outside storage item may be used for production orders. Can only be activated if the item is marked as an outside storage item. When activated, the costing method is automatically set to "Standard", the unit cost (fix) is set to 0, and "Inventory Value Zero" is deactivated. These fields can then no longer be changed. Deactivation is only possible as long as no item entries or value entries exist for this item.
Dangerous Goods
- UN No.
- Classification Code: Specifies the Classification Code. The Classification Code characterizes the hazardous properties of a substance or object.
- Packaging Group: Specifies the Packaging Group. A packaging group combines dangerous goods of one hazard level. Substances with similar hazardous properties are assigned to a specific packing group.
- Packaging Code: Specifies the Packaging Code. This serves to differentiate packaging more precisely beyond the packaging group.
- Description
- n.a.g-Text: Specifies the n.a.g. text. This is used to designate dangerous goods not otherwise specified by name.
- Weight/Volume: Specifies the volume or weight. The unit is specified in the Unit of Mass field.
- Unit of Mass: Specifies which unit applies to the Weight/Volume field.
- Harzardous to Environment: Declares the substance as hazardous to the environment.
- Exemption
- Comment
- Net Explosive Mass
Customer
This area describes the individual setups relating to the customer.
SIEVERS WMS
- {{Inbound Stock Post Code}}
- {{Outbound Stock Post Code}}
Over-Receipt Code
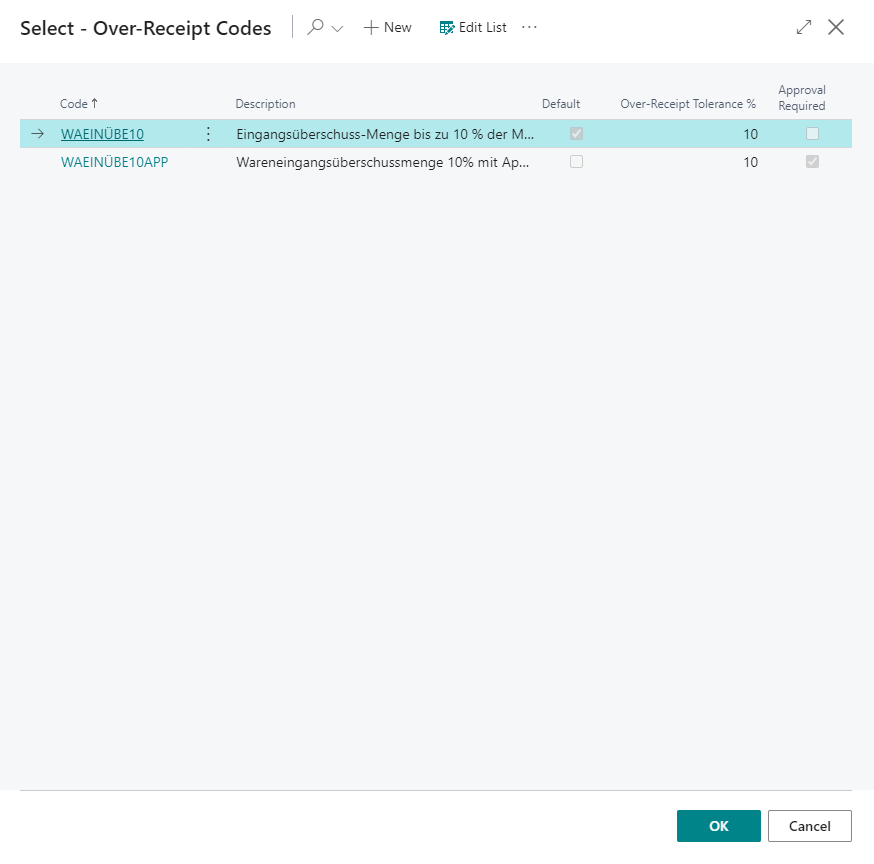
This setup is used to generate Over-Receipt codes that can be stored with the customer and in Inbound Stock Post orders. Over-Receipt codes are used to correctly process excess warehouse receipts that have not been ordered.
The setup contains the following fields:
- Code
- Code Description
- Default: Defines whether this code is used as the default
- Over-Receipt Tolerance %: Defines how much percentage overage there may be
- Approval required: Specifies whether Over-Receipt items with this Over-Receipt code must first be approved
If the Over-Receipt tolerance is exceeded in a document, an error message is displayed and the document cannot be posted.
Occupancy Matrix
The relationship between the inventory measure and the storage place category is established using the occupancy matrix. In the No. of spaces field, the no. of storage places stored in the storage place category is entered for the maximum capacity of inventory. The specified no. of storage places can be exceeded by activating the Multiple occupancy possible field.
- {{Inventory Measure Code}}
- Category code
- Number of Spaces
- Multiple Occupancy Possible
SNCL Categories
The storage place category is used to specify the type of storage place. In addition, properties such as height, width, depth, volume and weight can be specified for the respective category. These are required for storage place selection. The max. capacity of inventory is specified in the no. of storage places field.
Changes to a category (e.g. no. of places, height, width, depth, volume) are automatically passed on to all storage places that use this category. A manual storage place update is not required.
- Code
- Description
- No. of Places
- Space Code
- Dynamic No. of Storage Spaces
- Bulk Category
- Height
- Width
- Depth
- Volume
- Weight
- Swap Inventory Allowed
- Unlimited Capacity: If this flag is activated, a storage place with this category will never be marked with the occupancy "Full", regardless of the entered no. of places. The storage place update will not be performed for these places. A typical use case is function places such as warehouse receipt locations, which should never be considered "full". The storage place selection from the strategies continues to work.
Hinweis
If the No. of Places of a category is reduced, the system checks whether storage places with this category already have more places occupied than the new No. of Ülaces allows. In this case, a warning message appears. The change can still be made, however you should check the affected storage places afterwards.
Variants
Item variants allow you to further subdivide individual items. It has no effect on the item itself, but is merely a type of category. For example, you could store different sizes or colors for the item Rim as a variant.
The variant occurs in many places in the system: primarily on orders or inventory. The setup is done on the item in the menu under Related -> Item -> Variants.
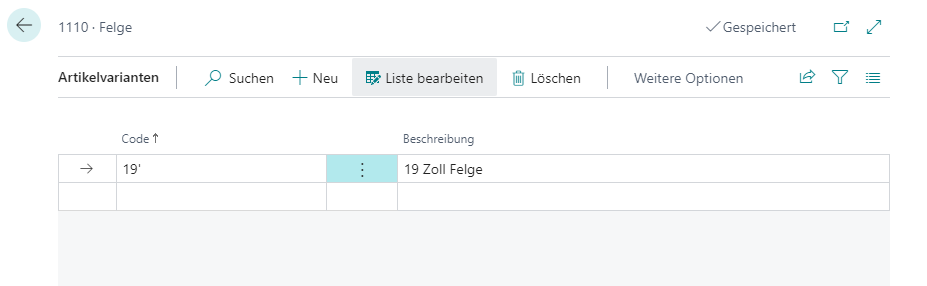
The visibility of item variants can be centrally controlled via the SWMS Feature Setup. Warehouses that do not use variant management can deactivate the feature and thereby receive a clearer user interface without variant fields.
Strategies
Inbound Stock Post strategies
Inbound Stock Post strategies serve the purpose of optimally controlling the process of Inbound Stock Posts in the warehouse. A Inbound Stock Post strategy should always be customized to the concept and tasks of the warehouse.
In the SIEVERS WMS setup, the corresponding strategy is stored in the "Strategies" tab, if one has already been created. Further setup options can be found on the item, in the item groups and in the stockkeeping units. When the item is deposited, the system checks the setups in the following order:
- Load Carrier
- Stockkeeping units
- Item
- Item group
- SIEVERS WMS setup
The order of the checks is basically the priority list of the setups. The setup for which entries were found first is always used.
A strategy consists of these parts:
- General options
- Inclusion/exclusion
- Strategy lines
The general options and the upper inclusion/exclusion options apply to the entire Inbound Stock Post strategy. The lines of the strategy are processed in sequence until the filter settings match the Inbound Stock Post. If the Inbound Stock Post can already be carried out with the first strategy line, the remaining lines are ignored.
General
- Code
- Description
- Use storage Load Carrier: Specifies that Load Carriers must be utilized
- Show Inbound Stock Post page: Specifies that the Inbound Stock Post page is shown before the Inbound Stock Post. This enables manual adjustment of the Inbound Stock Post. This is particularly useful for outside storage, as Inbound Stock Posts are used here anyway
- Check height, width, depth, volume, weight: Matches the dimensions and maximum weight of the storage places with the properties of the items to be put away, so that no items that are too large or heavy are posted to storage places that are too small
- Check Number of Spaces: Checks whether there are still enough free places in storage places for the new inventories
- Post on existing inventory: If this setup is active, the system checks whether an inventory with suitable parameters (item, serial no., lot no., etc.) already exists in the warehouse. If this is the case, the system assigns the already existing order no. as the new order no.. No new LB no. is created.
- Include/Exclude areas/warehouses/storage shelves/rows/levels: The setups listed here allow you to include or exclude certain storage areas. You can select whether you want to include or exclude the storage area.
Lines
Detailed setups are made in the Inbound Stock Post strategy lines. Any number of strategies can be stored here. When the items are deposited, these strategies are processed in sequence. If no storage place is found via the first line, the setup of the second line is checked and so on. The corresponding fields are explained in more detail in the following section.
- Description: A strategy name for the corresponding strategy line is stored in this field
- Deactivated: If this box is checked, this Inbound Stock Post strategy line is deactivated and will be skipped
- Belongs to Stock Document Type: Specifies for which Stock Document Type this strategy line should apply
- Include / Exclude list | Areas / Warehouses / Storage Shelves / Rows / Levels: The setups listed here allow you to include or exclude certain parts of the warehouse. In each case, you can select whether the Inbound Stock Post is to take place including or exclusively in this part of the warehouse.
- Search without grouping: Specifies whether the storage pallet is determined grouped by warehouse and Storage Shelf.
- Allocation order: Specifies the sort order in which the storage places are to be searched
- level-row sorts by level first, so the rows of a level are run through first
- Row level sorts by row first, so the levels of a row are searched first
- Code sorted by storage place code, i.e. it is run through in the order of the storage place codes
- Road optimization sorted according to the stored path optimization
- Volume path optimization ascending: Sorted according to the stored path optimization with the aim of finding the smallest possible places where the items physically fit best. Please note that the following setups are ignored after activating this allocation sequence: Consider proximity to picking place, grouping
- Volume code
- Applies to:
- Full pallets and opening
- Opening only
- Full pallets only
- On pick location
- To reserve location
- To picking place: Specifies whether to putaway to a picking place or a normal storage place. With the default setting, the system ignores this indicator. If the Chaotic picking location setting is selected, the storage locations in the Picking storage locations table are not used, but all storage locations with the storage type "Pick location" are considered to be picking locations and are taken into account.
- Consider min/max inventory: Specifies whether the inventory of the picking place should be taken into account
- Consider min/max replenishment quantity: Specifies whether the replenishment quantity should be taken into account when finding a picking place. If the number of pieces to be stored is too low, the picking place is not suggested as the destination.
- Splitting line for picking place allowed: If a picking place needs to be replenished but only requires part of the quantity of the actual warehouse document line, this indicator allows the system to split the warehouse document line. The original line is stored in the picking place, the second line receives the quantity remaining to be put away in another storage place.
- Fixed storage place: If parameters (storage area, warehouse, shelf, ...) are specified by the item, but no storage place can be found within these parameters, this field indicates whether the filters may be deleted or whether the parameters are fixed.
- Fixed zone: If this option is activated, items are only stored in the zone defined in the master data. If this zone is not available, items are stored in storage places without a zone.
- Next to Pick Place: The closest storage place to the picking place is found. This function can only be used with fixed picking places. This function cannot be used if volume route optimization has been set in the allocation sequence
- Find same item: The item is only stored in an inventory in which the same item already exists. If the item does not yet exist in the warehouse, no storage place is allocated
- Storage place Occupancy: Specifies how the storage place assignment is to be filtered. There are:
- Free storage places
- Exclude full storage places
- Consider available space codes
- Consider available space codes and exclude full storage places
- Ignore A / B / C code: The A/B/C code is not taken into account when selecting the storage place in the Inbound Stock Post. The system posts the item to the storage place, regardless of the A/B/C code of the place and the item.
- To Bulk Place: Specifies whether the destination may or must be a block bin.
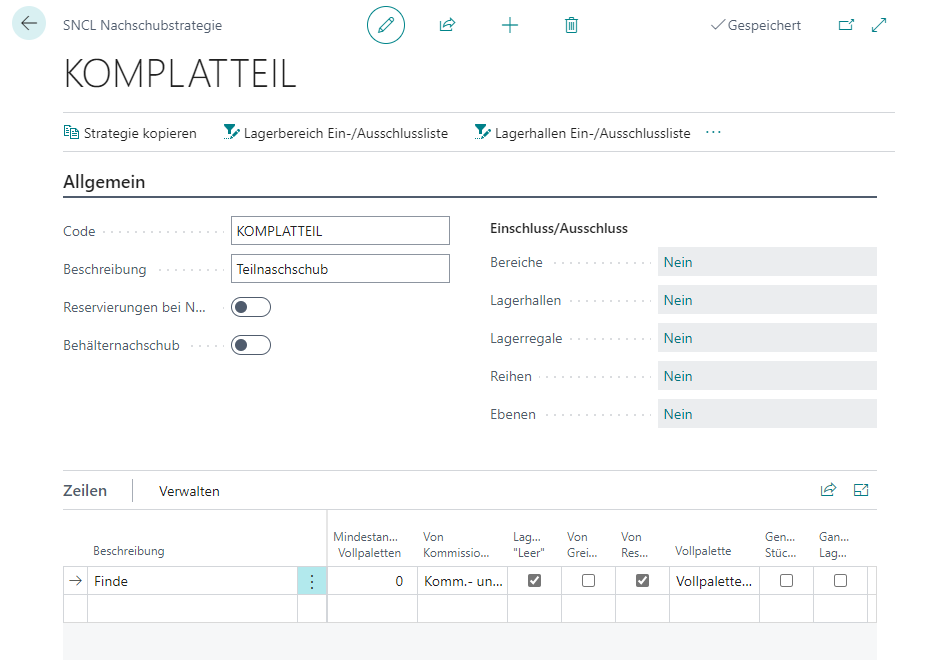
Replenishment Strategies
Replenishment strategies are used to setup replenishment at picking places. The aim is to find an inventory for replenishment.
The strategy can be stored on the item and in the warehousing data, which specifies it as the standard strategy. If no code is stored for the item, no replenishment is created for it.
Hinweis
Please note that there are further replenishment setup fields in the item card and in the warehousing data card that are not covered by the replenishment strategy.
To execute the replenishment strategy, either run Check replenishment or activate Automatic replenishment in the SIEVERS WMS setup.
When the storage place is found, the setups are processed in the following order:
- Storage data
- Items
Hinweis
Please make sure that a picking place has already been defined for the item for which a replenishment strategy is entered.
To define the options of the replenishment strategy more precisely, there are different setup options on the card in the "General" and "Lines" tabs.
General
- Code
- Description
- Ignore reservations for replenishment: If this setup is activated, both free and reserved inventory is transferred. The reservation is transferred from the reserve location to the picking place. If reservations are also to be transferred, only full pallets can be replenished. This means that no minimum or maximum stock levels can be set up for replenishment, only the number of full pallets.
- Inclusion/exclusion of areas/warehouses/Storage Shelves/rows/levels: The setups listed here allow you to include or exclude certain parts of the warehouse. You can select whether the inventory is to be found including or exclusively in this part of the warehouse.
- Load Carrier Replenishment for PS: Specifies that a load carrier move job must always be generated when the generated move job is for production supply and the entire quantity of a non-mixed carrier is required. If one of these conditions is not met, an inventory move job is generated.
Lines
In the lines of the replenishment strategy, detailed setups are made that apply to the individual strategy lines. When the storage place is found, these strategies are processed in sequence. If no storage place is found via the first line, the setup of the second line is checked and so on. The corresponding fields are explained in more detail in the following section.
- Description
- Deactivated: If this box is checked, this line is deactivated and will be skipped.
- Inclusion / Exclusion list | Areas / Warehouses / Storage Shelves / Rows / Levels: The setups listed here allow you to include or exclude certain parts of the warehouse. In each case, you can select whether the Inbound Stock Post should be included or excluded in this part of the warehouse. The storage section selected in the General area is extended by this selected section.
- Minimum number of full pallets: Data maintenance on the item is important for this setup. The corresponding "Number of pieces per inventory" is stored here. If a value is stored in this setup, the filters in this line only take effect if at least the number of stored full pallets has been requested.
Example: "Number of pieces per inventory" = 50 pieces, minimum number of full pallets = 3. In addition, an inclusion list for the "SUPPLY" area has been defined in this inventory determination strategy line. If at least 150 pieces, i.e. the full pallets, are now required for a Outbound Stock Post, this line takes effect and inventory is taken from the "NEXT STOCK" storage area. In a second line, the rest could then be retrieved from the pick location. This strategy line therefore ensures that a high demand for full pallets is retrieved from a different area/storage location than a normal demand from the pick location. - From picking place: This setup specifies whether the inventory must be in a fixed picking place. With the default setting "Pick and not picking place", the system does not care whether the inventory is in a picking place or not.
The following setups are also possible: picking place only, no picking place. - Storage place type empty: If this setup is activated, only inventory that is located in a storage place with the empty storage place type is selected during the search.
In relation to the next fields, it makes sense to select "From reserve location" so that inventory is always found for replenishment that is in a reserve location. - From pick location / From reserve location: If one or more of these setups are activated, the search will only select inventory that is in a storage location of the respective type.
- Full pallet: Specifies whether the inventory must be on a full pallet. With the default setting "Full pallets and opening", the system does not care whether the inventory is on a full pallet or not.
- Full Quantity: If this setup is activated, the system searches for an inventory for replenishment that has exactly the number of pieces you are looking for. If there is no inventory with this number of pieces, no replenishment is created for the desired quantity. The number of pieces is not split between several inventories.
- Full inventory: If this setup is activated, only inventories that are completely transferred to Outbound Stock Post are found. If only part of an inventory is required, this inventory is skipped so as not to create an opening.
Inventory Selection Strategies
The purpose of inventory selection strategies is to set specifications for the correct selection of stored items. For example, if an item is to be removed from storage, the system uses the inventory selection strategy to search for the specific item to be removed. For example, it can be specified that items are first removed from a specific area and only from pick locations. If no items can be found according to this rule, items should be removed from the reserve stock. With an inventory selection strategy, you ensure that the inventory is systematically searched and selected for corresponding transactions.
You can setup the inventory selection strategies in the following places:
- Stockkeeping units
- Item
- SIEVERS WMS Setup
This sequence is also the sequence in which the correct strategy is searched for before an inventory is found. The search continues until a suitable strategy is found.
You can create and manage inventory selection strategies on the page of the same name. You can set the following:
General
- Code
- Description
- Include / Exclude Areas / Warehouses/ Shelves / Rows / Levels: The configurations listed here allow you to include or exclude certain parts of the warehouse. You can select whether the inventory is to be found including or exclusively in this part of the warehouse.
- Reservation Entry Restriction: If this setup is enabled, inventories are only found with the inventory selection strategy if they are explicitly assigned to the reservation item contained in the source document line. It is not possible to assign unreserved inventory. If the setup is deactivated, the strategy does not take into account the reservation items in the source line or the assignment to the inventory. As a result, lines with reservation items may reserve inventory that is not assigned to a reservation item and vice versa.
Lines
- Description: A strategy name for the corresponding strategy line is stored in this field.
- Deactivated: If this box is checked, this strategy line is deactivated and will be skipped.
- Include/Exclude List | Areas / Warehouses / Shelves / Rows / Levels: The setups listed here allow you to include or exclude certain parts of the warehouse. In each case, you can select whether the Inbound Stock Post is to take place including or exclusively in this part of the warehouse. In the Include/exclude list line actions, specify what is to be included or excluded. The storage part selected in the General area is extended by this selected part.
Hinweis
The warehouse part selected in General is extended by this selected part. What does this mean? The strategy lines take the inclusion and exclusion list entered in General as a basis. This therefore applies to all. However, if, for example, a warehouse level is excluded in a strategy line, both lists are added together. For the example inclusion of levels 01, 02 and 03 in General and the exclusion of level 02 in the strategy line, the inclusion of levels 01 and 03 applies to this line.
- Minimum number of Full Pallets: Data maintenance on the item is important for this setup. The corresponding “Number of pieces per inventory” is stored here. If a value is stored in this setup, the filters in this line only take effect if at least the number of stored full pallets has been requested. Example: “Number of pieces per inventory” = 50 pieces, minimum number of full pallets = 3. In addition, an inclusion list for the “SUPPLY” area has been defined in this inventory determination strategy line. If at least 150 pieces, i.e. the full pallets, are now required for a Outbound Stock Post, this line takes effect and inventory is taken from the “AFTER-SUPPLY” storage area. In a second line, the rest could then be retrieved from the pick location. This strategy line therefore ensures that a high demand for full pallets is retrieved from a different area/storage location than a normal demand from the pick location.
- From Picking Place: This setup specifies whether the inventory must be in a fixed picking place. With the default setting “Pick and not picking place”, the system does not care whether the inventory is in a picking place or not. The following setups are also possible: Picking place only, no picking place.
- Storage Place Type Empty / From Pick Location / From Reserve Location: If one or more of these setups are activated, only inventory located in a storage place of the respective type is selected during the search.
- Full Pallet: If this setup is activated, the system checks whether the “Opening” check mark is set for the inventory. If this is the case, this inventory is ignored.
- Full Pallets Without Reservation only: If reservations are to be made from a full pallet, this field can be used to set whether reservations may already exist on this full pallet. If the field is set, a full pallet is only found if it has no reservations. Otherwise, this full pallet is skipped. In this case, it is not treated as an opening.
- Full Quantity: If this setup is activated, the exact number of pieces is searched for. An inventory with exactly this number of pieces must therefore exist. The number of pieces is not split between several inventories.
- Full Inventory: When this setup is activated, only inventories that are completely transferred to Outbound Stock Post are found. If only part of an inventory is required, this inventory is skipped so as not to create an opening.
- Full Load Carrier: If this setup is activated, the system checks whether the “Opening” checkbox is set for the inventory. If this is the case, this inventory is ignored.
- Only full Load Carrier without reservation: If reservations are to be made from a full Load Carrier, this field can be used to set whether reservations may already exist on this full Load Carrier. If the field is set, a full Load Carrier is only found if it has no reservations. Otherwise, this full Load Carrier is skipped. In this case, it is not treated as an opening.
- Whole Load Carrier only: If this setup is activated, only Load Carriers that are completely transferred to Outbound Stock Post are found. If only part of a Load Carrier is required, it will be skipped so as not to create an opening.
Picking Strategies
Picking strategies are used to specify the different ways in which items can be picked. For example, you can specify which stock removal items are to be processed and in which order this should take place.
In the SIEVERS WMS setup, the corresponding strategy is stored in the “Strategies” tab.
The individual setup fields of a picking strategy are described below:
General
- Code
- Description
- Include/Exclude Areas / Warehouses / Shelves / Rows / Levels: The setups listed here allow you to include or exclude certain parts of the warehouse. You can select whether you want to include or exclude the storage part.
Determine rows
- Sort Key Finding: This setup provides a selection of possible table keys. The selected key determines the sorting of the Outbound Stock Post lines. For example, “Shipment Date, Priority, Order” means that the rows are sorted by Shipment Date.
- Sort Key Finding Ascending: If this setup is active, the selected warehouse document rows are determined in ascending order, otherwise in descending order.
- Full Pallets: If this setup is activated, only Outbound Stock Post lines with full pallets are determined.
- Opening Inventory: If this setup is activated, only Outbound Stock Post lines with opening pallets are determined.
- Entire Document: If this setup is active, an employee must always be able to edit the entire document. If this is not possible, e.g. due to exclusion lists or the full pallet/opening setup, the document is skipped and not progressed by an employee with this strategy.
- Entire Storage Area: If this setup is active, an employee must always be able to edit all lines of the storage area contained in a document. If this is not possible, e.g. due to exclusion lists of a level (e.g. 4th level cannot be reached), the document is skipped and not progressed by an employee with this strategy.
- Clean Storage Area: Activating this setup specifies that all lines found must come from the same storage area. This ensures that an employee does not change areas during picking.
Multi Order Pick
- Cross-Document: If this setup is active, picking is not carried out per Outbound Stock Post, but the warehouse document lines are determined across all documents. The employees pick several orders at the same time.
- No. of Doc. to Consolidate: This setup is used to specify how many documents can be progressed at the same time.
- Cross-Doc Criteria Fields
- Max. Number of Lines: This setup specifies the maximum number of lines that can be reserved for an employee in the Multi Order Pick. This setup is required due to the size or number of boxes of the picking trolley, for example.
- Max. Weight: This setup specifies the maximum weight that is reserved for an employee in Multi Order Pick. This setup is required due to the load capacity of the picking trolley, for example.
- Collection No. Series: If multiple Outbound Stock Posts are grouped together during picking, they are grouped together with a unique number. This grouping is described as a Collection (or collection marker). This number series used for this purpose is stored here.
MDE control
In this section, the setup for the MDE (Mobile Data Entry) control is specified. In other words, it specifies how an employee is guided through the determined Outbound Stock Post lines using the MDE. The individual fields are explained in more detail in the following section.
- Sorting Key Picking: This setup provides a selection of possible table keys. The selected table key determines the order in which the Outbound Stock Post lines are progressed.
- Sort Key Picking Ascending: If this setup is active, the selected Outbound Stock Post lines are processed in ascending order.
- Use Load Carrier: This setup enables the use of Load Carriers. The options are picking pallet or storage Load Carrier.
- Pick Load Carrier No. from Nos.: If this setup is active, the picking pallet numbers are taken from the number series in the SNC Logisitics setup and entered automatically. Otherwise, barcodes that have already been generated must be used.
- Manual Pick Load Carrier No.: If this setup is active, the numbers can be taken from the number series or already created in the system.
- Picking Buffer Storage Place: A picking buffer location can be stored via this setup. If a place is stored, the item is temporarily posted to a buffer storage place when the line is completed.
- Target Storage Place Code: This setup shows the destination storage place. If the setup post move order to destination is active, the item is posted to the specified storage place accordingly. Otherwise, the destination is only confirmed but not posted.
- Post Move Job on Target: If this setup is active, the inventory is posted to the specified destination storage place by move order. Otherwise, the destination is only confirmed but not posted.
- Confirm Line: This setup specifies which action is performed to confirm the warehouse document line. For example, the “Storage place” option means that when the storage place is reached in picking, the line must be confirmed by scanning the storage place.
- Finish Line: This setup specifies which action is performed to close the warehouse document line. The “Inventory” option means, for example, that the line must be closed by scanning the inventory when the inventory is picked in the picking process.
Series Creation Strategies
The series creation strategies determine which order lines are combined in a series and how the series is created.
You can set the following for each line:
- Code
- Description
- Automatic Release: Automatically releases new series created by this strategy after creation. A picking document is generated. If this option is not activated, series must be released manually.
- Split Orders: Specifies whether an order may be split into several series. This can be useful in a large warehouse with long distances, for example, as it can make picking much more time and route efficient. If the option is not activated, all lines of an order are always assigned to the same series.
- Sorting Order: Specifies the sorting order of the lines found. The options are by Storage Place or by Road optimization.
- Customer Filter Exists: An inclusion/exclusion list can be specified here
- Location Code: mandatory field. Specify here for which Location Code this strategy line should apply
- Default Picking Team/Packing Team: Specify here which picking or packaging team the series created with this strategy line should be assigned to. This specification overwrites other team specifications.
- Outside Storage: Restricts this strategy line exclusively to outside storage or SNCL Outbound Stock Posts.
- Max. Number of Orders/Positions/Number of Pieces/Volume: Specifies how high the maximum number of this property may be in the series.
- Order Type: Only orders with this order type are eligible for this series creation strategy
- Shipment Date: This is a date filter that is based on the order shipment date.
- Priority Filter: Here you can set a priority filter, e.g. >100, so that only orders with a suitable priority are considered
- Parcel shipping only: Specifies that only orders with shipping agents who have deactivated the No Shipping Orders option will be considered
- Ship-to Country Category: Limits the orders eligible for the series based on the country category. You can specify these on the Countries/Regions page for all countries entered. The following categories are available
- Interior
- EU
- Third Country
- Ship-to Code Filter: Limits the orders based on the ship-to code
- Custom Event Code: An event number from a custom event can be entered here. Please only use if you know what you are doing!
::: Attention Do not enter anything in the User-defined event field, as this will disable the regular series creation strategy! :::
Movement Strategy
This page is used to define the movement strategies according to which teams should work. The movement strategy determines the order in which the load carriers to be picked are displayed and has an enormous influence on the efficiency of the team.
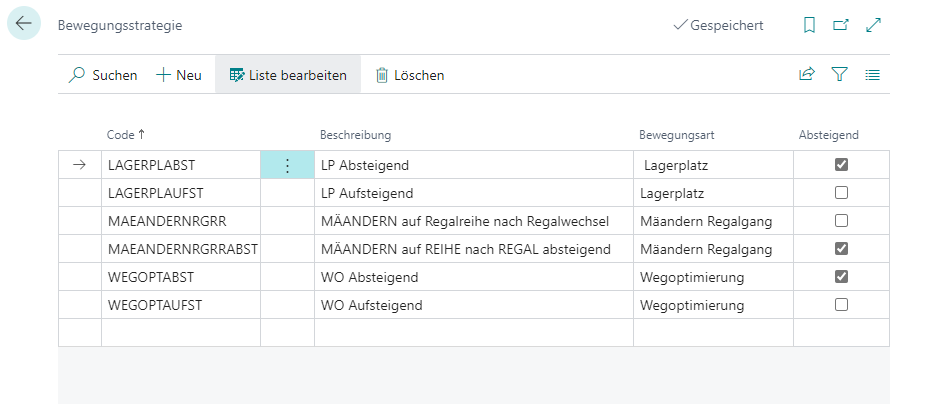
- Code
- Description
- Movement type: Specifies the team's movement type. The following options are available here:
- Storage place: Sorts the list in ascending order by storage place number
- Road optimization shelf aisle: Sorts the list per shelf aisle in ascending order according to the path optimization value stored in the storage place cards
- Meandering shelf aisle: Sorts the list per shelf aisle alternatively in ascending and descending order so that the warehouse employee does not always have to go back to the beginning of the aisles to work through the next shelf aisle. As a result, he goes from the front to the back through an aisle and starts the next aisle from the back to the front. The next aisle is then started again from the front to the back.
- Descending: Reverses the sorting sequence
The movement strategy influences teams working in A2, A3 and A4.
Provisioning Strategy
Provisioning strategies are used to determine the destination storage places in move orders for all input materials required for production orders. These strategies are necessary if, for example, only the storage area and/or warehouse are entered for the items, meaning that the inventory can be located in a very large area.
When creating a move order with the type production supply, the provisioning strategies are taken into account with the following priorities:
- Machine center
- Stockkeeping unit
- Item
- Item category
- Production order
Priority 1 always applies. If this is not available, priority 2 is used, and so on.
If the Check production supply process is executed and only the storage area and/or warehouse are entered for the required components, the provisioning strategy is used to determine the target locations for the generated move orders. These target locations should ideally be located near the machine centers.
A strategy consists of these parts:
- General options
- Inclusion/exclusion
- Strategy lines
The general options and the upper inclusion/exclusion options apply to the entire Inbound Stock Post strategy. The lines of the strategy are processed in sequence until the filter settings match the Inbound Stock Post. If the Inbound Stock Post can already be carried out with the first strategy line, the remaining lines are ignored.
General
- Code
- Description
- Use storage Load Carrier: Specifies that Load Carriers must be utilized
- Show Inbound Stock Post page: Specifies that the Inbound Stock Post page is shown before the Inbound Stock Post. This enables manual adjustment of the Inbound Stock Post. This is particularly useful for outside storage, as Inbound Stock Posts are used here anyway
- Check height, width, depth, volume, weight: Matches the dimensions and maximum weight of the storage places with the properties of the items to be put away, so that no items that are too large or heavy are posted to storage places that are too small
- Check Number of Spaces: Checks whether there are still enough free places in storage places for the new inventories
- Post on existing inventory: If this setup is active, the system checks whether an inventory with suitable parameters (item, serial no., lot no., etc.) already exists in the warehouse. If this is the case, the system assigns the already existing order no. as the new order no.. No new LB no. is created.
- Include/Exclude areas/warehouses/Storage Shelves/rows/levels: The setups listed here allow you to include or exclude certain storage areas. You can select whether you want to include or exclude the storage area.
Lines
Detailed setups are made in the Inbound Stock Post strategy lines. Any number of strategies can be stored here. When the items are deposited, these strategies are processed in sequence. If no storage place is found via the first line, the setup of the second line is checked and so on. The corresponding fields are explained in more detail in the following section.
- Description: A strategy name for the corresponding strategy line is stored in this field
- Deactivated: If this box is checked, this Inbound Stock Post strategy line is deactivated and will be skipped
- Belongs to Stock Document Type: Specifies for which Stock Document Type this strategy line should apply
- Include / Exclude list | Areas / Warehouses / Storage Shelves / Rows / Levels: The setups listed here allow you to include or exclude certain parts of the warehouse. In each case, you can select whether the Inbound Stock Post is to take place including or exclusively in this part of the warehouse.
- Search without grouping: Specifies whether the storage pallet is determined grouped by warehouse and Storage Shelf.
- Allocation order: Specifies the sort order in which the storage places are to be searched
- level-row sorts by level first, so the rows of a level are run through first
- Row level sorts by row first, so the levels of a row are searched first
- Code sorted by storage place code, i.e. it is run through in the order of the storage place codes
- Road optimization sorted according to the stored path optimization
- Volume path optimization ascending: Sorted according to the stored path optimization with the aim of finding the smallest possible places where the items physically fit best. Please note that the following setups are ignored after activating this allocation sequence: Consider proximity to picking place, grouping
- Volume code
- Applies to:
- Full pallets and opening
- Opening only
- Full pallets only
- Find same item: The item is only stored in an inventory in which the same item already exists. If the item does not yet exist in the warehouse, no storage place is allocated
- Storage place Occupancy: Specifies how the storage place assignment is to be filtered. There are:
- Free storage places
- Exclude full storage places
- Consider available space codes
- Consider available space codes and exclude full storage places
- To Bulk Place: Specifies whether the destination may or must be a block bin.
MOP Batch Creation Strategies
The MOP batch creation strategy enables the automatic consolidation of multiple orders into a multi-order picking batch. Analogous to the series formation strategy, the setup is done via a central table in which filter criteria, quantity limitations, and behavior rules are defined. The goal is optimized picking through precise batch creation according to the order structure.
The strategy is set up via the SNCL MOP Batch Creation Strategy page and can be executed manually or automatically via the job queue.
Prerequisites
- MOP batch number series stored in the SIEVERS WMS Setup
- Order types must be activated for MOP batch formation
- Warehouse shipments must be released
- Orders must be within the defined delivery date horizon
Menu
- Create MOP batches: Creates MOP batches based on the strategy lines below
- MOP Monitor: Opens the MOP Monitor
Setup Fields
- Code: Unique identifier of the strategy (max. 10 characters)
- Description: Description of the strategy for better identification
- Location Code: The location in which to search for lines for batch formation
- Automatic Release: Automatic release of the created MOP batch directly after creation. If this option is activated, the batch can be picked immediately
- Same Packaging Team: Specifies that only identical packing teams are allowed in one batch
- Customer Filter Exists: Indicates whether a customer inclusion/exclusion list is stored. Via navigation, you can specifically include or exclude customers for this strategy
- Shipment Date Horizon: Lead time for the delivery date as a date formula (e.g., 5D or 2W). Only orders with a first loading date ≤ work date + date formula are eligible for the batch. When using days (D), the shop calendar of the location is considered to correctly determine working days. Example: With work date Thursday and formula 3D, orders with loading date Thu, Fri, Mon, Tue are considered (Sat/Sun are free days). With 0D, only orders with loading date = work date are included
- Order Type: Restriction to specific order types. Only orders with the order type stored here are considered for batch formation
- Ship-To Country Category: Limits batch formation to a shipping country category (Domestic / EU / Third Country). Orders from different categories are not consolidated
- Default Packaging Team: Default packing team for all orders in the batch. This value overrides the entries in the Warehouse Shipment Planning at order level
- Same Delivery Address: Only orders with identical shipping addresses are consolidated in one batch. Activating this option ensures shipping address-pure batches
- Max. Number of Orders: Maximum number of orders per batch. If this value is exceeded, the next order is added to a new batch
- Min. Number of Orders: Minimum number of orders per batch. If this value is not reached, the batch is only created but not automatically released. It can be released manually or discarded
- Max. Number of Lines: Maximum number of lines in the batch. If this value is exceeded, the next order is added to a new batch. Example: Order type allows 5 positions, Max. Number of Orders = 10 → theoretically 50 positions. With Max. Number of Lines = 40, a second batch is formed for the remaining positions
- Max. Number of Pieces: Maximum number of pieces in the batch. If this value is exceeded, the next order is added to a new batch. Particularly useful for homogeneous products with similar assortments to limit the batch scope. For heterogeneous part relations, the field remains empty
- Max. Weight: Maximum weight of the batch in kilograms. If this value is exceeded, the next order is added to a new batch. Enables limiting the batch size based on the load capacity of picking carts or physical conditions
- Max. Volume: Maximum volume of the batch in cubic meters. If this value is exceeded, the next order is added to a new batch. Useful for limiting the batch size
- Custom Event Code: Custom event during the batch formation process. If filled, an event with the stored code is triggered during MOP batch formation and the standard MOP process is not executed
::: Attention Only enter something in the Custom Event field if you know exactly what you are doing. This will disable the regular MOP batch formation strategy! :::
Batch Formation Process
Batch formation follows this logic:
- Order Determination: The system determines all released warehouse shipments that meet the filter criteria (order type, delivery date horizon, shipping country category, customer filter)
- Sorting: Orders are sorted by loading week and priority
- Batch Compilation: Orders are added to the batch one after another as long as all criteria are met:
- Filter criteria (shipping address, packing team) match
- Quantity limitations are not exceeded
- Batch Completion: As soon as a threshold is reached or no more matching orders are available, the batch is completed
- Release: With Automatic Release activated, the batch is automatically released, otherwise the release must be done manually
- Minimum Quantity: If Min. Number of Orders is not reached, the batch remains in "created" state and can be released manually or discarded
Strategy Execution
The MOP batch creation strategy can be executed in two ways:
Manual Execution:
- Open the SNCL MOP Batch Creation Strategy page
- Select the desired strategy
- Click Create Batch
- The system creates the batches according to the setup
Automatic Execution:
- Set up a recurring task in the job queue
- Select the codeunit SNCL Create MOP Batches
- Define the execution interval (e.g., hourly)
- The batches are automatically created according to the stored strategies
Example Scenarios
Scenario 1: Customer-Pure Batches for Domestic Shipping
- Same Shipping Address: Activated
- Shipping Country Category: Domestic
- Max. Number of Orders: 10
- Automatic Release: Activated
Result: Batches with a maximum of 10 orders are automatically created, all having the same shipping address and shipping country category "Domestic".
Scenario 2: Packing Team-Oriented Batches
- Batches by Packing Team: Activated
- Lead Time Horizon (Delivery Date): 3D
- Min. Number of Orders: 3
- Max. Number of Lines: 50
Result: Only orders with the same packing team and loading date within the next 3 working days are consolidated. The batch is only released if at least 3 orders are available and a maximum of 50 lines are included.
Scenario 3: Number of Pieces-Limited Batches for Homogeneous Products
- Max. Number of Pieces: 600
- Order Type: STANDARD
- Automatic Release: Activated
Result: Batches are limited to a maximum of 600 pieces, regardless of the number of orders. Ideal for warehouses with similar products (e.g., hairbrushes) to physically limit the batch size.
SIEVERS Shipping Setup
SIEVERS Shipping is used for shipping processing in the WMS. This is not only used to carry out general process setups, but also to set up label printing, which can be carried out automatically by an external service provider.
The actual SIEVERS Shipping solution should be set up using the setup wizard. If you want to change the setup later, you can access the setup wizard again or open the SIEVERS Shipping setup page. If you want to print labels using an external service provider, the SIEVERS WMS offers the options ECOMSUITE or ShipXpert. These must be set up separately using the setup wizard or setup page.

Before you set up SIEVERS Shipping, please make sure that you have set up users, Location Codes, shipping agents and shipping units.
Shipping Setup Wizard
As the setup wizard itself already describes in detail what needs to be done, it will only be described briefly in this section.
- Specify which users should have access to SIEVERS Shipping.
- Specify the Location Codes for which shipping orders are to be used. To do this, select on the Location Codes page for which locations Shipping order required should be used.
- Specify for the shipping agents whether No shipping orders should be generated for them. If the check mark is not set, shipping orders are generated.
- Make sure that the shipping units are set up correctly.
- Assign the shipping units to the shipping agents.
- Specify the number series and the provider for the label print implementation.
- Further setups are available in the SIEVERS Shipping setup
Shipping Setup
Here you can make further setups in addition to the Setup wizard.
Shipping Order No.: Specifies the Shipping Order No. series
Use Shipping Source Doc. Form: Allows items to be distributed across multiple shipping units after a shipping order has been created
Show Weight Exceeding Confirm: Specifies whether the user should receive a warning if the total gross weight of the items exceeds the maximum gross weight of the selected delivery shipping unit
Content creation: Specifies whether content creation should be possible without a source document and, if so, whether with or without a warning
- Allow without source document
- Warning without source document
- Only with source document
Label Print Implementation: Specifies which service provider is to be used for label printing. For ECOMSUITE and ShipXpert, please carry out the corresponding setup/setup wizards. Not Defined is default and also ECOMSUITE.
ECOMSUITE Setup Wizard
This setup wizard describes how to set up the ECOMSUITE interface for [SIEVERS Shipping](#shipping setup wizard). As the setup wizard itself already describes in detail what needs to be done, the individual steps are only briefly summarized.
- Set up ECOMSUITE on the SIEVERS ECOMSUITE setup. Please read the corresponding section.
- Store the shipping profiles with the shipping agents.
Then set the Label Print Implementation field in the SIEVERS Shipping setup to ECOMSUITE.
SIEVERS ECOMSUITE Setup
On this setup page, you prepare the SIEVERS WMS for the use of the shipping label service provider ECOVIUM. If it is necessary to change the API URLs, you can show them via Actions -> Show API URLS.
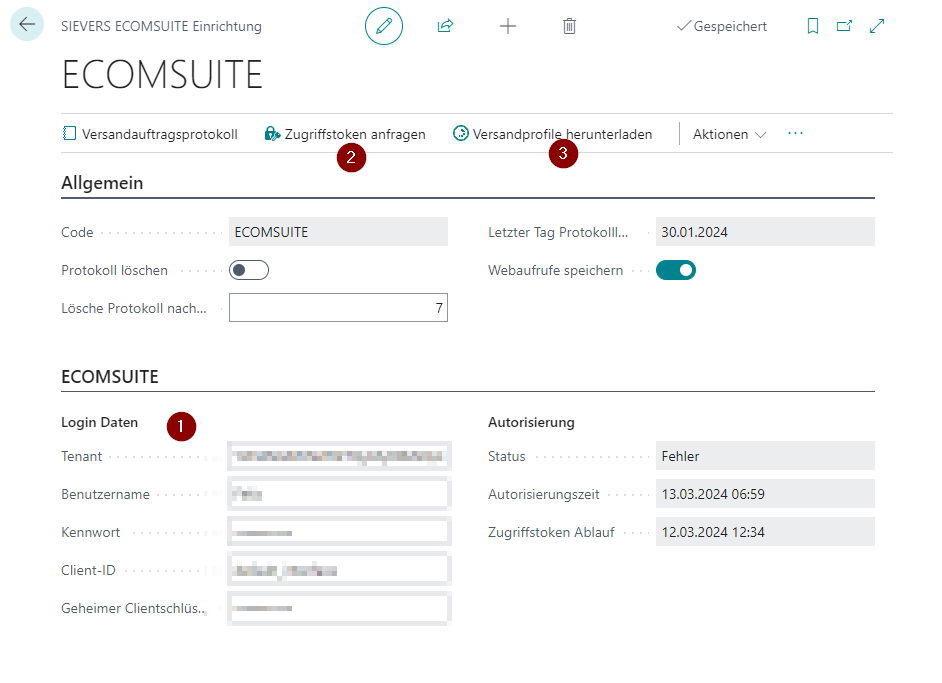
- Enter your login data
- Check the login data via Request Access Token
- Then request via Download Shipping Profiles. These are now saved in the SIEVERS ECOMSUITE Shipping Profiles table.
- Now assign the stored shipping profiles on the Shipping Agent page to the shipping agents or Shipping Agent Service.
A shipping label is from now on automatically requested from ECOVIUM and printed out for the shipping agents with shipping profiles when using Print shipping label in the shipping order. You can find out how the shipping process works in Process a document-based warehouse shipment.
The individual fields are described below.
Menu
- Shipping Order Log: Shows the log of shipping orders
- Request Access Token: Requests an access token with the login data entered. This process is used to test the login data
- Download shipping profiles: Downloads the shipping profiles for the interface to the Business Central system. The shipping profiles are stored in the SIEVERS ECOMSUITE shipping profiles table.
- Actions
- Show API URLs: Adds the API URLs fields to the setup page. This is not usually necessary
General
- Code
- Delete Logging: Specifies whether only the most recent shipping order action should be saved
- Clear log after x days: Enter here after how many days the log should be deleted
- Last Day Log Cleanup: Shows when the log was last deleted
- Save Webcalls: Specifies whether web service calls should be saved.
ECOMSUITE
- Login data
- Tenant
- User Name
- Password
- Client ID
- Client Secret
- Authorization
- Status
- Authorization time
- Token Expiration
Setup Wizard for the ShipXpert Interface
This setup wizard describes how to set up the ShipXpert interface for SIEVERS Shipping. Since the setup wizard itself already describes in detail what to do, the individual steps are only briefly summarized.
- set up ShipXpert on the ShipXpert setup. Please read the corresponding section.
- set up a job queue for the shipping labels and for archiving or deleting the service provider's requests and responses
Then set the Label print implementation field in the SIEVERS Shipping setup to ShipXpert.
ShipXpert Setup
On this page you can set up the ShipXpert interface.
Menu
- Shipping orders
- Shipping Order Log
- Shipping Label Requests
- Job queue shipping label responses
- Archive shipping label requests and delete archived requests and responses Job queue
- Shipping Label Responses
- Archived Shipping Label Requests
- Archived Shipping Label Responses
- Publish ShipXpert Web Services: Publishes the ShipXpert web services for the following pages:
- Item Card
- Shipping Agent
- Shipping Agent Transport Types
- Comments
- Lines
- Posted Sales Shipment
- Warehouse Shipment
General
- Delete log: Specifies whether the log should be deleted when a new action is performed for a shipping order or daily closing. Only the last log is saved, the previous ones are deleted.
- Delete log and archived requests and responses after x days: Specifies when entries in the log and archived requests and responses are to be deleted automatically. Standard is 30 days.
- Last Day Log Cleanup: Specifies the day on which the log was last deleted
Shipping Label Printing
- Request No. Series
- Archive Requests After x Hours: Deletes requests to ShipXpert automatically after x hours
- Show Printer Station Selection: Determines whether the printer station selection should be opened when printing a shipping label. The printer station selected here by the user is saved as the default for this user. If this option is not activated, the printer station stored for the shipping user is automatically selected.
ShipXpert Shipping Label Requests
Shows the shipping label requests to the service provider ShipXpert. Entries in this list are automatically archived via job queue.
You can remove individual shipping requests via Manage -> Delete.
- No.
- Shipping Order No.
- Shipping Order Line Entry No.
- {{Printer Station}}
- Function
- Status
- Created At
- Modified At
ShipXpert Shipping Label Responses
Shows the shipping label responses from the service provider ShipXpert. Entries in this list are automatically archived via job queue.
- Shipping Order No.
- Shipping Order Entry No.
- Function
- Status
- Error Code
- Error Message
- Tracking No.
- Tracking URL
- Waybill No.
- Weight
- Shipping Agent Code
- Shipping Agent Service Code
- Carrier Name
- Shipping Costs
ShipXpert Archived Shipping Label Requests
Shows the archived shipping label requests to the service provider ShipXpert. Entries in this list are deleted after a few hours depending on the setup.
- No.
- Shipping Order No.
- Shipping Order Entry No.
- {{Printer station}}
- Function
- State
- Created on
- Modified on
ShipXpert Archived Shipping Label Responses
Shows the archived shipping label responses from the service provider ShipXpert. Entries in this list will be deleted after a few hours depending on the setup.
- Shipping Order No.
- Shipping Order Entry No.
- Function
- State
- Error Code
- Error Message
- Tracking No.
SIEVERS Shipping Log
Shows a collected list of responses and requests to and from shipping labels. Here you can also export or import the list as .json via Export request/response data.
- Labelprint Setup Code
- Type
- Webrequest
- Webresponse
- Shipping Order
- No./Code
- Order Line Entry No.
- Process
- Processing Date
- Processing Time
- Messagetext
Shipping Advice Rules
This setup is present in the following places:
- SIEVERS WMS Setup: The setup here defines the standard for all customers. It is overwritten by the individual setup on the customer.
- Customer: This setup defines the rules for all source documents in warehouse shipments for this customer. It is overwritten by the setup in the warehouse shipment planning
- Source Document in Warehouse Shipment/Warehouse Shipment Planning: This setup defines the rules for this specific source document
It contains an entry for handling complete deliveries and an entry for handling partial deliveries for each setup location.
- Complete: There must be no missing parts in the warehouse shipment.
- Partial: A warehouse process is deliberately started or not started even with missing parts.
Rules:
- 1-Warehouse Shipment Creation allowed: Allows the creation of a warehouse shipment. The work can be planned.
- 2-Stock document creation allowed: Allows the creation of a stock document. The quantities can be reserved for warehouse processes. Releasing the picking document is not allowed – neither via automation nor manually.
- 3-Picking Document Release allowed: Allows the creation of a picking document.
- 4-Loading and WS Posting allowed: Allows loading and posting.
Each rule implies the permission of the previous rule.
Not every rule can be set at every point in time:
- State 0 can no longer be set if the warehouse shipment already exists
- State 2 can no longer be changed if there is already a stock document.
- State 3 can no longer be changed if there is already a released picking document.
- State 4 can no longer be changed if there is already a loading.
Organise Replenishment
If storage places have been configured as picking places, they can be replenished from reserve locations. This can be done automatically or via the check replenishment action. In both cases, correctly set up replenishment strategies are essential.
Automatic replenishment
The option for automatic replenishment can be found in the SIEVERS WMS setup. If this is activated, inventory or Load Carrier move jobs are automatically generated depending on the replenishment strategy and demand.
Check Replenishment
You can use this action to manually trigger a replenishment check for a Location Code and any other filters. A replenishment check should be carried out regularly, especially if Automatic replenishment is not activated in the SIEVERS WMS setup. You can also automate the replenishment check using Schedule.
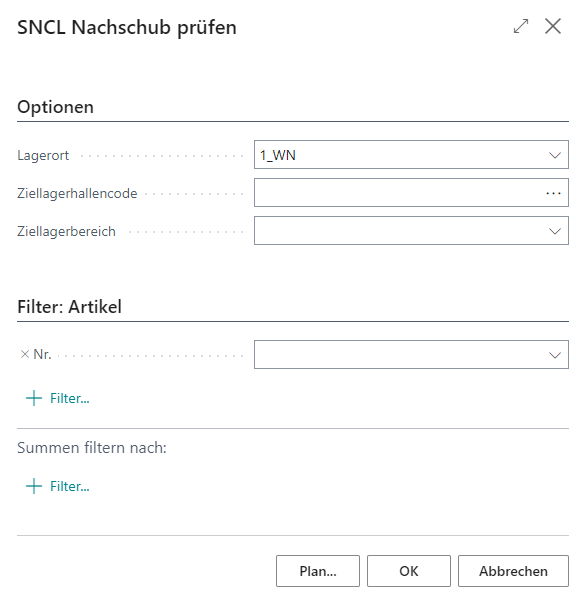
If errors occur, they are skipped. You can view them on the Check Repl. Aut. Protocol page.
Production Storage Place Replenishment
With this action you can determine and create replenishment for the production storage places. This way the replenishment of the rest of the warehouse is completely separated from production.
- Group by: Defines how replenishment move jobs are grouped. By default, grouping is done per item. To optimize route guidance in production supply, the following options are available (only one option can be active at a time):
- Target Storage Place: Creates replenishment move jobs per target storage place (production storage place). Activate this option to avoid mixing move jobs across different target places. A move job can contain multiple items if they have the same target storage place. Conversely, multiple move jobs can be created for one item if it needs to be distributed to different production storage places.
- Target Storage Area: Creates a replenishment move job for the specified target storage areas. Enter one or more storage areas separated by "|" (e.g., "PROD-A|PROD-B"). Only one move job is created that contains all lines with matching target storage area. Replenishments for other storage areas are not created.
- Target Storage Area: Creates a replenishment move job for the specified target storage areas. Enter one or more storage areas separated by "|" (e.g., "HALLE1|HALLE2"). Only one move job is created that contains all lines with matching target warehouses. Replenishments for other warehouses are not created.
- WMS Teams: Activates the team-based grouping of move jobs. When activated, all other grouping options are deactivated. The move job creation follows this logic:
- Primary grouping: Internal Transport Team from SNCL Move Job
- Secondary grouping: Internal Transport Follow-up Team from SNCL Move Job
- Per move job, only lines with an identical team combination are consolidated
The following filter options for the storage places are available:
- Location Code
- Warehouse Code
- Storage Area
- Row Code
- Level Code
- Storage Place Type
- ABC Code
- Blocking Code
If no filter field is filled, the report checks and creates replenishment move jobs across all production storage places. The calculation and creation of the replenishment corresponds to that of the regular Check Replenishment report.
Production Supply
The aim of production supply is to supply and dispose of production with material as needed, as well as to manage work in progress. This section guides you through the relevant settings for production supply.
In the SIEVERS WMS Setup, you will find the Production section. Here you can carry out the basic setup for production and its supply. For example, the setup includes the production location, the staging location for the components and facilities such as the quantity determination basis or supply class. Parts of the setup made here depend on setup fields on the item. These can be found in the section assembly and manufacturing supply. For example, you can define whether and which minimum and maximum stock of this item should be available in production. Furthermore, you can specify the replenishment strategy, inventory selection strategy and Inbound Stock Post strategy for this item in the context of production.
Production supplies are moved using move orders with the production supply type. These move orders can be created either automatically via a job queue entry, manually via the released production order or the Check Production Supply report. The strategies for replenishment, inventory selection, provisioning, and Inbound Stock Post are responsible for determining the storage places of the components and finished parts. These are specified in various locations in the system. For this reason, there is an internal system priority to specify which strategy applies. Priority 1 is the highest priority. This applies first. If there is no setup here, the next priority applies.
Priorities:
- Machine center
- Stockkeeping unit
- Item
- Item category
- Production order
The automatic team assignment for production supply move jobs takes into account the move job type filter configured in the team card. Teams of the type production supply can specify via this filter which move job types they want to process. Only move jobs that match the filter are automatically assigned to the team.
Locations
This page is used for the setup of the various Locations. Locations do not necessarily have to be physically separate places, but can also be used to separate areas within a place whose processes are fundamentally different - for example, whether or not shipping orders should take place.
This is where you manage the Locations and specify the following:
- Stock Management: Specifies whether the SIEVERS WMS should be used for this location. Activating this option results in automatic activation of the Stock adjusts availability option.
- Require Shipping Order : Specifies whether shipping orders are required for warehouse shipment in this location
- Using SNCL Warehouse Shipment Posting: Specifies whether the SIEVERS WMS Warehouse Shipment process should be used in this location. Please note that once this option has been activated, no more manual stock documents can be created from sales orders in this location.
Warehouse management can also be activated for existing storage locations. Please note, however, that there must be no open item ledger entries in the warehouse at the time of activation.
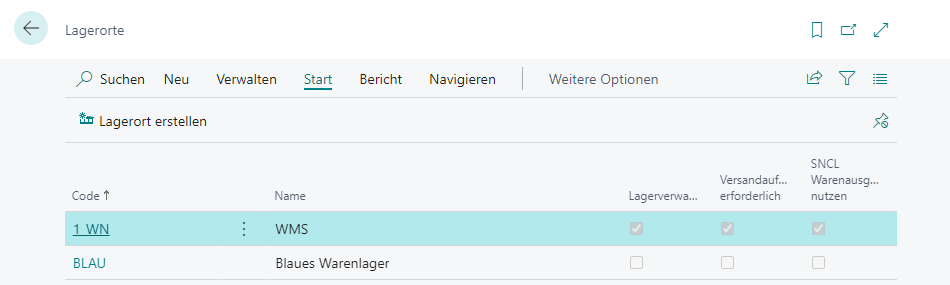
Warehouses
A Location can consist of several warehouses. These warehouses do not necessarily have to exist physically, but can also be created purely for the purpose of separating, for example, categories of goods. You can create new warehouses and manage existing ones via SNCL Warehouse List. In addition, you can create storage places for warehouses that have already been created.
When you create a new warehouse in the SNCL Warehouse List, the SNCL Warehouse Card opens.
SNCL Warehouse List
The warehouse list shows the following information:
- Location code
- Code (of the warehouse)
- Description
- Blocked
- Storage type
- Function
- Number of Spaces
- Blocked Number of Spaces
- Available Number of Spaces
SNCL Warehouse Card
You can use the Warehouse Card to create new storage places for this warehouse and to change its properties:
- Location code
- Code (of the warehouse)
- Description
- Storage type
- Function
- Storage Area Code
- Blocked: All inventory in this warehouse is blocked
- Storage Field Management
- Visible to Sale
- Visible for Manufacturing
- Alternative warehouse
- Buffer Warehouse
- Reservation max. 1 warehouse shipment: If this indicator is activated, it is transferred to all storage places in the warehouse
- Reservation max. 1 order: If this indicator is activated, it is transferred to all storage places in the warehouse
Warehouse Employees
In this setup, you assign the users of the system to the Storage Locations. A user can also be assigned to several Storage Locations, but only have one Standard Storage Location. This Location Code serves as the default storage location for incoming and outgoing goods created by this employee.
In the upper area of the page, it is displayed how many licenses are currently being used and how many are available in total. This display is automatically updated when warehouse employees are added or removed.
Hinweis
When creating or modifying warehouse employees, the system automatically checks whether the licensed number of users is exceeded. Only warehouse employees with a SIEVERS WMS location are subject to licensing and are considered during the check.
We have also added the following setup:
- Not Consider Location Code in Role Center: If this value is activated, the data from the selected storage location in the role center is not included in the calculation. If the value is deactivated, the key figures of the storage location are included when determining the quantities and numbers in the role center. The purpose of this setup is to create a blacklist, i.e. a selection of locations that the employee should not see. For example, you can set up the system so that an employee can see several locations — namely those for which the indicator is not activated.
GS1-SSCC Setup
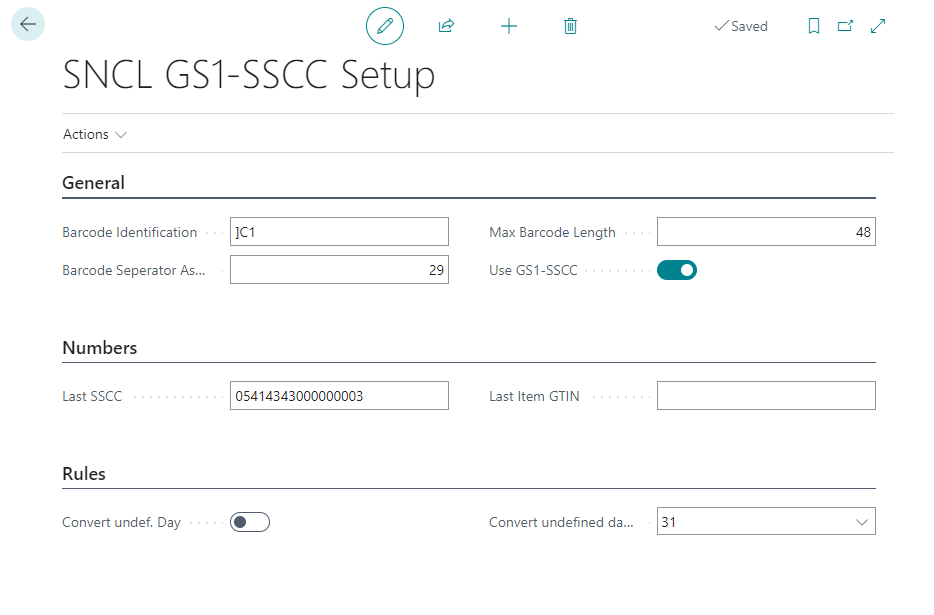
This page can be used to setup GS1 barcode identification. The setup options also include the identifiers, ISO country codes and field assignments. These are already pre-filled according to the GS1 standard. Please only change them if special requirements make this necessary.
Actions
Setup
- EAN128 Identifiers
- Customer/Vendor Identifier
- EAN Identifier Field Assigning
- ISO Codes: Opens a page where you can define ISO codes for countries
Functions
- XMLport EAN identifier import: Imports/exports an XML file containing a list of all data identifiers defined on the GS1 SSCC Data Identifiers page.
- XMLport ISO Codes Import Export: Imports or exports an XML file containing ISO codes for countries
- Import/Export field assignments: Imports or exports an XML file containing the field mappings from the GS1-SSCC DB Field Mappings page
General
- Barcode identification: Specifies the character string with which GS1 barcodes are identified
- Barcode separator Ascii value: Defines the ascii value that separates the barcode parts from each other
- Max Barcode length: Defines the maximum barcode length that SIEVERS WMS should accept
- Use GS1 SSCC: Activating this option enables GS1 barcode recognition
Numbers
- Last SSCC
- Last item GTIN
Rules
- Convert undef. Day
- Convert undef. Day to
GS1-SSCC Identifiers
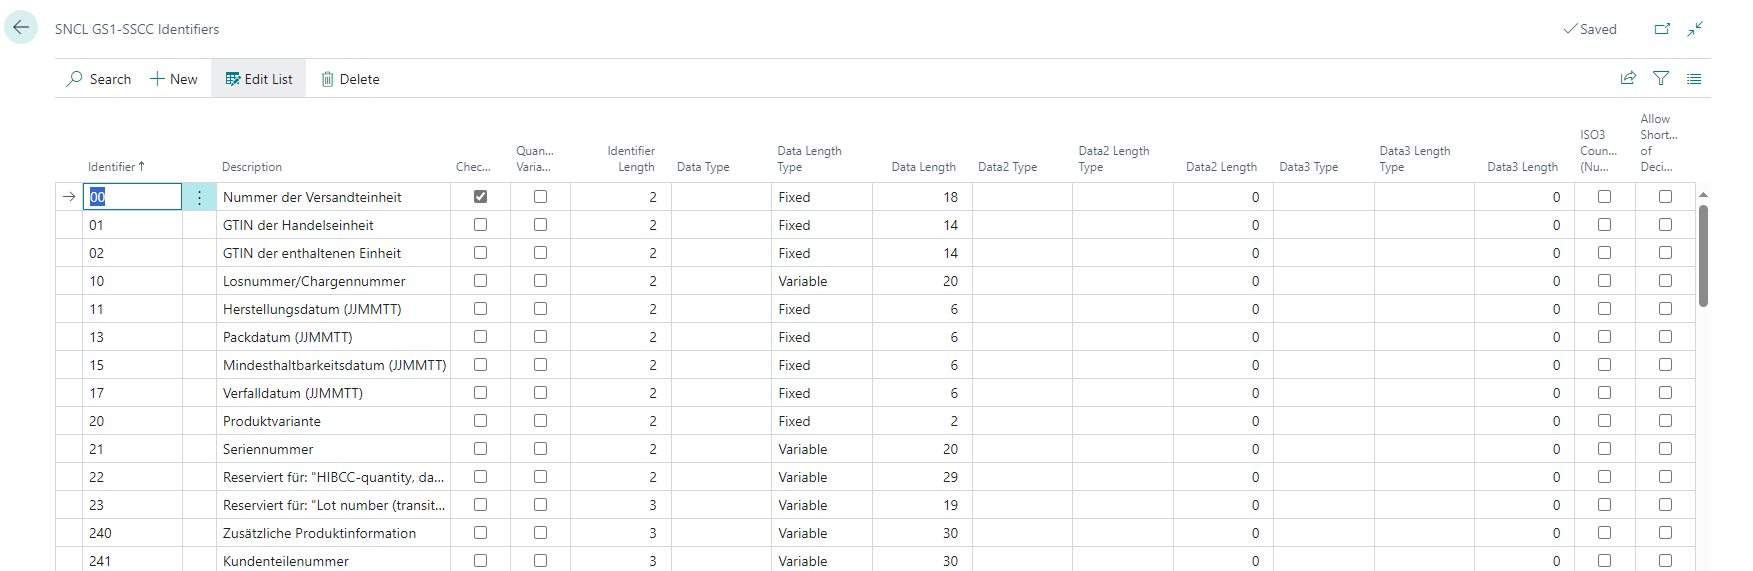
- Identifier: Defines the data identifier number
- Description: Names the data identifier
- Checkdigit
- Quantity variable
- Identifier Length
- Data/2/3 type
- Data2/3 length type
- Data2/3 length
- ISO3 country code (number): Insert an ISO3 country code if this description is country-specific.
- Allow shortening of the decimal number
- GS1 Label Support: In the table Customer/Vendor Identifiers, the fields GS1 SSCC and Code128 provide the option to print the respective identifier on a GS1 SSCC label. However, this is not yet possible for all identifiers. The reason for this is the high development effort, which is being worked through gradually. To make it easier to identify which identifiers can already be printed, this information field exists.
Customer/Vendor Identifier
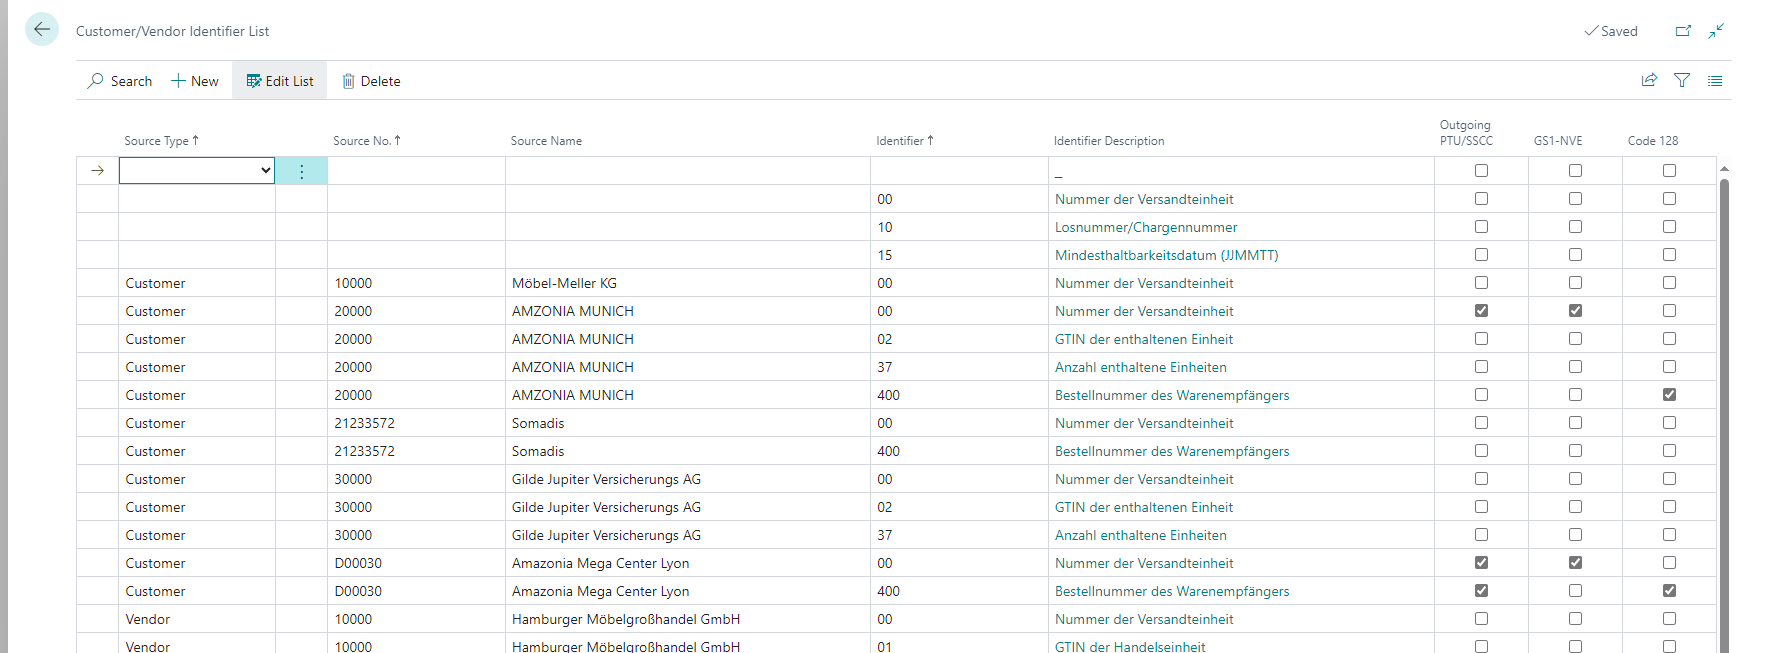
In this list, you can define the specific descriptions that your customers and vendors use in the GS1 barcodes. The combinations defined here are mandatory fields in warehouse receipt or warehouse shipment. If no specific vendor or customer is entered in the line, this setup line will be utilized for all vendors and customers except those defined here.
- Source type: Either both (empty field), customer or vendor
- Source no.: Enter a customer or vendor number here.
- Source name: Name of the customer or vendor
- Identifier: Enter an identifier number here
- Identifier description: Description of the identifier
- Outgoing PTU / SSCC: Indicates whether a different label such as the Amazon GS1 label is to be used for the sales order
- GS1-SSCC / Code 128: You can use these radio buttons to select which type of barcode should be generated when creating a PTU/SSCC. You can only select one of the two options. If you do not select an option, a barcode is created according to Code 128
The identifiers are defined to GS1-SSCC identifier.
GS1-SSCC Identifier-Field-Assign
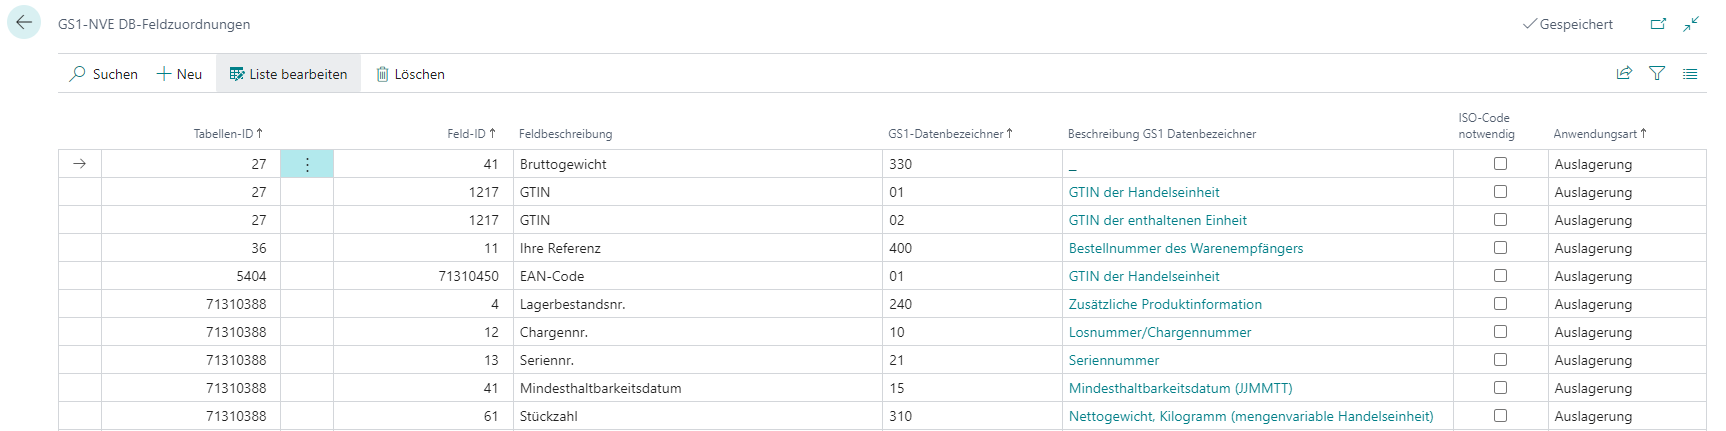
This page is used to assign GS1 descriptions and SIEVERS WMS fields to each other. This means that you can specify which identifier from the GS1 SSCC identifier page is to be utilized for which field in the warehouse receipt or shipments process.
- Table ID: Enter the table ID from which you require the field ID.
- Field ID: Enter the field ID.
- Field description: Describes the field
- GS1 identifier: Insert one of the identifiers defined on GS1-SSCC identifier
- Description GS1 identifier: Describes the identifier
- ISO code necessary: Activate this option if this field identifier combination is country-specific.
- Application type: Select between Inbound Stock Post, Outbound Stock Post and Warehouse Receipt
SNC Mobile
SNC Mobile Setup
In this setup you specify central options for Mobile.
- Delete history data after: Specifies the time after which data is deleted from the History. Please note that a change to this field only takes effect after an action by the respective user. For example, after reducing this field, the history of a user above the threshold value is retained until the user performs another action, e.g. a login.
- Use function key hotkeys: If activated, hotkeys are triggered by F1–F12. If deactivated, they are triggered by Ctrl + letter. For testing and development purposes, this option can be switched off. In production, however, we recommend switching this option on, as this results in fewer problems with the function keys. The reason for this is that the keymapper is no longer used on the mobile devices and therefore cannot fail. For further information, please contact your contact person at SIEVERS-GROUP. Please do not switch this option on or off without consultation!
- Use Indi Tab Menu SNC: Shows the individual tab D in the mobile menus. This is reserved for customer-specific extensions. Tab D contains six pre-filled entries to ensure that customer-specific customizations are not overwritten during updates. Pressing empty buttons has no effect. The tabs are populated via events and require a project-specific implementation.
- Use Indi Tab Main Menu SNC: Shows the individual tab X in the mobile main menu. This is reserved for customer-specific extensions.
- Use job scheduler to delete history: This option switches off the deletion of history by the client. Instead, create a job queue entry with the codeunit 70294093 "SNC History Deletion Mgt." and assign the desired time.
- Mobile Masks Auto Update: Specifies whether changed masks should be replaced automatically. If yes, the masks are overwritten during app installation or upgrade. Please note that if this option is activated, an app cannot be installed if there is an error in the masks.
- Storage Account: Fixes the Azure Storage Account from which the masks should be downloaded
- SAS Token: Token for authentication on the Azure Storage Account
- Device Model Selection: This enables a special field on the mobile login page where users can see which device they use. If the SNC Mobile User Change of Device Model allowed option is activated, users can also change their used device on their own.
- Maximum screen width: Limits the maximum width of the mobile display in pixels. On larger screens, the content is centered and not stretched beyond this width.
- Maximum screen height: Limits the maximum height of the mobile display in pixels.
SNC Mobile User
The users for Mobile, i.e. the MDE, are entered here. Only users who are in this list can log in to the MDE.
In the upper area of the page, it is displayed how many licenses are currently being used and how many are available in total. This display is automatically updated when mobile users are added or removed.
Hinweis
When creating or modifying mobile users, the system automatically checks whether the licensed number of users is exceeded. Mobile users are always subject to licensing, unless they are assigned to a warehouse employee. In this case, the license is covered by the warehouse employee.
Menu
- New
- Delete
- Edit list
- Home
- Force logout: Logs out the selected user and removes them from the employee markings of move orders and picking documents.
- Reports
- Print user login barcode: Prints a barcode with which the user can log in to the MDE via scan.
- Views: Shows the views history of the user
- History: Shows the action history of the user
- Actions
- Disable functions per user: Set which functions should be deactivated for this user
Table
- User ID
- User name
- User password
- Location Code
- Change of Location allowed: Specifies whether the user is allowed to change the location independently. If this option is deactivated, the user can only work in the specified location.
- Logistics Team: Assigns the user to a SIEVERS logistics team
- Restrict to Logistics Team: Specifies whether the user is allowed to change the logistics team independently. If this option is deactivated, the user can only work in the specified team
- Forklift
- Restrict to Forklift: Specifies whether the user is allowed to change forklifts independently. If this option is deactivated, the user can only work with the specified stacker
- Printer station
- Device Model
- Change of Device Model allowed: Specifies whether the user can change their device independently or whether the device specified here applies.
- Current Form
- Current Step
- Language code
- BC User
- Save History:
- Complete: Saves the complete mobile history of this user
- Reduced: Only saves the most necessary information of the history of this user
- No: Does not save any history of this user.
- Logged in
- Hostname
Hinweis
- If the user is not allowed to change location and device and has a Business Central user assigned to them, the login screen is skipped. The user does not need to enter any credentials and starts on the main menu
- If the user is allowed to change location, the login screen will open with focus on the location field
SNC Mobile History
Hinweis
Mobile History is disabled by default and is intended exclusively for troubleshooting purposes. Navigation in mobile forms (e.g., navigating back) is handled by a new, performance-optimized stack mechanism in the JScript add-in that does not require history storage.
This history shows all recorded actions of the selected user in a specific time period. This period is specified in the SNC Mobile setup. The history is cleaned up with every action (incl. login) of the user according to the time period.
- SNC Mobile user
- Created on
- Direction
- Type
- Form Code
- Event Code
- Activated Control
- Input/Value
- Logout forced
- Logout forced by
Device Model List
Here you can specify your mobile devices and their keyboard types. You have the choice between these types:
- Handheld Scanner with function keys
- Handheld Scanner without function keys
- Tablet without keyboard
- Tablet with keyboard
In addition, you can enter a scaling factor: This enlarges all fonts and graphical elements based on the standard device (MC3300/MC3400) by the specified factor. A value of 1.5, for example, enlarges all elements by 50%. This is particularly useful for larger displays such as tablets to reduce empty areas and improve readability.
You can enter the defined devices per user in the SNC Mobile User table.
If you create a device without function keys or a keyboard and assign it to a Mobile user, the mobile system will show a toolbar with standard functions and the corresponding menu functions. You can find out what the icons in the toolbar mean in the section Toolbar icons Mobile.
Various Order Handling
This term stands for cross-order picking and packaging. Here, various stands for miscellaneous orders. What these orders have in common is that they are located within a warehouse shipment. Depending on whether various order handling is only used for packaging or also for picking, it has different effects:
- Packaging only: PTUs with an order reference from several orders are packed into one SSCC. The SSCC itself no longer has an order reference. This allows the customer to create a reference to their individual orders after opening the received SSCC.
- Packaging + picking: The picking process no longer refers to an order. The picker packs items from different customer orders into mixed packages. Orders that are progressed by the same packing team and have the same unloading place in warehouse shipment may be packed and picked together. This procedure can be very efficient - but leads to the customer no longer being able to refer to a specific order/order reference when receiving the SSCC.
::: Attention This is not a picking method! :::
The setup for this function is done via the SIEVERS WMS setup and the customers. If individual orders should not be part of the various order handling, you can still override the settings in Warehouse Shipment Planning.
Setup
The two indicators By Shipping Address and Picking creation by consolidation number in the source document table of Warehouse Shipment Planning are central to various order handling.
- By Shipping Address: If this indicator is activated, this order may be packed together with other orders that meet the following requirements: same warehouse shipment, same unloading place, same packing team. This indicator can be set manually or pre-assigned by the customer. This indicator only applies to packaging. Please note that source documents with the same delivery address are always merged, even if, for example, the customer number is different.
- Picking creation by consolidation number: If By Shipping Address and the Picking document creation by consolidation number indicator are active, cross-order picking documents are created in which the picking quantities are totaled by picking team, item, load carrier and consolidation number from the Outbound Stock Post. If this option is activated, DIVERS is entered in the picking document instead of order numbers. This indicator can only be activated if *By Shipping Address is active.
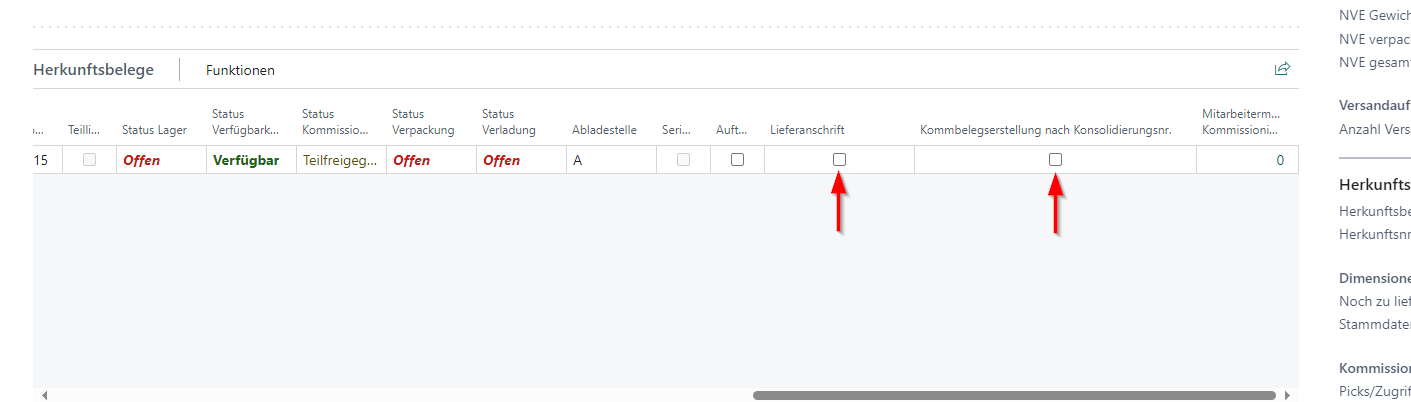
The use of these indicators must first be permitted in the SIEVERS WMS setup. Here there are the option fields
- Consolidation by Shipping Address allowed
- Allow picking creation by consolidation no.
Here you also have the option
- Proposal of the unloading point, which makes sense after consolidation by shipping address. If this option is activated, all warehouse shipments with the same shipping address will have the same unloading place.
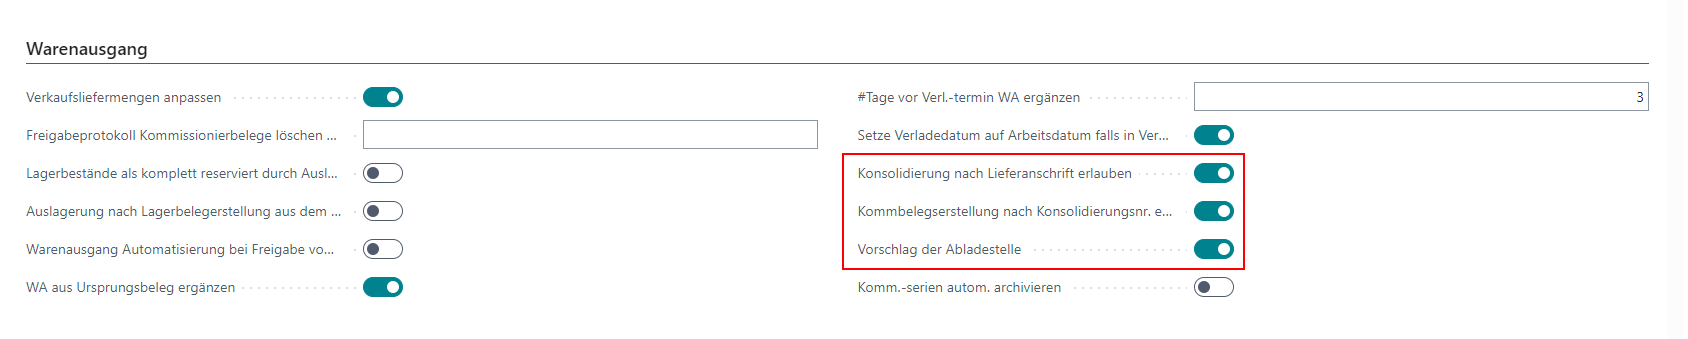
You can automatically pre-assign the By Shipping Address indicator for Warehouse Shipment Planning in the customer. The Packing according to shipping address option is available in the Shipping section. Once activated, By Shipping Address is always activated for this customer. If required, you can also deactivate this manually depending on the order.
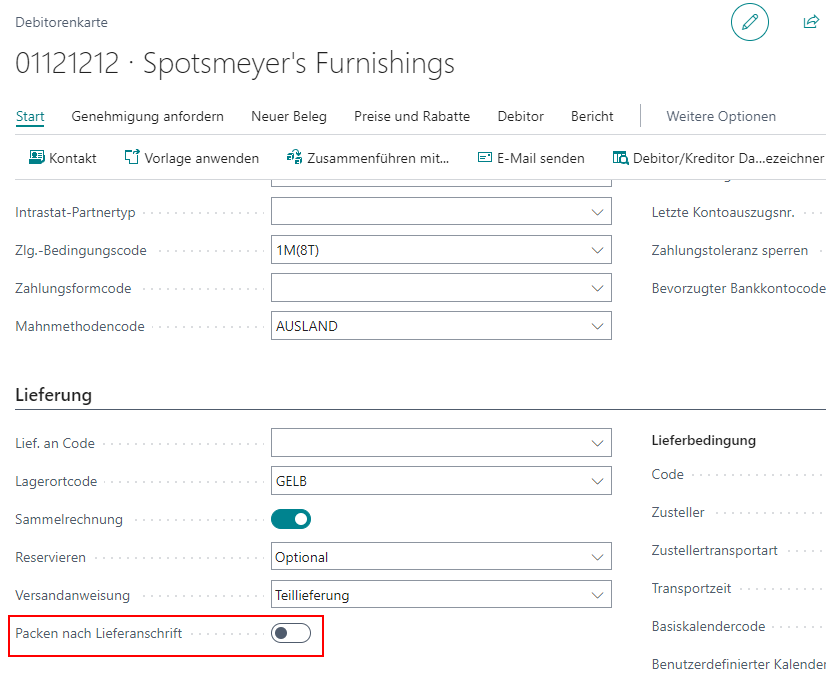
If the By Shipping Address indicator is automatically pre-assigned by the customer and the Consolidation by Shipping Address allowed field is set in the WMS setup, Picking creation by consolidation number is also always automatically set to active in Warehouse Shipment Planning for orders from this customer.
Packing Together Rules
The packing together rules determine which orders may be picked together and packed into the same load carrier (PTU or SSCC) during packing. These rules are controlled via flags on the warehouse shipment and affect picking, serial distribution, and packing.
The consolidation number is assigned based on these rules and controls which orders may be processed together.
Basic Rules
The following conditions must be met for orders to be allowed to be packed together:
- Orders must belong to the same warehouse shipment. Exception: In series-oriented picking (SOP), orders can be consolidated across warehouse shipments
- By-order flag must be set to not active. If it were active, each order would have to be picked and packed separately
- By Shipping address flag must be set to active. This enables various order handling
- Unloading place must be the same for all orders
- Packing team: must be the same for PTUs, can differ for SSCCs
If multiple orders meet all these conditions, they receive the same consolidation number and may be picked and packed together.
Flags on the Warehouse Shipment
By-order flag:
- Enforces order-pure picking and packing
- Each order must be picked and packed separately
- Affects conventional picking methods (parallel/serial), multi-order picking (MOP) as well as serial distribution
- Does not affect series-oriented picking (SOP), as picking is done across orders anyway
By Shipping address flag:
- Allows packing orders together (various order handling)
- Orders may be packed together if all conditions mentioned above are met
Hinweis
Source documents with the same shipping address are always consolidated, even if the customer number differs
Default behavior (By-order flag = True, by shipping address flag = False):
- No various order handling
- Each order is treated separately
- Orders are not packed together
Consolidation Number
The consolidation number is assigned based on the packing together rules:
- Orders with the same consolidation number: May be picked and packed together
- Orders with different consolidation numbers: Must be picked and packed separately
The generation of the consolidation number differs depending on the picking method:
Conventional picking (parallel/serial) and MOP:
- A separate consolidation number is generated per order
- If multiple orders meet the packing together rules, they receive the same consolidation number
- Order reference is maintained
Series-oriented picking (SOP):
- One consolidation number per SOP batch (considering the packing together rules)
- Can be across warehouse shipments
- Order reference is restored in serial distribution
For more information, see:
Automations
Automatic Stock Transfer Posting
Transfers can be posted automatically in SIEVERS WMS. This can be useful, for example, if inventory has to be regularly sorted out to another location because it is broken, for example. The Automatic Stock Transfer Posting also works for outside storage inventory.
In the SIEVERS WMS setup, set up the numbering Automatic Item Transfer Jnl. Template Name and Automatic Item Transfer Jnl. Batch Name.
![]()
Also make sure that you have filled in the Inventory Posting Setup for the Location Code.
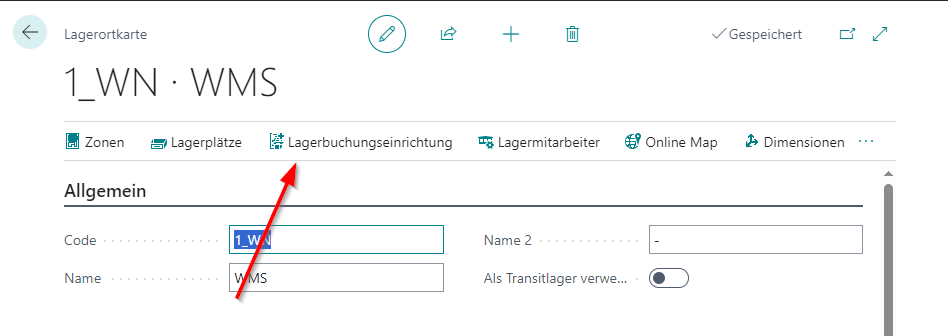
Then open the storage place card for the storage place from which you want to make an automatic transfer. Here you will find the fields
- Transfer Location Code
- Transfer Storage Place Code.
Here you enter the destination location and place for the transfers. Ideally, this is a place or location that all employees know as a drop-off point for sorting out, for example. If the storage location is a SIEVERS WMS-managed storage location, you must also enter a storage place. If this is not the case, the storage place field remains empty. The location entered here must be different from the location of the storage place to which the current storage place card belongs. The reason for this is to ensure a clean separation of inventories so that broken items are not sold by mistake.
If an item transfer or an internal transport is now posted from a storage place to the transfer location or place, the system automatically creates a transfer posting in the corresponding item transfer journal.
Warehouse Shipment Automation
This automation is used to automatically create warehouse shipments or assign source documents to existing warehouse shipments according to certain rules. The Whse. Ship. Automation page is used as the configuration table. Here you can not only set the rules in question, but also access the log and start processing the automation.
Ideally, you have set up the warehouse shipment automation as a job queue entry. If the processing is to be executed automatically via job queue, please use the CodeUnit 71310347 for the AppSource onPrem and SaaS versions and 77347 for PTE.
The setup rows of the Whse. Ship. Automation are executed in the order in which they are sorted. The following setup columns are available on the page:
- Sorting: The automation rows are processed in this order when the automation is started
- Deactivated: When this field is checked, the automation row is not applied
- Location Code: Specifies that this automation is only applied to orders at this warehouse location
- Description: Describes the automation row
- Priority: Defines a priority for all warehouse shipments created with this setup line. If you do not enter anything here or enter a 0, the priority will be formed regularly according to weekday + priority value and shipping agent + priority value.
- Source Type Filter: Defines the type of source document to which this automation line is applied.
- Customer Clean: Specifies that all subsequent orders must have the same customers as the first order. This is how single-customer warehouse shipments are formed.
- Customer No. Filter: Specifies that this automation line only applies to a specific customer. If nothing is entered here, the line is applied to all customers.
- Vendor Clean: Specifies that all subsequent orders must have the same vendors as the first order. This is how single-vendor warehouse shipments vendors are formed.
- Venor No. Filter: Specifies that this automation line only applies to a specific vendor. If nothing is entered here, the line is applied to all vendor.
- By Order: Specifies that a separate warehouse shipment must be created for each order.
- By Shipping Address: Specifies that all source documents in the warehouse shipment must have the same shipping address.
- Shipping Agent Code Filter: Specifies that all warehouse shipments created have this shipping agent. Please note that the shipping agent also serves as a filter when adding new orders to warehouse shipments
- Lead Time: Specifies how many working days before the delivery date a warehouse shipment can be created. If a 10 is entered here, a warehouse shipment can be created 10 days before the loading date. See also Warehouse Shipment Dates.
- Deadline: Specifies the number of days before the first loading date of the warehouse shipment that no more orders are assigned. This can be useful if it takes one or more days from the creation of the warehouse shipment until loading is possible. If no base calendar is entered, calendar days apply.
- Grace Period Shipment Date: Tolerance period around the first loading date in which various orders can be grouped into a warehouse shipment. For more information, see Warehouse Shipment Dates.
- Loading Day: Specifies the loading day for each warehouse shipment created with this setup line. The system tries to find a date in the current week before the shipment date. If this is not possible, the next possible date in the following week is set as the loading date.
- Update Loading Date: If you have not specified a loading day in the previous field, use this radio button to activate the automatic update of the loading date based on the earliest loading date from the source documents.
Outbound Stock Post Automation
This automatically creates Outbound Stock Post documents for orders X days before the warehouse shipment loading date. The automation is executed by a job queue or the button Start Processing on the Outbound Stock Post Automation page. This is where you can set up lines that are passed through when the automation is executed. The table has the following fields:
- Sorting: The automation lines are procCessed in this order when the automation is started
- Deactivated: If this field activated, the automation line is not applied
- Location Code: Determines that this automation will only be applied to orders in this location
- Description: Describes the automation line
- Source Document: Defines the source document type this automation line will be applied on. Right now there are only warehouse shipments possible
- Shipping Agent Code Filter: Determines that this automation will only be applied to orders of this shipping agent
- Lead Time: Determines the time in working days how far before the delivery date a Outbound Stock Post may be created. If a 10 is entered here, a Outbound Stock Post may be created 10 days before the loading date. The working days are based on the calendar from the location.
- Reservation Order: Determines the order in which the documents are sorted to create the Outbound Stock Posts
- Variable for Auto. Creation Filter: Here you can determine a variable as filter for the automatic Outbound Stock Post. You can find the corresponding counterpart of the field in the warehouse shipment planning. The optional field is called Variable for Aut. creation of stock doc..
- Delete Protocol after days: Specifies after how many days the protocol should be deleted. Can be disabled with 0
After the execution is started via the button or a job, all source documents with warehouse shipments that match the filter criteria are searched for. The filter criteria include
- Order type
- Shipping agent
- Variable for Aut. Creation of Stock Doc.
After that, a check is made to see if the lead time of, for example, three days before the loading date has been reached.
If this is the case, Outbound Stock Post documents and shipping orders are now created on the basis of the source documents and sorted by delivery date and priority of the order. If the system finds that a stock document is empty, it is automatically deleted.
Hinweis
The runtimes of the Outbound Stock Post automation can differ greatly. Sometimes the processing is quickly finished and sometimes it takes a long time. This is often because many new stock documents have to be created and these are already processed during the next run. In addition, a cache is filled during processing, which can be retrieved again as needed during later runs. This can also speed up processing.
Automatic Picking Team Determination
In both manual and automatic goods issue processing, a picking team must be found and assigned during the process. Sometimes this does not work right away, for example, because team master data is not set up correctly. This may not be noticed immediately, especially in automated processes. To avoid this, you can set up a job queue entry with the code unit SNCL Pick Team Determ Mgt. This automatically searches for picking documents without a picking team and attempts to assign a team to them. The code unit has the following IDs:
- SaaS/OnPrem: 70294248
- PTE: 77248
Hinweis
If you have any questions about this, please contact your SIEVERS partner.
Automatic Picking Documents
With this automation, created picking documents can be released automatically. This reduces the manual effort involved in processing warehouse shipments. The automation mainly runs via three setups:
- Job Queue Entry: If you want the processing to be carried out automatically in the job queue, please use CodeUnit 70294228 for the Appsource onPrem and SaaS versions and 77228 for PTE. This releases the picking documents based on the release lead times.
- Order Type Release Lead Time
- Picking & Packaging Release Lead Time
The release lead time indicates how many days before the loading date the picking document is automatically released. The release lead time in the order types always has the highest priority. If the current work date falls within the release lead time, the appropriate picking documents for the corresponding team are released via job queue entries. The automatic release can also be executed manually via the Picking -> Automatic Release action on the team.
In the teams themselves, you can also start the automatic release manually via the action menu. Automatically released picking documents are logged.
Picking Release Automation Protocol
This page displays a log of the automatically released picking documents. If an error occurs, it will be written in the Error Message field. An error does not necessarily mean that the release run is cancelled completely. For example, if a blocked inventory is found during the release, it will only be mentioned in the error message and skipped.
- Entry No.
- Location Code
- Source No.
- Source Subtype
- Source Type
- Warehouse Shipment No.
- Outbound Stock Post No.
- Picking Document No.
- Picking Team
- Order Type
- Shipping Agent Code
- Successful
- Error exist
- Error Message
Company information
In addition to the regular setup fields of the Business Central standard, the company information also contains the SNC Trace section. Here you will find some fields that are necessary for generating GS1 codes for SSCC:
- GLN: The GLN consists of 13 digits. The 13th digit is a check digit calculated according to Mod10
- Base GLN: The base number consists of the first 7-9 digits of the GLN
- Base GLN Length: Number of digits in the base number
- Extension Digit: Any single-digit number between 0 and 9. It is placed in front of the GLN
SNCL Blocking Code
Defines the codes used to block inventory or storage places.
You can enter the following fields:
- Code
- Description
- Visible to Sale
- Visible to Manufacturing
The last two options are set at the storage place or in the inventory when the respective blocking code has been used.