Import
With the E-Rechnung Import, you can import e-invoice XML or PDF files. The following describes how this works and what you need to be aware of.
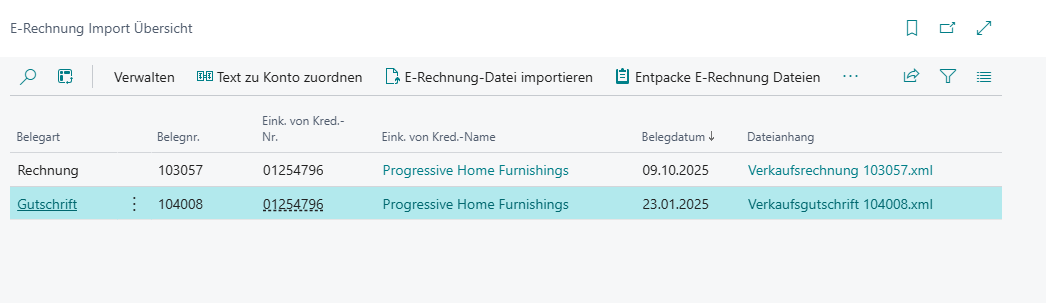
E-Rechnung Import Overview
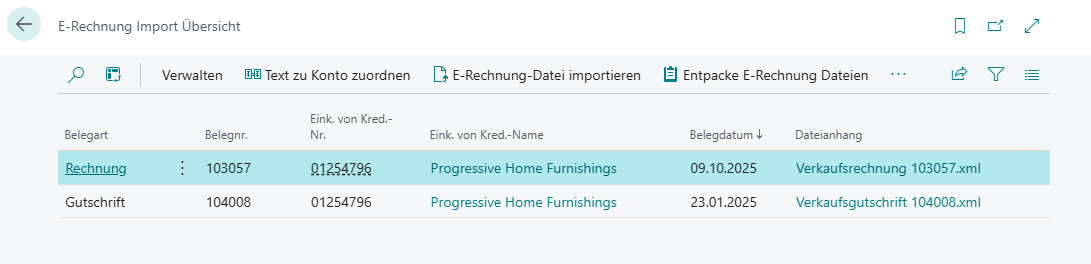
The E-Rechnung Import Overview is the central Business Central page that controls the import. Here you have an overview of current imports without assigned purchasing documents and can import new XRechnung or ZUGFeRD invoices. You can view finished imports that have assigned purchasing documents via the Import Archive.
Hinweis
Please ensure that imported files have the following formats:
- XRechnung and Peppol: Must have the UBL format.
- ZUGFeRD: The syntax of the embedded XRechnung XML must be CII.
You can import both the XML file itself or a PDF with embedded XML.
Import Process
The import process of an E-Rechnung works like this:
- Open the E-Rechnung import overview.
- Click on Import E-Rechnung file in the Menu and select your desired file.
- Then check the imported data by clicking on the receipt line in the Import document and correct it if necessary. You should pay particular attention to the following fields:
- General
- Document no.
- Vendor no.
- Lines
- Type
- No.
- Unit code Business Central
- General
- Optional: Use Check imported XML file to validate the file against the XRechnung business rules (BR-DE-1 to BR-DE-28) to ensure it is technically compliant.
- Generate a purchase document from the document via menu. You can open and process the generated document via show purchase document. If there are surcharges and/or discounts in the file, these must be assigned to the items in the purchase invoice.
- Assign the E-Rechnung import lines to a receipt, receipt lines and a location via the import check worksheet or lines in the import document.
- After the purchasing document has been created, the E-Rechnung is transferred to the import archive. The archived E-Rechnung document is shown in the E-Rechnung section of the generated purchasing document and can be accessed from there.
If errors occur, these are listed in the Import log. After resolving the cause (e.g. missing master data, unfilled text-to-account mapping, or missing contact email), you can use the Revalidate import action in the import overview or import document to re-run all import checks without re-importing the file. The log is completely cleared first and then rebuilt.
Hinweis
Item description fields and vendor names in e-invoice XML files can be longer than the maximum allowed field length in BC/NAV:
- Business Central: max. 100 characters
- NAV: max. 50 characters
- NAV 2009: max. 30 characters
Longer texts are automatically shortened during import to enable an import with automatic assignment. However, assignment using item descriptions or vendor names is actually only intended as an alternative. For reliable item assignment, we recommend maintaining the GTIN in the master data and using it in the e-invoices.
If an item cannot be automatically assigned, this is displayed in the Import Log. In this case, manual intervention in the import document is required.
When the document is imported, it is assigned to a vendor. The assignment is made using one of these fields:
- Name
- Buy-from Address
- GLN
- Bank account
- VAT Reg. No.
In addition, the invoice lines are automatically assigned to items, resources, charges, and G/L accounts. The system searches in the following order and uses the first data record found:
- Item References: Search via maintained item references
- Items: Search via GTIN, description, sellers item identification, and item no.
- Resources: Search via description and sellers item identification (only in Business Central versions 16-27)
- Item Charges: Search via description and sellers item identification
- G/L Accounts: Search via description and sellers item identification
- Map Text to Account: Manual assignments via the "Map Text to Account" function
- Standard Accounts: Standard accounts from Purchases & Payables Setup
Hinweis
The search ends at the first successful assignment. For example, if an item is found, no further search for resources or G/L accounts is performed for this line.
Hinweis
If this automatic assignment is not desired, it can also be influenced using events. Please contact your SIEVERS partner about this.
Import Menu
The menu has the following functions:
Map Text to Account: Manages the table for assigning invoices to G/L accounts. See also Text to account mappings
Import E-Rechnung file: Imports an E-Rechnung file
Import protocol: Accesses the Import log. Import errors can be viewed here. If errors have occurred during import, the log is opened automatically
Revalidate import: Re-runs all checks that are performed during the initial file import (without re-importing the file). The Import log is completely cleared first and then rebuilt based on current master data. Use this action after correcting master data or text-to-account mappings following a failed import.
Import Job Buffer: Open the import job queue buffer table. The files automatically read in via the job queue are shown here and can be processed via Run Import Job Codeunit. This table is required if you want to partially automate the import via the job queue. For more information, please contact your SIEVERS partner or the SIEVERS GROUP. Use Remove Lines to remove individual lines from the XML file of a buffer entry; the file can then be imported as usual. The Notes FactBox also displays the HTML body of the associated email through which the file was received.
Check imported XML file: Validates the imported XML document against the XRechnung business rules (BR-DE-1 to BR-DE-28) and shows the results. Both UBL and CII files are supported. If the validation passes, a corresponding message is displayed; otherwise, an overview opens showing entries by severity (Error/Warning), rule ID and description.
::: Note This function is only available in the AL version (from Business Central 14). It is not supported in C/AL for technical reasons. :::
Generate purchasing document: Generates a Business Central purchasing invoice with the data transferred from the e-invoice
Show purchasing document: Displays the purchasing document created
Import document
The import document is the overview of a finished imported E-Rechnung from a PDF or XML. You can see here whether all the data is correct and correct it if necessary. The menu displayed here is identical to the menu from the overview page.
Menu
- Import Protocol
- Revalidate import: Re-runs all import checks for this document. The log is cleared first and then rebuilt based on current master data. Useful when errors have been resolved by maintaining master data after the initial import.
- Check imported XML file: Validates the imported XML document against the XRechnung business rules (BR-DE-1 to BR-DE-28).
- Show assigned Purchase Order: Opens the associated purchase order. If there is none, a list of the last purchase orders from the vendor is displayed, from which a purchase order must be selected.
- Show Review Worksheet
- Create Purchase Document
- Cancel: Cancels the e-invoice and resets it. The generated purchase document is also deleted. The import document can then be edited again and a new purchase document created. Please note that canceling is only possible as long as the purchase document has not yet been posted.
You can view the following data here:
General
This area contains general information. On the right side you can see a possible note in the E-Rechnung.
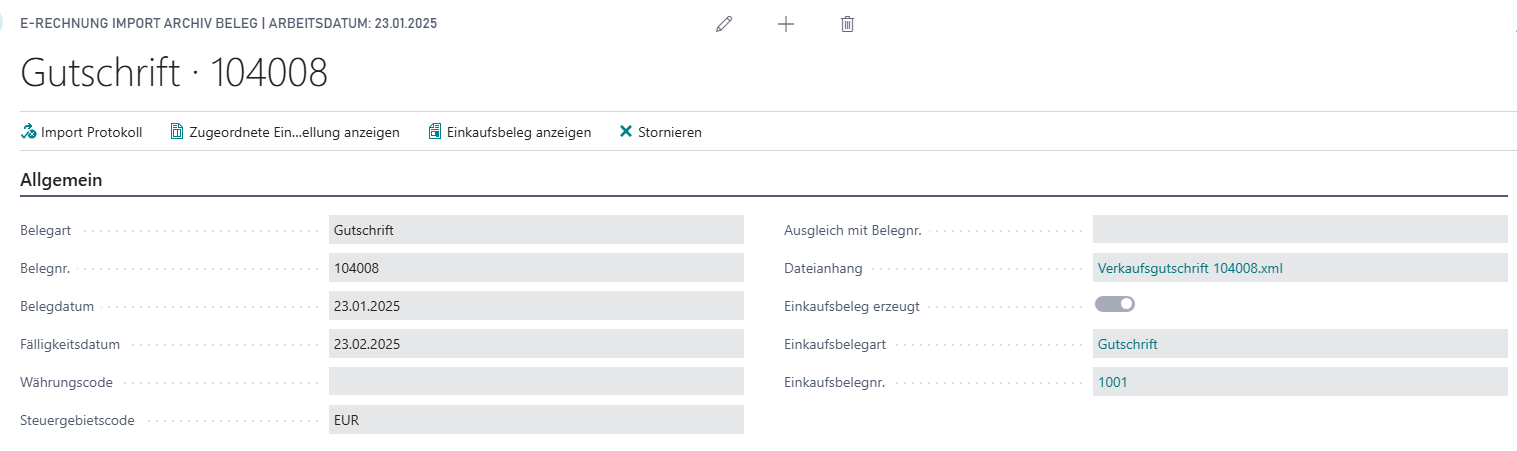
- Transfer imported attachments to purchase document: Overrides the default value stored in the E-Rechnung Setup for this document. Possible options are Nothing, Document Attachment and Incoming Document. Change the value before creating the purchase document.
- ZUGFeRD PDF File Name: Shows the name of the PDF file from which the embedded XML was extracted. This allows both files (PDF and XML) to be identified in the document.
Vendor

Company Information

Amounts

Additional supporting documents

Any additional supporting documents are shown here. These are adopted as attachments when the purchasing document is created.
Hinweis
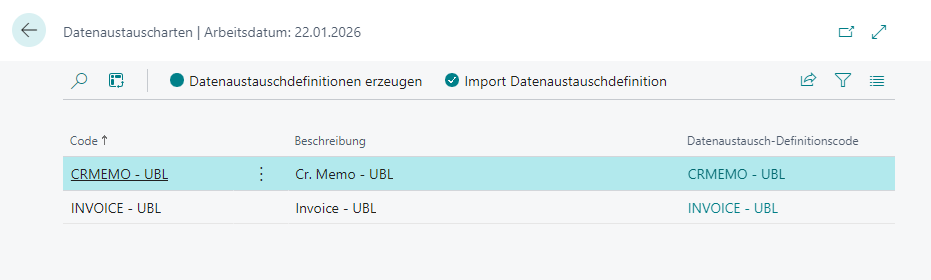
If you have received the function for importing additional supporting documents via software update from SIEVERS, you must create the data exchange definitions again before using it. To do this, execute the Create data exchange definitions action on the corresponding page.
If you have reinstalled SIEVERS E-Rechnung, this step is not necessary.
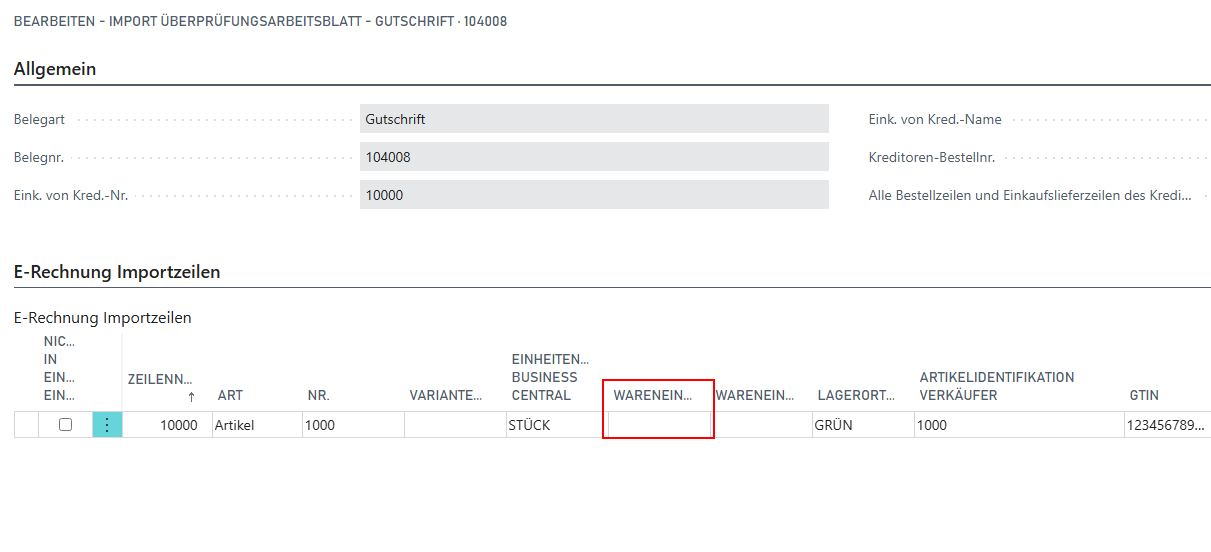
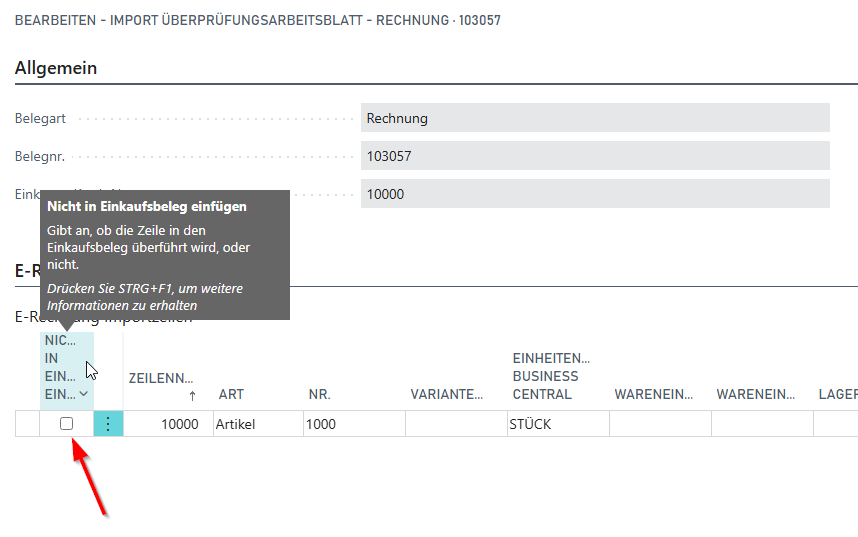
Lines
Contains the receipt lines of the E-Rechnung. Please check these for correctness.
The E-Rechnung import module automatically attempts to find items, resources, item charges, G/L accounts, or assets and to automatically fill in the type and no. from Business Central tables. The complete search order is described in the Import Process section.
If nothing can be found, an error is displayed in the import log. The user must then take manual action and manually assign the unclear lines to the items/G/L accounts/assets maintained in Business Central.
Hinweis
Resources can only be imported in Business Central versions 16-27. This is due to technical reasons.
The last line in the screenshot shows a resource that cannot be utilized in purchasing. In order to be able to transfer the file to a purchasing invoice anyway, you can use the Do not insert in purchasing document radio button on the left to exclude this line from being transferred to the invoice.

Also make sure that the Unit of measure code file and Unit of measure code Business Central are assigned correctly.

Import Review Worksheet
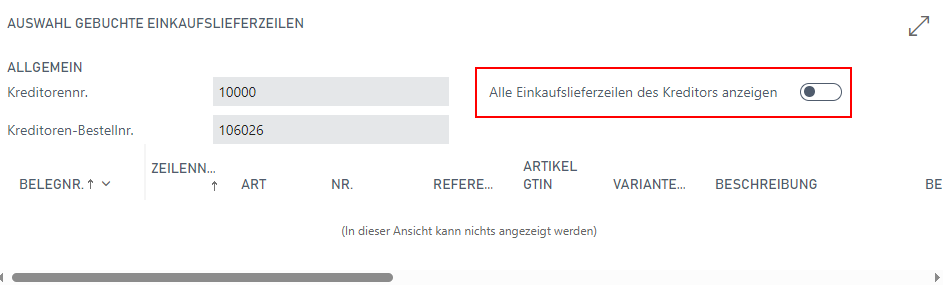
You can use the verification worksheet to compare the imported e-invoice lines with the order lines of the purchase order. You can then edit the e-invoice lines as you wish or decide that they should not be transferred to the purchasing document.
You assign the e-invoice import lines to goods receipts and thus also to goods receipt lines and Location Codes via import lines.
This can also be done by lookup in the last purchase delivery lines.
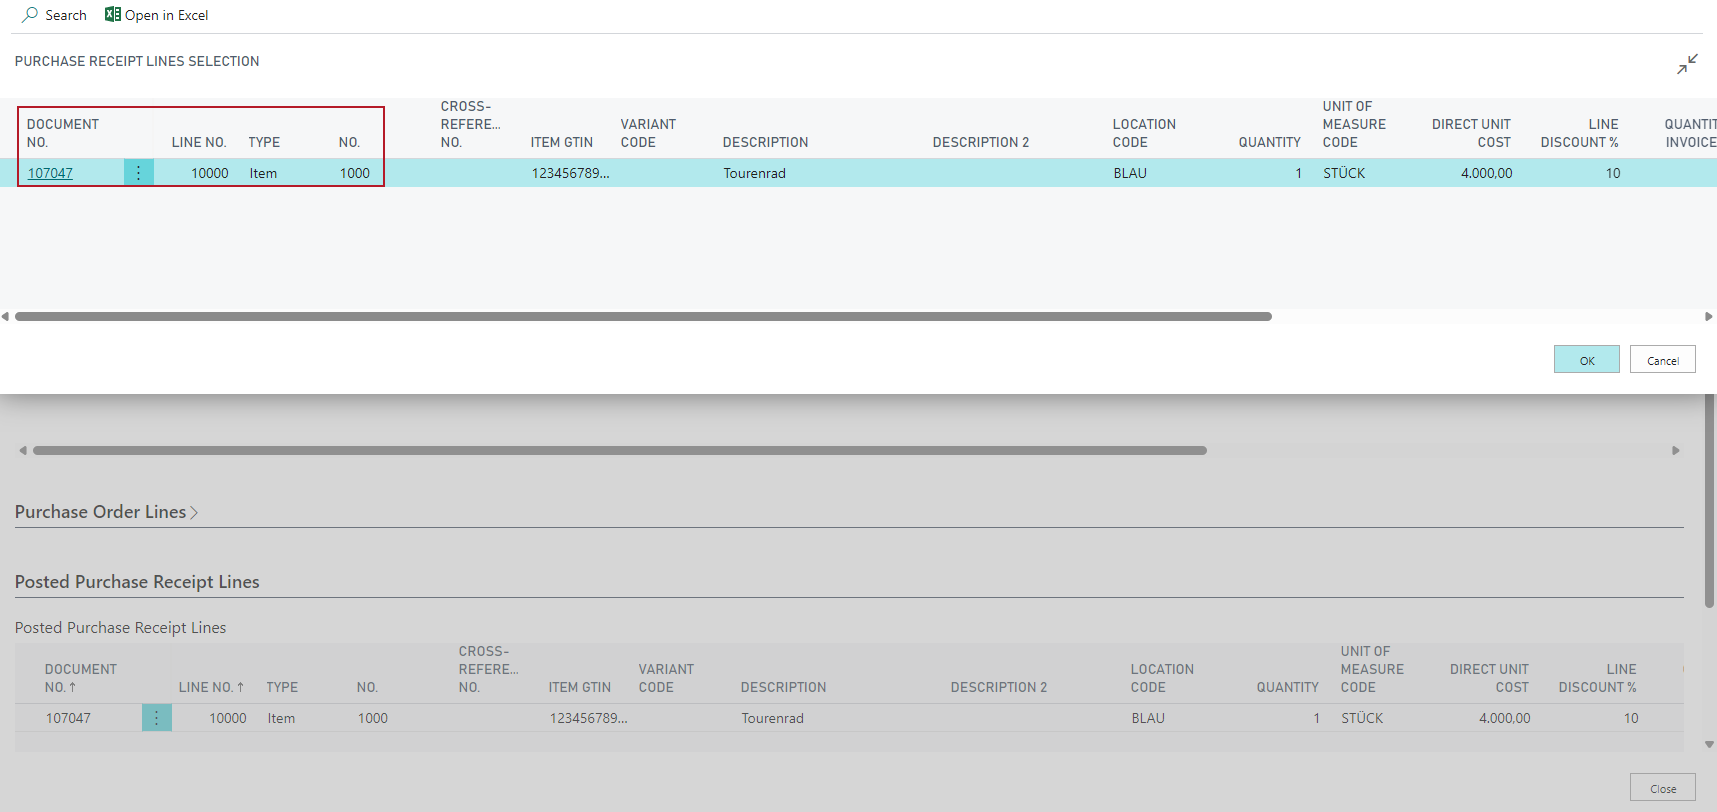
The e-invoice and the purchasing document are then linked.

In both the review worksheet and the goods receipt overview, you can activate a switch that displays all purchase order lines and posted purchase receipt lines for the vendor. This simplifies the assignment of e-invoices.

Subcontracting: Transfer of Production Order Metadata
When a goods receipt line from a subcontracting operation (e.g. from the subcontracting worksheet) is assigned to an import line, the following production order fields are automatically transferred from the receipt line to the import line:
- Prod. Order No.
- Prod. Order Line No.
- Operation No.
- Work Center No.
- Routing No.
- Routing Reference No.
When the purchase document is subsequently created, these fields are transferred to the purchase invoice line, ensuring that subcontracting costs are correctly assigned to the referenced production order in Business Central.
Hinweis
If the Gen. Prod. Posting Group of the import line differs from that of the receipt line, the posting group from the receipt line is used automatically. A corresponding note is written to the Import Log.
Before creating the document, the system checks the consistency of the production order reference. If the assigned receipt line contains a production order number, it must also be present and matching in the import line. In addition, the production order must have the status Released or Finished and the work center must exist. If these conditions are not met, an error message is displayed and the purchase document cannot be created. In this case, please check the receipt line assignment in the import document.
Import Archive List
E-invoices that have been converted to purchasing documents are stored in this archive. From here, you can access the document itself and show the associated posted purchasing document and the import log.
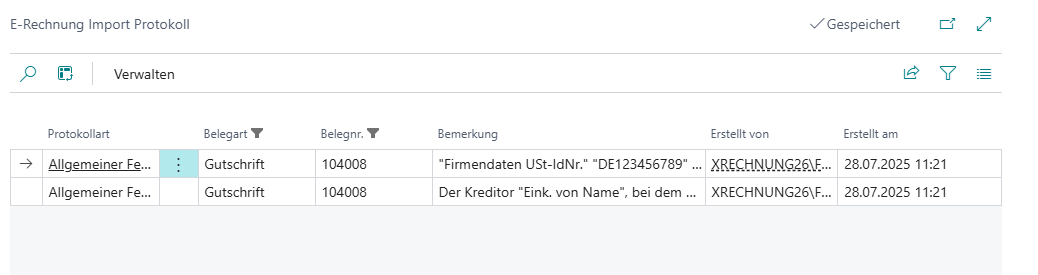
Import Log
Errors that occur during import are collected in this log and shown separately. In this case, for example, the vendor cannot be found and must be selected manually.
Once the cause of an error has been resolved (e.g. by maintaining master data or the text-to-account mapping), you can use the Revalidate action in the Import Overview or Import Document to clear the log and re-run validation without re-importing the file.
Generated purchase invoice
A purchase invoice generated correctly by the import looks like this:
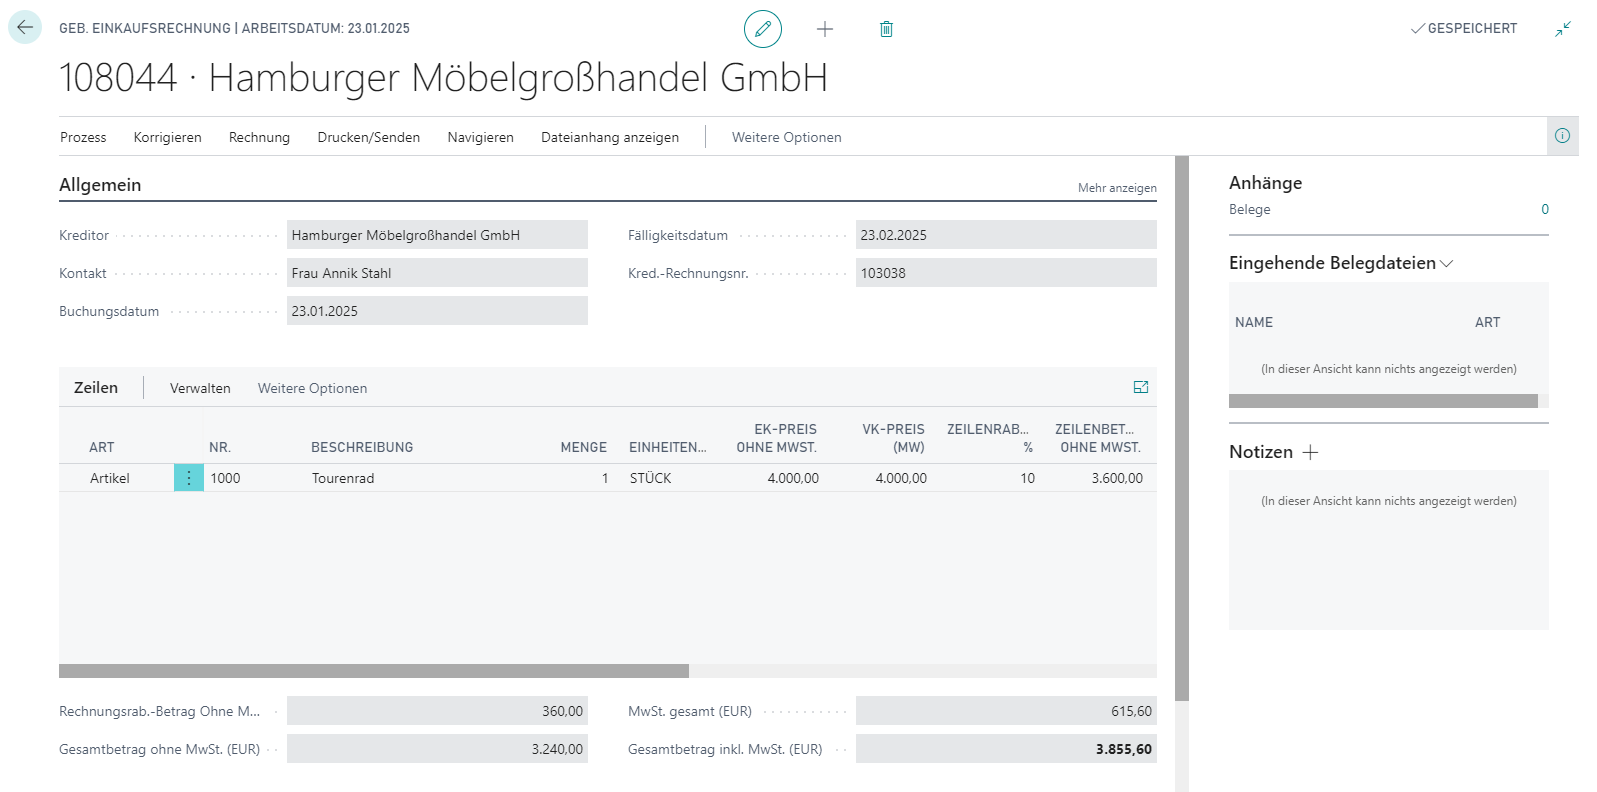
As you can see, a regular purchase invoice is generated on the basis of the e-invoice. It is no different from a manually generated invoice.
If additions and deductions need to be assigned, you can do this here. To do this, change the Quantity to assign in the surcharge and budget billing lines.

Data Exchange Types
You only need to access this page if an import is not possible or if the import works without errors even if the imported data is faulty. In exceptional cases, this may be because data exchange types were not automatically entered when SIEVERS E-Rechnung was installed. If this is the case, the data exchange types table is empty. If this is the case, you can use Create data exchange definitions to catch up on this step. After that, the import should work without errors.
Text-to-Account Mappings
With SIEVERS E-Rechnung, you can automatically assign invoices to G/L accounts, resources, items or charges. To do this, open the page with the action Map Text to Account via Import Overview.
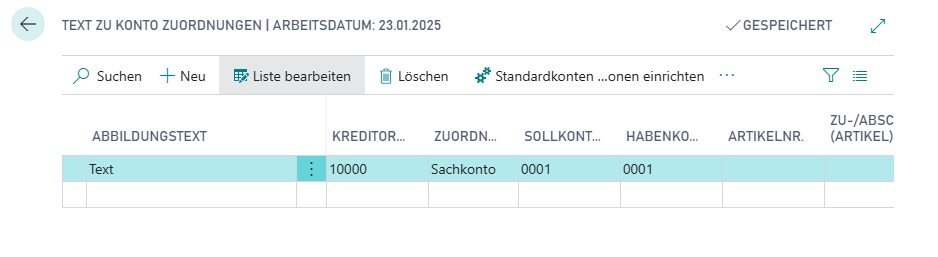
You can enter the following here:
- Mapping Text: Enter the text the system should search for in the e-invoice XML. A maximum of 30 characters is possible.
- Vendor No.: Defines the vendor for whom this line should apply.
- Mapping Type: Selection from item, G/L account and Charge (Item)
- Debit Acc. No.
- Credit Acc. No.
- Item No.
- Charge (Item) No.
If you have correctly filled out this line, the next suitable e-invoice will be assigned to the corresponding G/L account.
Hinweis
Note that the "Map Text to Account" function only takes effect after the system has already searched for item references, items, resources, item charges, and G/L accounts. The complete search order can be found in the Import Process section.
Important for NAV users: Make sure that the "Map Text to Account" table is not open in the background while performing the import, as this can cause malfunctions.
It will happen regularly that products or lines cannot be identified correctly or that it is a non-item position. For these cases, you should set up default debit and credit accounts. This is what the action Set Up Default Accounts for Non-Item Lines is for. This opens the purchases & payables setup with the default accounts section.
Automating the import
It is possible to automate the import of files via the job queue to a large extent. Please contact your SIEVERS-GROUP partner for more information.
When the job queue is running, the files are added to the import job queue overview. You can access this via the menu in the import overview. From here, you can start processing the file via Run Import Job Codeunit. This step is only necessary on a temporary basis, as a complete automation is in the works.
If an imported XML file contains problematic lines, they can be deleted from the buffer entry using Remove Lines. The file can then be imported as usual. The Notes FactBox in the overview also displays the HTML body of the email through which the file was received.